View attachment 310898View attachment 310900View attachment 310899View attachment 310897View attachment 310896
All finished.
I used a 25mm diameter wardrobe rail. It came in a 122cm length so I chopped it in half and didnt give much thought to the extra cm.
As the rail is hollow I filled it with expanding foam, mainly coz I just don't like hollow, it added a touch extra weight. Wrapped them in the white Easton tape. One pack of tape does both batons just nicely. Its a pain to have to get a 2nd set just for the straps as you use need hardly any of it. I secured them at both ends with a bit of black electrician tape, measured and cut the straps then painted.
I did a LOT of testing with paint and dye for this. The packs of tape come with 2 short extra strips so you got a bit to play with, but if you've planned ahead and got both packs to start with you're golden.
The dye didn't touch it, as above, barely made it a little dirty and I did a few varying recipes. I tried a bit of spray paint but that gets brittle and cracks very easy. I didnt try vinyl dye spray, that apparently burns into the surface, so it may work but I don't know how limited you'd be with colour.
I made up a batch of acrylic green (DoCrafts forest green) and the same brand black mixed with a CLEAR drying pva glue. Brushing it on came up ok, but I found the best application was to rub it in with a paper towel or kitchen paper. Cloth just didnt give it the same look and too much came off leaving a lot of white coming through. Dip the towel and rub it in, in small circular motions, and keep going over and over like really rubbing polish into a boot. Its messy so prepare your area and gloves are handy. Once you've been at it a good while and its on almost too thick put to one side and do the other one. Go back to the first and buff it of gently with a clean paper towel. Repeat until you;re happy with the finish.
I should add, don't put any water in the mix as that just causes it to spread too thin and it doesn't fill in the grain of the foam.
I did a light and quick black wash with the black acrylic mixed with clear pva again and water. Brushed on buffed off (paper towel) almost immediately, this step is something you wanna play with on an off cut, you may not wanna do it at all.
The paint is on solid, fully dry in a matter of a couple of hours. You can drop these, beat someone to a pulp etc, the paint isn't going to crack off or flake, its probably only likely to get any real damage if you smack it off brick and and abrasive surfaces regularly. Obviously I've only had these painted up for 2 days so i can't fully vouch for the long term adhesion of this paint system, the test patch is a week old and its as solid as when it first dried. It may dry out over months/years and crack, I don't think it will, but the process could be repeated to freshen it out, the foam won't degrade that much.
The bar end caps that came with the tape fit just nice into the ends of the rail, so i taped them into place and fully wrapped the ends then taped on the straps.
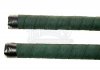
The last 2 pics give the best indication of true colour.


")


