Hello all,
I have browsed the forum on and off over the years but never really made an account because I wasn't really proud enough of the work I had done to show it off. I did a few things on and off. But over the past several years I have really been pushing myself to the point I could call myself a machinist. About a year ago I started working on machining a Cryocan replica from the original Jurassic Park movie and I finally feel worthy of showing it off here. I would love to hear your feedback.
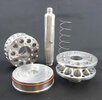
First things first are the most recent photos, gotta start with the best. I am pretty happy with it, but its not quite perfect yet. I still have a few tiny detail to improve.


It is all machined from 6061 aluminum and I made the spring myself too since I couldn't find the one I wanted.
So now for the story time. I started this whole thing several years ago when I burned he engine of out of my Mazda 6. Racing it might not have been the best idea in hindsight. But I needed a new car and was tight on cash. My buddy was moving and offered to sell me his jeep wrangler cheap. It was in okay shape but far from nice. Lots of chipping paint and rust. I figured I could fix it up a little and it would be fine. I didnt want to try and fix it up totally so I started playing around with the idea of making a replica jeep from Jurassic Park. I figured a little wear and tear would fit the theme of a jeep used in a park like that. I joined the facebook group and started working on it.
Well it was fun and once the jeep started to be recognizable I was really enjoying the reactions I got from people. That set me down the Jurrassic Park prop rabbit hole. I did a few small things and decided to make a raptor claw. That turned out nice. My day job is engineering / machining parts and the cryocan always was in the back of my head. So I decided to give it a go. I downloaded some models from thingiverse and printed one to get a feel for it. Then started making my own 3d model.

Then I started machining some parts. I made a lot of scrap, but I got parts that looked good eventually.


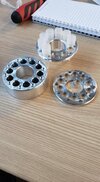
After about hundreds of hours I finally got something that looked good.

But along the way I learned all the little details that made my design wrong. Top didn't have a real thread like it should, it was missing a set screw, the vials were not exactly right, the vial holder didnt have the tapered middle section, the spring mechanism wasn't right either. So I knew what I had to do. I had to start over and completely redesign it again.
So I started over from scratch. I reviewed tons of photos, I remodeled every part in my CAD program. I completely changed the spring mechanism and I started machining it all over again.

This one id extremely close to perfect. The center post is going to be redone to get rid of that tiny step. But The vial holder has the center taper now. The spring mechanism is not visible at all. There is a real thread at the top now and the set screw on the vial holder. That set screw is actually used for the spring mechanism and I believe that is how the real prop was done as well. There is also a groove on the center post as well, but I dont have a great photo of that right now. It has been a long process, but this is now one I can be proud of making.
Well thanks for letting me share. I could use some feedback and hopefully some encouraging words. I cant believe how many hours I put into this thing so far.
Thanks.
I have browsed the forum on and off over the years but never really made an account because I wasn't really proud enough of the work I had done to show it off. I did a few things on and off. But over the past several years I have really been pushing myself to the point I could call myself a machinist. About a year ago I started working on machining a Cryocan replica from the original Jurassic Park movie and I finally feel worthy of showing it off here. I would love to hear your feedback.
First things first are the most recent photos, gotta start with the best. I am pretty happy with it, but its not quite perfect yet. I still have a few tiny detail to improve.
It is all machined from 6061 aluminum and I made the spring myself too since I couldn't find the one I wanted.
So now for the story time. I started this whole thing several years ago when I burned he engine of out of my Mazda 6. Racing it might not have been the best idea in hindsight. But I needed a new car and was tight on cash. My buddy was moving and offered to sell me his jeep wrangler cheap. It was in okay shape but far from nice. Lots of chipping paint and rust. I figured I could fix it up a little and it would be fine. I didnt want to try and fix it up totally so I started playing around with the idea of making a replica jeep from Jurassic Park. I figured a little wear and tear would fit the theme of a jeep used in a park like that. I joined the facebook group and started working on it.
Well it was fun and once the jeep started to be recognizable I was really enjoying the reactions I got from people. That set me down the Jurrassic Park prop rabbit hole. I did a few small things and decided to make a raptor claw. That turned out nice. My day job is engineering / machining parts and the cryocan always was in the back of my head. So I decided to give it a go. I downloaded some models from thingiverse and printed one to get a feel for it. Then started making my own 3d model.
Then I started machining some parts. I made a lot of scrap, but I got parts that looked good eventually.
After about hundreds of hours I finally got something that looked good.
But along the way I learned all the little details that made my design wrong. Top didn't have a real thread like it should, it was missing a set screw, the vials were not exactly right, the vial holder didnt have the tapered middle section, the spring mechanism wasn't right either. So I knew what I had to do. I had to start over and completely redesign it again.
So I started over from scratch. I reviewed tons of photos, I remodeled every part in my CAD program. I completely changed the spring mechanism and I started machining it all over again.
This one id extremely close to perfect. The center post is going to be redone to get rid of that tiny step. But The vial holder has the center taper now. The spring mechanism is not visible at all. There is a real thread at the top now and the set screw on the vial holder. That set screw is actually used for the spring mechanism and I believe that is how the real prop was done as well. There is also a groove on the center post as well, but I dont have a great photo of that right now. It has been a long process, but this is now one I can be proud of making.
Well thanks for letting me share. I could use some feedback and hopefully some encouraging words. I cant believe how many hours I put into this thing so far.
Thanks.