SheerHeartAttac
New Member
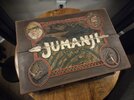
Ever since I was a kid, one of my most desired props to own was the Jumanji board. For some reason, mystical props are just my thing (Indiana Jones and The Mask fall into that category, too). Plus, the film is a classic.
Anyway, a lot of the replicas I saw, mainly the InfinityCollection, were a bit steep even though the craftsmanship definitely warrants the price. Could I afford one? Yes. But did I want to pay that? Nah. The $1,600-$2,500 InfinityCollection is amazing, but for that price - it has some inaccurate details.
But I did see that Barnes and Noble released a functional board game of Jumanji - that also was a really great replica. I mean, for a mass produce piece for $140, it looked great. Well, not 'great', but it had great bones.
The sizing was perfect and matched the dimensions of the prop, the shape was great, the design was spot on, and the details were there for the most part.
But the paint job was severely lacking, and there are some missing parts. So I decided to buy one and see if my paint job and some additional carvings and details could make this $140 piece look as good as it deserved to.
I started Wednesday afternoon and finished Thursday night. Well worth it!
Props (heh!) to Barnes and Noble for making this thing so well. The paint just needed to be redone to highlight how nice this thing actually is.
What did I do?
Anyway, I'm pretty happy with it! $140 plus some paint ain't half bad.
BEFORE -


AFTER -


Anyway, a lot of the replicas I saw, mainly the InfinityCollection, were a bit steep even though the craftsmanship definitely warrants the price. Could I afford one? Yes. But did I want to pay that? Nah. The $1,600-$2,500 InfinityCollection is amazing, but for that price - it has some inaccurate details.
But I did see that Barnes and Noble released a functional board game of Jumanji - that also was a really great replica. I mean, for a mass produce piece for $140, it looked great. Well, not 'great', but it had great bones.
The sizing was perfect and matched the dimensions of the prop, the shape was great, the design was spot on, and the details were there for the most part.
But the paint job was severely lacking, and there are some missing parts. So I decided to buy one and see if my paint job and some additional carvings and details could make this $140 piece look as good as it deserved to.
I started Wednesday afternoon and finished Thursday night. Well worth it!
Props (heh!) to Barnes and Noble for making this thing so well. The paint just needed to be redone to highlight how nice this thing actually is.
What did I do?
- Sanded the entire thing. Getting rid of the pesky mold-lines, too.
- Did paint removal on the front.
- Carved additional details into Van Pelt, the Rhino, Monkey and Elephant, as well as the mountains and leaves.
- Repainted the entire front, with dry-brushing and other techniques to age it to desired effect. Sanded, too.
- Repainted the whole exterior in brown. Then did a sponge wash of dark brown to give the look of wood grain.
- Dry brushed the edges for 'wear'.
- Repained the interior leaves and backing. Dry brushed to age and show 'wear'.
- Sanded the instructions and aged them.
- Dirtied up the green dome.
- Added wooden pegs to the exterior hinges to match the film.
Anyway, I'm pretty happy with it! $140 plus some paint ain't half bad.
BEFORE -
AFTER -