Jodo Kast Build

toolguy301

Active Member
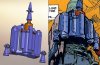
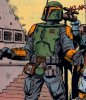
Decided to do a Jodo Kast. This seemed like a fun & challenging character to do. I am taking a different approach to this than others have taken in the past. I have been working on designing most of the parts to be 3D printed. I am trying to make the pieces as close to the comic book reference "Twin Engines of Destruction", but using some creative liberties as well.

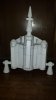
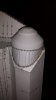
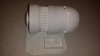
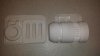
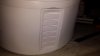
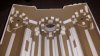
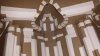
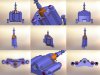
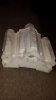
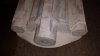
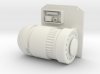
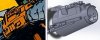
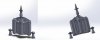
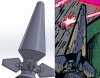
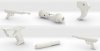
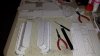
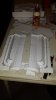
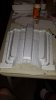
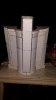
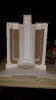
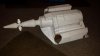
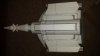
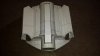
The first pieces that I have gotten in were for the jetpack. I did a complete 3D design of the jetpack & have created a pepakura file to build the body. Design this base on what I learned from my first jetpack build. I designed the rocket tip, beacon, & stabilizer based off the comic which would be specific to Jodo Kast. I have had all the other pieces thrusters, upper/lower fuel tank caps, rocket collar, & the rocket pieces already designed.

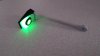
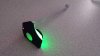
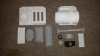
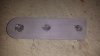
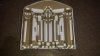
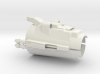
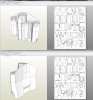
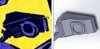
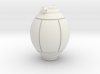
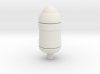
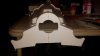
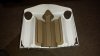
Here are some of the 3D designs for the piece that I am planning on having printed. These are both the left & right belt pieces & rangefinder with the added lens & the round lens on the perspex block. The pistol & throw grenades were designed per the comic references. The pistol grenade will fit on the end of the Pulce 40 that I designed. Which is a 4 pieces design & is designed to have a seperate moving trigger. I decided to go with the Pulce 40 because this is consistent with Boba Fett & being similar era & in previous Jodo Kast costumes this has been used. Jodo seems to use a number of different blasters though out the comic. I will also be making a modified EE-3 based on the comic.

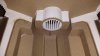
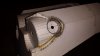
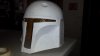
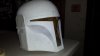
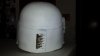
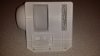
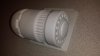
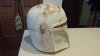
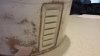
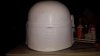
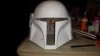
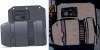
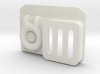
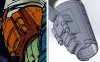
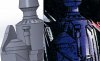
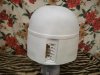
I got a miscast helmet from Darth Voorhees (TDH), to use. It had a messed up key slot area which I will cut out & replace with buttons instead.

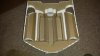
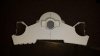
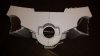
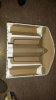
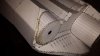
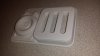
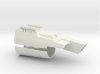
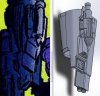
Designed the gauntlets to be 3D printed which will be Jodo Kast specific based on the comic.

The right gauntlet difference from Boba Fett is the added the extra rockets (Same as the knee armor pieces) on the sides & the scoop around the darts. I went with a combination of the ESB & ROTJ whip cord housing because there is a reference showing details similar to both throughout the comic so why not make a hybrid.

The left gauntlet difference from Boba Fett is adding the 2 smaller rockets. I made them a little smaller than how they are shown in the comic to try & make it more realistic on the left gauntlet. I wanted to keep the main features intact with some simple mounts & not to make it too bulky.
 

Attachments

  • 100_8338_zpsb9bb0fc1.jpg
    100_8338_zpsb9bb0fc1.jpg
    87.6 KB · Views: 93
  • Left_Belt_Assembly_Comparison_zpsb1823ce4.jpg
    Left_Belt_Assembly_Comparison_zpsb1823ce4.jpg
    189.2 KB · Views: 95
  • Right_Belt_Assembly_Comparison_zpsaa6fc9f3.jpg
    Right_Belt_Assembly_Comparison_zpsaa6fc9f3.jpg
    169.6 KB · Views: 98
  • 625x465_2866150_7898788_1418269070_zps56071b8d.jpg
    625x465_2866150_7898788_1418269070_zps56071b8d.jpg
    28.1 KB · Views: 92
  • 625x465_2934726_7884418_1418170466_zps7509a1ad.jpg
    625x465_2934726_7884418_1418170466_zps7509a1ad.jpg
    29.8 KB · Views: 100
  • 625x465_2953236_7940821_1418602184_zps2e9b1c96.jpg
    625x465_2953236_7940821_1418602184_zps2e9b1c96.jpg
    24.7 KB · Views: 98
  • 625x465_2960762_7971603_1418788799_zps0aa6d0b5.jpg
    625x465_2960762_7971603_1418788799_zps0aa6d0b5.jpg
    104.3 KB · Views: 80
  • Jodo_Kast_RH_Gauntlet_Comparison_Inside_zps40fe12a5.jpg
    Jodo_Kast_RH_Gauntlet_Comparison_Inside_zps40fe12a5.jpg
    372.1 KB · Views: 87
  • Jodo_Kast_LH_Gauntlet_Comparison_Inside_zps440b5afe.jpg
    Jodo_Kast_LH_Gauntlet_Comparison_Inside_zps440b5afe.jpg
    203.2 KB · Views: 101
  • Jodo_Kast_RH_Gauntlet_Comparison_Outside_zps007547f8.jpg
    Jodo_Kast_RH_Gauntlet_Comparison_Outside_zps007547f8.jpg
    55.5 KB · Views: 74
  • CB_JETPACK_BODY_V1_5_GROUP_zpsde1c8ddb.jpg
    CB_JETPACK_BODY_V1_5_GROUP_zpsde1c8ddb.jpg
    130.2 KB · Views: 106
  • Jetpack_Jodo_Kast_Views_zps7f55c029.jpg
    Jetpack_Jodo_Kast_Views_zps7f55c029.jpg
    30.1 KB · Views: 82
  • Jetpack_Rocket_Tip_Comparison_zps3b407d2f.jpg
    Jetpack_Rocket_Tip_Comparison_zps3b407d2f.jpg
    204.2 KB · Views: 91
  • Jetpack_Beacon_Comparison_zps3476e948.jpg
    Jetpack_Beacon_Comparison_zps3476e948.jpg
    227.9 KB · Views: 85
  • 20141213_203635_zps9e38c8a6.jpg
    20141213_203635_zps9e38c8a6.jpg
    92.6 KB · Views: 91
  • Rangefinder_Assembly_Viewer_Comparison_zps05dc07f9.jpg
    Rangefinder_Assembly_Viewer_Comparison_zps05dc07f9.jpg
    150.8 KB · Views: 78
  • Rangefinder_Assembly_Comparison_zps12793693.jpg
    Rangefinder_Assembly_Comparison_zps12793693.jpg
    216 KB · Views: 97
  • 100_8340_zps74fbc314.jpg
    100_8340_zps74fbc314.jpg
    83.3 KB · Views: 110
  • Pulce_40_Pieces_zpsc43e119e.jpg
    Pulce_40_Pieces_zpsc43e119e.jpg
    23.3 KB · Views: 94
  • 625x465_2860303_7458618_1416033583_zpsf9eecd7a.jpg
    625x465_2860303_7458618_1416033583_zpsf9eecd7a.jpg
    18.8 KB · Views: 84
  • Belt_Grenade_Comparison_zps1c213d4d.jpg
    Belt_Grenade_Comparison_zps1c213d4d.jpg
    172.7 KB · Views: 85
  • 625x465_2860305_7898935_1418270589_zpsbaa39479.jpg
    625x465_2860305_7898935_1418270589_zpsbaa39479.jpg
    14.4 KB · Views: 87
  • Holster_Grenade_Comparison_zpse811d442.jpg
    Holster_Grenade_Comparison_zpse811d442.jpg
    196.1 KB · Views: 79
  • Jodo_Kast_25.jpg
    Jodo_Kast_25.jpg
    753.8 KB · Views: 119
I know this is a quick follow up. Started working on my jetpack Saturday. This started with 25 printed sheets of 110 lb. card stock.

All the pieces were cut out. This tends to be one of the most grueling parts of the build. With this being a pepakura build there are tabs with all the I.D. numbers to help you put it together & line everything up.

After everything is cut out decided to start sorta in the middle in order to work my way out. The pep file is designed symmetrical so there is left & right side so makes it easy to put it together. There are bend lines printed on each piece that I am lightly scoring to help create the bend & am using various pliers to help do the bending of the tabs & pieces. I have found that using wood glue works well, easier to clean up than using super glue & less chance of sticking fingers together.

I built my Boba Fett jetpack in the same manner that I am going to build this using the card stock as an outer shell & using .060" thick chip board (architectural card board) for internal structure. Printing out a second set of pieces on plain paper, using these as templates for the chip board pieces that will be used on the inside. There is more that will be done but this is a start.

Mocked up with the 3D printed rocket & base collar.
 

Attachments

  • 20150103_134710_zpseea684da.jpg
    20150103_134710_zpseea684da.jpg
    59.7 KB · Views: 75
  • 20150103_134640_zps57d55639.jpg
    20150103_134640_zps57d55639.jpg
    80 KB · Views: 65
  • 20150103_182844_zps24fb9c4f.jpg
    20150103_182844_zps24fb9c4f.jpg
    77 KB · Views: 73
  • 20150103_185405_zpsf8231153.jpg
    20150103_185405_zpsf8231153.jpg
    55.6 KB · Views: 63
  • 20150103_205326_zps320311e7.jpg
    20150103_205326_zps320311e7.jpg
    52 KB · Views: 73
  • 20150103_235124_zps4fad2571.jpg
    20150103_235124_zps4fad2571.jpg
    65 KB · Views: 64
  • 20150104_002746_zps06b2ad87.jpg
    20150104_002746_zps06b2ad87.jpg
    57.4 KB · Views: 62
  • 20150104_010714_zps32e2dcf9.jpg
    20150104_010714_zps32e2dcf9.jpg
    45 KB · Views: 69
  • 20150104_012232_zpse19aff48.jpg
    20150104_012232_zpse19aff48.jpg
    35.5 KB · Views: 76
  • 20150104_012404_zps5e8bc210.jpg
    20150104_012404_zps5e8bc210.jpg
    42.1 KB · Views: 58
  • 20150107_173727_zps113ce59b.jpg
    20150107_173727_zps113ce59b.jpg
    61.8 KB · Views: 76
  • 20150107_173650_zps58a94e15.jpg
    20150107_173650_zps58a94e15.jpg
    50.7 KB · Views: 74
  • 20150107_173321_zpsb8808d51.jpg
    20150107_173321_zpsb8808d51.jpg
    48 KB · Views: 77
  • 20150107_173314_zps44ca6426.jpg
    20150107_173314_zps44ca6426.jpg
    63.6 KB · Views: 60
  • 20150107_173236_zpsfc426aad.jpg
    20150107_173236_zpsfc426aad.jpg
    61 KB · Views: 79
  • 20150107_173226_zps0225754b.jpg
    20150107_173226_zps0225754b.jpg
    62.4 KB · Views: 64
  • 20150107_173205_zps798e79bf.jpg
    20150107_173205_zps798e79bf.jpg
    55.9 KB · Views: 56
Wow, awesome start! I love the Jodo Kast character and always thought they could have done so much more with him besides a one shot.

I love the subtle details you put on the belt greeblies. Definitely gives it a real world feel. You're really going the extra mile on this and it shows. I'm subscribing to this one!

Wes
 
Thanks for the kind words.

Trying to give Jodo that real world feel and still hold true to the comic. I love the Jodo Kast character, too bad he met a fatal end.

Big help for me on this build is it's following the completion of my ROTJ Boba Fett so learned tons with that build which was pretty much a scratch build. Really enjoying this build so far in that I can use some creative liberties but still try to maintain accuracy to the character.

Some more progress on the jetpack. Finished up assembling the exhaust vent & added some more pieces of the chip board for structure.
 

Attachments

  • 20150108_215837_zps935504dd.jpg
    20150108_215837_zps935504dd.jpg
    63.9 KB · Views: 59
  • 20150108_215823_zps3a97a120.jpg
    20150108_215823_zps3a97a120.jpg
    83.3 KB · Views: 58
  • 20150108_215918_zps650a61ff.jpg
    20150108_215918_zps650a61ff.jpg
    40.4 KB · Views: 40
  • 20150108_215652_zpsc392dc36.jpg
    20150108_215652_zpsc392dc36.jpg
    43.2 KB · Views: 48
Finished up the assemble of the card stock shell on the outer portion of the jetpack. Still need to finish the back but will be adding some added chip board inside. Did a complete mock up with all of the 3D printed parts.

Also received a box in the mail today with some 3D printed pieces. The belt pieces, rangefinder assembly, jetpack piano keys, ears & back plate for the helmet.

The light kit is JC27's (TDH) from my Boba Fett rangefinder, this is a drop in without any modification. This range finder assembles in minutes.

The ear pieces & the rangefinder stalk are printed in a metallic gray plastic.
 

Attachments

  • 20150110_110056_zps48bb850c.jpg
    20150110_110056_zps48bb850c.jpg
    45.4 KB · Views: 53
  • 20150110_120222_zpsacf2bfc3.jpg
    20150110_120222_zpsacf2bfc3.jpg
    56 KB · Views: 70
  • 20150110_120210_zps94125091.jpg
    20150110_120210_zps94125091.jpg
    83.2 KB · Views: 57
  • 20150110_124143_zps34c76371.jpg
    20150110_124143_zps34c76371.jpg
    83 KB · Views: 43
  • 20150110_110125_zpscccbffd3.jpg
    20150110_110125_zpscccbffd3.jpg
    37.9 KB · Views: 52
  • 20150110_112903_zps4a45b24c.jpg
    20150110_112903_zps4a45b24c.jpg
    96.2 KB · Views: 65
  • 20150110_110142_zpsd61b43bf.jpg
    20150110_110142_zpsd61b43bf.jpg
    48.5 KB · Views: 60
  • 20150110_110233_zps47682a8e.jpg
    20150110_110233_zps47682a8e.jpg
    49.9 KB · Views: 54
  • 20150110_124049_zpsb77ad3c4.jpg
    20150110_124049_zpsb77ad3c4.jpg
    64.5 KB · Views: 54
  • 20150110_124033_zps370512a2.jpg
    20150110_124033_zps370512a2.jpg
    47.3 KB · Views: 46
  • 20150110_114852_zpsaaf74f80.jpg
    20150110_114852_zpsaaf74f80.jpg
    35 KB · Views: 61
  • 20150110_114841_zpsf90f9916.jpg
    20150110_114841_zpsf90f9916.jpg
    33.8 KB · Views: 58
  • 20150110_114755_zps05a87f57.jpg
    20150110_114755_zps05a87f57.jpg
    27.4 KB · Views: 53
  • 20150110_114552_zpsa2a3b777.jpg
    20150110_114552_zpsa2a3b777.jpg
    28.3 KB · Views: 57
  • 20150110_115929_zpsff29b134.jpg
    20150110_115929_zpsff29b134.jpg
    56.7 KB · Views: 43
  • 20150110_115943_zpsb0015342.jpg
    20150110_115943_zpsb0015342.jpg
    72.3 KB · Views: 54
  • 20150110_120025_zps7948652f.jpg
    20150110_120025_zps7948652f.jpg
    66.3 KB · Views: 46
  • 20150110_120041_zps98b99fca.jpg
    20150110_120041_zps98b99fca.jpg
    57.8 KB · Views: 47
  • 20150110_120100_zps89bb5bd2.jpg
    20150110_120100_zps89bb5bd2.jpg
    78.8 KB · Views: 47
  • 20150110_115829_zps06092772.jpg
    20150110_115829_zps06092772.jpg
    54.5 KB · Views: 41
  • 20150110_115950_zps328758f9.jpg
    20150110_115950_zps328758f9.jpg
    67.2 KB · Views: 47
  • 20150110_115905_zps27bb7f8b.jpg
    20150110_115905_zps27bb7f8b.jpg
    61.2 KB · Views: 42
  • 20150110_115853_zps30cead94.jpg
    20150110_115853_zps30cead94.jpg
    47.4 KB · Views: 49
Thank you for the kind words.

Did some work on the helmet got the dent filled in and filled in the Boba specific damage. Leveled the areas the ears sit & got the mounting holes drilled for them. Cleared out the key slot area & installed the button panel. Getting ready for some primer.
 

Attachments

  • 20150117_123223_zps11e09385.jpg
    20150117_123223_zps11e09385.jpg
    51.2 KB · Views: 67
  • 20150117_123236_zps5fc67665.jpg
    20150117_123236_zps5fc67665.jpg
    46.5 KB · Views: 54
  • 20150117_123248_zps608c6759.jpg
    20150117_123248_zps608c6759.jpg
    46.9 KB · Views: 52
  • 20150117_123317_zps331035f2.jpg
    20150117_123317_zps331035f2.jpg
    54.8 KB · Views: 45
  • 20150117_123345_zpsa6cb286c.jpg
    20150117_123345_zpsa6cb286c.jpg
    61.8 KB · Views: 48
  • 20150117_123748_zps978de87b.jpg
    20150117_123748_zps978de87b.jpg
    42.6 KB · Views: 69
Worked on finishing the inside of the jetppack before putting the back on. After putting all the chip board pieces that I wanted on the inside I began gluing pieces of card stock on all of the seams. I find this helps hold things in place & leaving gaps will allow the coating of resin to fill in those places which was done next. Used smooth cast 320 to coat the inside using a chip brush & some pouring to spread it around. I have found that this give a very strong & durable result & is very light weight.

Primed the helmet & block sanded it, but need to spot prime a couple of spots before paint but is pretty much ready for that stage. The 3D printed ears have a hex designed in them to fit an 8-32 nut which I epoxied in so that they could be attached to the helmet.
 

Attachments

  • 20150122_204239_zpse37fea91.jpg
    20150122_204239_zpse37fea91.jpg
    78.1 KB · Views: 58
  • 20150122_204121_zps46318561.jpg
    20150122_204121_zps46318561.jpg
    87.8 KB · Views: 60
  • 20150122_203557_zps27f20b84.jpg
    20150122_203557_zps27f20b84.jpg
    28.4 KB · Views: 54
  • 20150122_203549_zps634f3128.jpg
    20150122_203549_zps634f3128.jpg
    29.8 KB · Views: 59
  • 20150122_203503_zpsa30a73ad.jpg
    20150122_203503_zpsa30a73ad.jpg
    42.8 KB · Views: 56
  • 20150122_203314_zps8c2aab9f.jpg
    20150122_203314_zps8c2aab9f.jpg
    51.5 KB · Views: 73
  • 20150122_203255_zps568727dd.jpg
    20150122_203255_zps568727dd.jpg
    68.8 KB · Views: 53
  • 20150122_192551_zps7c05d65e.jpg
    20150122_192551_zps7c05d65e.jpg
    69.7 KB · Views: 58
  • 20150122_192530_zps59e73e0f.jpg
    20150122_192530_zps59e73e0f.jpg
    61.4 KB · Views: 63
  • 20150122_192524_zpsdce5614f.jpg
    20150122_192524_zpsdce5614f.jpg
    76.9 KB · Views: 72
Last edited:
Received my cape from MLS (TDH), can't say enough for his communication & working with me on what I wanted. For doing something custom he got this done in quick order. Absolutely excellent. The cape is similar to the ESB Boba Fett cape. The stripe is the same color but went with a dark brown for the rest.

Getting close to completing the jetpack I have been mulling over the color scheme which is something that I have been pondering for a while. Haven't seen anyone do a paint scheme in the mono-color scheme that is shown throughout the comic so decided to come up with a scheme based on this with some artistic interpretations. Going with a medium blue body, with red caps on the fuel tanks, orange on the base of the rocket & the piano keys, & some gray & silver throughout. This will also be heavily weathered. My thinking is that it would be similar but different to the ESB Boba Fett jetpack as a comparison.
 

Attachments

  • Jodo_Kast_Strip_On_Cape_zpscb49ac86.jpg
    Jodo_Kast_Strip_On_Cape_zpscb49ac86.jpg
    299 KB · Views: 74
  • 20150123_213818_zps51f62d72.jpg
    20150123_213818_zps51f62d72.jpg
    72.9 KB · Views: 58
  • Jetpack_Render_zps07593025.jpg
    Jetpack_Render_zps07593025.jpg
    435 KB · Views: 87
  • Jetpack_Jodo_Kast_Color_Views_zps30679d39.jpg
    Jetpack_Jodo_Kast_Color_Views_zps30679d39.jpg
    77.8 KB · Views: 63
This is going really well. I saw a boba fett jet pack file a while back but didn't think it could be made and come out well. Great job, I can't wait to see more
 
Thanks guys.

I saw a boba fett jet pack file a while back but didn't think it could be made and come out well. Great job, I can't wait to see more

This is my second pep built jetpack. Did this for my ROTJ Boba Fett which was a complete pep build tank caps, rocket, & thrusters. That pep file was designed by Skupilkinson. This design was my own with improvements & changes that I had made to make that file work for me. I take a different approach to pep building from what I have seen others do. Here is a photo of my completed ROTJ Boba Fett jetpack. I have done a number of complex pep builds & with a good plan & patience you can pretty much make anything in this medium.

http://www.thedentedhelmet.com/f20/pepakura-jetpack-47919/
 

Attachments

  • Jetpack_Comparison_Raw_Finished_zpsaf9f3ff2.jpg
    Jetpack_Comparison_Raw_Finished_zpsaf9f3ff2.jpg
    50 KB · Views: 86
Been a bit have had some home projects to work on, but have gotten the jetpack fully resin coated, filled with a coat of bondo & sanded, then a light coat of a spackle with a mixture of Elmers glue for some extra bond. Sanded this down to a pretty smooth finish. Will be adding some spot filler & brush on another light coat of resin over the entire outside of the pack to fill in voids & to seal the spackle. Then finish sanding & ready for primer. Will be getting the piano keys attached will probably use super glue. Getting things ready for painting when the weather finally warms up.
 

Attachments

  • 20150224_201343_zpsog4dht22.jpg
    20150224_201343_zpsog4dht22.jpg
    56.8 KB · Views: 57
  • 20150224_201107_zpsqjz03xho.jpg
    20150224_201107_zpsqjz03xho.jpg
    157.6 KB · Views: 51
  • 20150224_201125_zps6rczr7ss.jpg
    20150224_201125_zps6rczr7ss.jpg
    165 KB · Views: 56
  • 20150224_201153_zpscpbuatdk.jpg
    20150224_201153_zpscpbuatdk.jpg
    52.4 KB · Views: 55
This thread is more than 8 years old.

Your message may be considered spam for the following reasons:

  1. This thread hasn't been active in some time. A new post in this thread might not contribute constructively to this discussion after so long.
If you wish to reply despite these issues, check the box below before replying.
Be aware that malicious compliance may result in more severe penalties.
Back
Top