Is that official game art or fanart?Enjoy ;-)
-
Welcome to the Project Runs Forum!
This forum is intended for interest gauging and active runs. Due to the transient nature of this forum, please keep all research and ongoing discussion in one of our main forums so your information is not lost.
Only Premium Members can start a new run.
You are using an out of date browser. It may not display this or other websites correctly.
You should upgrade or use an alternative browser.
You should upgrade or use an alternative browser.
Done / Completed Jaro Tapal/Cal Kestis [«OGGDO KILLER»] lightsaber (from "Fallen Order") by Lukyanov - SOLD OUT
- Thread starter lukyanov
- Start date
lukyanov
Sr Member
Yes, I see at the tracking-numbers every dayIs anyone else still waiting? I've been patient but now I'm getting worried. Still says Russia
Eldenshelton
Active Member
Mine just arrived yesterday both hilts for staff configuration. Got the same scratch issue as the previous guy on one of the shroud side.Yes, I see at the tracking-numbers every day
lukyanov
Sr Member
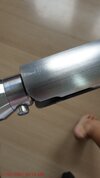
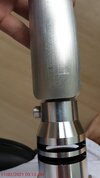
Picture, please?Mine just arrived yesterday both hilts for staff configuration. Got the same scratch issue as the previous guy on one of the shroud side.
Here is how mine arrived. A bit of 1200grit should get rid of it and then some polishing for a smooth shiny surface for my version ")
I just love the design you did, very well thought out with how it all comes together. Really wish I had grabbed two for the staff.
I just love the design you did, very well thought out with how it all comes together. Really wish I had grabbed two for the staff.
Attachments

Last edited:
14trharris
Member
Mine arrived yesterday and I have some scuffing on the shrouds as well and some other marks around the sound vents; thankfully I bought two (one from Denis and one from SaberBay) so I am going to use the one in better condition for display and the second one for dueling. Not complaining, just wanted to share and make you aware Denis like everyone else.
I know some people were not a fan of the plastic grip but it honestly feels really nice and the weight on this saber is beautifully balanced; everything about the design, layout, and feel of this saber is phenomenal! You really outdid yourself with this one Denis, thank you so much!!!!!!!!!!!!!!!!!!!
I know some people were not a fan of the plastic grip but it honestly feels really nice and the weight on this saber is beautifully balanced; everything about the design, layout, and feel of this saber is phenomenal! You really outdid yourself with this one Denis, thank you so much!!!!!!!!!!!!!!!!!!!
Last edited:
Remove the emitter from the main body by unscrewing the 4 grub screws underneath the shroud where the switch is screwed into.How do you remove the shrouds? I want to take them off so I can clean up the insides and be able to weather the top section. Thanks
This will give you access to the screws holding the shrouds to the emitter.
Would you have a picture that shows the whole rectangle circuit piece on the emitter? It's slightly o strutted in the one provided.Cal Kestis lightsaber reference photos taken directly from the game for any of you who are working on weathering. Click the link below to access the album. Hope they help!
Kestis Saber Reference Photos - Google Drive
drive.google.com

Mine has been sitting in Chicago for about 5 - 6 days. It’s been a little over a month since it shipped out. Hopefully it’ll start moving this week. It still has a ways to go to reach me down here in the carribean.
View attachment 1412483
Mine was the same. Then today it suddenly went from Chicago to “out for delivery” in Los Angeles.
Yeah that’s happened to me with other packages before. USPS is not very reliable when it comes to tracking. We’ll see what happens.Mine was the same. Then today it suddenly went from Chicago to “out for delivery” in Los Angeles.
mtrixman
Well-Known Member
Finally was able to finish mine.
I didn't see it mentioned here before but for the wires, 12 AWG copper and aluminum wires fit best for the bottom portion. A tab of superglue will hold them in place.
For the small piece near the emitter, 30 AWG wires worked best for me. It should fit the tiny holes perfectly. Tried to match the wires the best I could as shown in the game itself (not the promo image)
Weathered with a little bit of oil paints but majority of it was with Tamiya weathering powders to achieve that dry rust look. Top half was hit with some aluminum black to darken the metal and then using fine steel wool to achieve the right level of weathering.
Eldenshelton
Active Member
Picture, please?
Attachments
14trharris
Member
Will the powder rub off or does it act more like a paint? Also what oil paints did you use?Finally was able to finish mine.
I didn't see it mentioned here before but for the wires, 12 AWG copper and aluminum wires fit best for the bottom portion. A tab of superglue will hold them in place.
For the small piece near the emitter, 30 AWG wires worked best for me. It should fit the tiny holes perfectly. Tried to match the wires the best I could as shown in the game itself (not the promo image)
Weathered with a little bit of oil paints but majority of it was with Tamiya weathering powders to achieve that dry rust look. Top half was hit with some aluminum black to darken the metal and then using fine steel wool to achieve the right level of weathering.
mtrixman
Well-Known Member
Will the powder rub off or does it act more like a paint? Also what oil paints did you use?
It's more like a wax than a powder now that I think of it. It will come off with heavy handling at first but over time it becomes less likely to rub off if you handle it lightly. This will be a display piece so it doesn't bother me too much. It will come off really easily when using water though.
For the oil paint, I used winsor and newton
lukyanov
Sr Member
It can be super ez removed. 95% of the sabers has this "defect"
Thanks, I removed the screws and the bottom part of the shroud lifts away but the top half doesn’t. Can’t see any other fixing but nervous to pull it too hard in case it snaps off. Denis can you confirm it’s just a tight fit please?Remove the emitter from the main body by unscrewing the 4 grub screws underneath the shroud where the switch is screwed into.
This will give you access to the screws holding the shrouds to the emitter.
Jm419
Sr Member
Thanks, I removed the screws and the bottom part of the shroud lifts away but the top half doesn’t. Can’t see any other fixing but nervous to pull it too hard in case it snaps off. Denis can you confirm it’s just a tight fit please?
Nope, there's a hex-head screw inside the emitter too. Don't just lift it off; that aluminum piece is held in place in two locations.
Similar threads
- Replies
- 30
- Views
- 6,089
- Replies
- 17
- Views
- 445
- Replies
- 2
- Views
- 653