Iron Man Mk. 1 Arc Reactor Build

FSURobbie

Well-Known Member
Hi folks!

So I haven't posted in awhile and wanted to share my results with a prop I've wanted to build for over a decade now. It's one that's been done ad nauseam, so my apologies, but I love how it turned out.

Back when Iron Man first came out I fell in love with the Mk. 1 arc reactor. Honestly, none of the following reactors have had anywhere near the personality that the first, cave built reactor had. I mean, look at this beauty:

1038855
1038856


I tried several times to build it over the years, some on my own, some using kits (Hi Throwing Chicken!) but all to no avail.

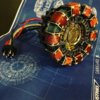
So a few months ago I was on eBay and searching props like I do and I stumbled across a DIY kit made by someone that goes by Mando Studios. The kit promised to have everything you needed to make the mk.1 reactor and, for a cheap price, seemed a pretty decent base kit. Here's what you got, once put together:

1038857


Not bad, but nowhere near screen accurate. It had a full cage though and all the base parts, so I jumped on it. It's taken me a few months working on it here and there, but I finally finished it and am happy with how it turned out. It's fairly close to screen accurate, at least IMO, and has that character the original prop had. It also makes you realize just how big a hole Tony had in his chest in that first film! o_O

Below I will post pics of my progress and explain some of my choices along the way.
 
Last edited:
The first thing I tackled was dying the ring that came with the kit. It showed up totally clear, not that Coke bottle green the prop had, so I spent a few days learning about dying plastics. I read several places that you can always go lighter, but never darker. Speaking from experience now, that's not true, lol.

Out of the box:
1038859


I first tried dying it an azure blue but the dye wasn't made for plastics and it didn't take, no matter how long I let the ring sit. I then bought some iDye Poly that was an emerald green and, after one dip, the thing came out looking like a wine bottle. Unfortunately I didn't take any pics as I immediately panicked and spent the next few hours trying to figure out how to save the ring as I have no mold making skills and also had no desire to buy a second kit.

Turns out, the same dye remover you use on shirts works on plastics. It took two baths, but the ring finally came back down to *mostly* light green. At that point I used a Kentucky blue poly dye and after those two dye baths was satisfied with how it turned out. Also ready to have a nervous break down and never touch dye again.

Blue bath (non poly dye) and the resulting final piece after multiple panic attacks:
1038863
1038865
 
Last edited:
From there I basically built the kit out and modded it as I went along, adding parts that were missing and replacing those that were wrong. Here you can see where I added red electrical tape to the copper ring that sits under the metal face plate. In the screen used prop photo only 5 red rings were visible but when I mocked it up in Illustrator that would have created a very uneven pattern, something I refused to believe Tony Stark would do, so I made six red bands to appease my OCD and, after lining up my finished prop to match the source photo, found my red rings still hit in the same place. Would love to know if there were six on the original. Either way, mine has them.

I also realized at this point that the mesh over the emitter was wrong, but figured I would live with it. More on that later.

1038874


I also went ahead and added 10 blue capacitors. Again, I'm not sure that number matches the screen used prop, but to my naked eye they hit in roughly the right spots compared to the original photo. I tried rolling with 9 but it was uneven so I was willing to make the change there.

1038876


You can also see that at this point I had the cage put together and added the included power cable, which was totally wrong. More on that later, too!
 
I decided to create my own motherboard to sit under the heat sink as there is one visible in the prop. Mine isn't accurate, as I couldn't find a yellow capacitor, but I like how it turned out regardless. It took a bit of finagling to get it to sit right in the cage and have the emitter pop in place, but I finally got it in. I also made the changes to the power cord.

1038879


One thing I noticed years ago about the power cord was that, despite most prop builds using a white cable, the original was opaque. I'm a designer and recognized the cable immediately (at least, to me). What I saw was a USB 2.0 cable that had been hacked into place. I just so happened to have a very similar cable and after cutting it up found it fit PERFECTLY to the cable. It also matched the dimensions of the original, in relation to the other cables. I took the time to even wind the red and black cables around the USB cable in the same fashion as the prop so that, when it sits, the cable lays the exact same was as in the source photo.

1038880

1038881
1038882


You can also see the beginning of the final headache, the wrapping of the copper wires.
 
I thought dying the ring would be my biggest headache, but boy was I wrong.

I knew the copper wires would be tedious, but man, I had no idea what a nightmare finishing that ring was going to be. The terminals were made of plastic and I can't tell you how many of them snapped and had to be fixed while attempting to wrap wire. It go so bad I even tried making copper staples, for lack of a better description, to avoid wrapping the wire but that failed badly too. I basically had to suck it up and spend a few nights working on a terminal here or there, as time permitted.

The hard part was that I realized that, even after bulking up the terminals with electrical tape, all I had done was create rounded terminals. If you look at the prop photo, they are very square. To fix this, I used styrene to build out the terminal shape, then wrapped around that. The terminals weren't all perfect as the styrene turned out better on some than others, but they were in the ball park of how they were supposed to look.

Ring Pre Built Up Terminals: See how rounded they are? WRONG.

1038883


One other thing that most people don't notice: There are tiny screws on the ends of the terminals, with basically one on every outward facing corner. If you do the math, that's 8 per terminal, multiplied by 10 terminals for a total of 80 tiny screws. I spent tons of time trying to find something the right size and finally came across the perfect fit: 1mm glitter. I kid you not.

Building up the terminals with styrene (and Glitter Screws present!):

1038884


Between gluing down 80 individual pieces of glitter, building up 10 terminals with styrene and painting said terminals, I was dreading wrapping the wires.

Turns out my OCD saved me.

Granted, I re wrapped several terminals MULTIPLE times, but I ended up with a final result I was really proud of. The original prop, despite first glance, is NOT perfectly wrapped. This made me feel better about my imperfections. If you're making one, and you want screen accuracy, guess what? Those wires don't have to be perfect! They have to be TIGHT, but not perfect, lol.

1038885
 
At this point I started putting pieces together and noticing details I wanted to change. First, that stupid mesh that was wrong. The screen used prop had a much finer mesh than what the kit came with. Funny enough, the new reactor Sideshow has coming out uses the same wrong mesh. Go figure. I used a mesh pulled from a sink aerator and it was perfect.

1038887


I also noticed something that I don't think a lot of people mention. Granted, this is artist interpretation so I'm probably wrong, but in the source photo of the screen used prop, I distinctly see a shadow being cast BEHIND this mesh. The original prop had a lot of depth under the emitter that mine doesn't simply because of the way the LED defuser sits. This ring gives a nice implied depth though, IMO, and brings the piece closer to the original in appearance.

At this point, I went out and found a plastic washer that would fit the size I needed and cut notches out to fit it under the mesh. Once in place it cast the same shadow. Happy with the result, I painted it gold to match the emitter rings.


1038890
1038891
 
The next bit I had to correct was the metal "Y" that lays over the emitter. Not sure what the proper name for that part is, sorry. :(

The kit came with the correct pieces, but the bars themselves had four lines cut out of each. I have seen this in several prop builds and don't understand where it came from. In the screen used prop you can distinctly see four RAISED bars coming up, not four cut outs.

It took some time, but I finally found a greeblie that would work to fill in those holes: A paperclip. Cut down to size, it was a perfect fit, and just needed to be painted.

In this photo you can see both the holes, and the paperclip solution that fixed them:

1038893


And our painted, ready to go piece, along with the ring it sits on:

1038898
 
Last edited:
Once I had all my parts more or less ready to go, I put it all together and prepared for the final hurdle: The soldered wires between the terminals.

A lot of builds omit the fact that you can clearly see gold chips that the wires are soldered to. Maybe they just don't want to deal with them, I donnu. Either way, OCD guy here, so that wasn't an option. Enter styrene!

After measuring out the terminals and cutting out several test chips, I finally came up with a size that seemed fairly accurate. As such, I measured out 40 chips (Yay, fun!), painted the styrene gold and cut those chips out:

1038894
1038895
1038896
 
Adding the wires wasn't bad actually, this whole portion took maybe 20 minutes, which was a relief compared to everything else ring-related I had been through. Also, something to note to others that want to create a screened build: those wires are bent all kinds of wonky on the original prop. Any build you see with clean, straight wires, wasn't built in a cave. Tony had shaky hands or something, but those wires should NOT be perfect if you want something screen accurate-ish.

I used model glue to glue the wires down and, once it dried, applied puff paint over them to recreate the solder. I didn't want to risk melting anything so figured fake solder was a better solution.

The puff paint dried out perfectly and, once painted silver, looked the part perfectly.

I also went ahead and weathered the terminals to create the look of silver edges coming out from under worn down black paint.

Pre Puff Paint, sorry:

1038899
 
As I went to put everything together I realized one last thing the kit got wrong: The emitter ring. If you look at the photo above, the ring provided is NOT beveled like it's screen used counterpart. From a sales standpoint, I get it, but from a fan standpoint it couldn't stand...Please forgive the bad puns.

After half an hour between files and my Dremel, the emitter ring looked properly beveled. Here's a pic of pre and post bevel:

1038903
 
From there I put everything together and geeked out pretty hard. One of the things I like about the base kit I used was that a ton of the parts are actual metal. That gives the whole reactor a nice weight and it just feels real, if that makes sense. Everyone that has seen it in person has said the same thing, that they were impressed by how realistic it seems. So anyways, here are some of my attempts at pretty pics (please try and pretend the USB power cable isn't there, lol):

1038911


1038910


1038912


1038913
 

Attachments

  • 4AC6ABC7-C453-4DA5-9F0C-8F4886F58226.JPG
    4AC6ABC7-C453-4DA5-9F0C-8F4886F58226.JPG
    671.5 KB · Views: 407
And to wrap it up, a side by side by side of the screen used prop, my build, and the kit as it came. I'm so happy with how it turned out and to finally have it sitting on my shelf. In hindsight I weathered the metal ring over the emitter too much, but I'm willing to live with that.

Anyways, thanks for reading along, hopefully some of the things I noticed/shared can help someone else down the road.

1038914
 
I built mine yesterday, straight from the box.

I wish I saw your post earlier I would have loved to dye the acrylic ring.

You've made a really cool looking prop !
 
That is some outstanding work! I also put my kit together like Helix did, right out of the box with no extra work, but now I kind of want to build a more accurized version too. :D Thanks for documenting your build so well!
 

Your message may be considered spam for the following reasons:

If you wish to reply despite these issues, check the box below before replying.
Be aware that malicious compliance may result in more severe penalties.
Back
Top