Hi guys,
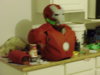
Back in 2010 I completed my first Iron Man mark 3 build using Dancin Fools peps (Thank you!). I was happy with the end result but I knew I had the potential to do better. The original was missing a lot of the intricacies including line detail, proportions. A skill set I just did not have yet, until I finished the darn thing lol.
Here is 2010:


After following countless Iron man builds on this awesome forum, the itch returned, and it was time to re-do the mark 3.
The plan is to upgrade the parts that I feel that need accuracy upgrades and details. After seeing Surreal Studios HD Mark 3, Is got the motivation to try to hit that level of quality on my own. Although I don't believe I can hit his level of perfection, I am going to try. This build will be fiberglass and bondo for the most part. Reason being, the mark 3 is not a easy armor to do in foam as it has a lot of round surfaces and specific lines, and because I am aiming for 100% movie accuracy (though realistically I'll be happy with 90%), and this will be a show piece in my man cave, this is the only way to go.
So here is what is being redone:
New upper torso and Helmet- ( thank you Zabana )
New calves - I made my own last time, and they were too heavy, Big Turc I'm going with yours. They are pretty much 100% movie accurate. Thank you!
Hands - Due to the time constraint I have last time and this time, I ordered a custom set from Shapeways by Mr.Trouble. They need some sanding and what not, but look great overall.
Modify Thighs - Dancin Fool did a great job, but I pepped them poorly and need to modify them accordingly
New Cod piece and ab section - I'm going to do my own ab section, but the cod piece will be that of Dancin Fools as well.
New Shoulders - If I have time, I will design my own, as getting the right scaling is imperative, and I'm best to design them from scratch.
New chest RT - Last time I used a dollar store tri led pod with a Pringles cover over it. It worked well with such limited time.
New bolts - These are from BigTurc. Thanks again for getting these to me. For those interested, they do look great and highly recommend them.
So here we go:
The new torso - First sanding with primer

Lines detailed.Still some pinholes and nicks I need to fix, but will later. Overall, extremely happy. And new helmet pepped.


New RT - Thanks Stealth for your Hero Tutorials. Although I didn't use your method 100% of Youtube, the pre-wired LED idea was golden. Initally I wanted the unibeam look, but in the movie, all you see is a diffused solid light. So that is what I'm going for. I used the rim off this pencil cup holder, and painted it metallic silver, then the casing I made with card stock, fiber glassed it. These are nine 9v white LEDs. Super bright. I also glued tin foil on the interior of the casing to maximize light out put. Actually made a big difference


I used 5 layers of plastic to properly diffuse light. Also had to space out the layers properly to get it perfect. The outcome was dead on, and I couldn't be happier. I also have a clear lens over it as well to make it look like it's behind glass. Picture doesn't capture it well, but it makes look a bit more authentic :


Time for the new helmet -


More work to go, but I hope to have this all done by Halloween 2013. Please give me your feed back, and help guide me to the level of perfection I wish to aspire. I really want this to be movie accurate. These are the models I'm using to keep me in check:
![iron-man-concept-art-11[1].jpg](https://therpf-f28a.kxcdn.com/forums/data/attachments/28/28668-de43ef05c90db4a145a33c72bbc3c49e.jpg "iron-man-concept-art-11[1].jpg")

![2632501225_99604aa1cf_b[1].jpg](https://therpf-f28a.kxcdn.com/forums/data/attachments/28/28670-b185a47a4b1298fdaa9c59fa2c5b6c0d.jpg "2632501225_99604aa1cf_b[1].jpg")
And here is a fan art drawing I did last for you guys. ENJOY!:

Back in 2010 I completed my first Iron Man mark 3 build using Dancin Fools peps (Thank you!). I was happy with the end result but I knew I had the potential to do better. The original was missing a lot of the intricacies including line detail, proportions. A skill set I just did not have yet, until I finished the darn thing lol.
Here is 2010:
After following countless Iron man builds on this awesome forum, the itch returned, and it was time to re-do the mark 3.
The plan is to upgrade the parts that I feel that need accuracy upgrades and details. After seeing Surreal Studios HD Mark 3, Is got the motivation to try to hit that level of quality on my own. Although I don't believe I can hit his level of perfection, I am going to try. This build will be fiberglass and bondo for the most part. Reason being, the mark 3 is not a easy armor to do in foam as it has a lot of round surfaces and specific lines, and because I am aiming for 100% movie accuracy (though realistically I'll be happy with 90%), and this will be a show piece in my man cave, this is the only way to go.
So here is what is being redone:
New upper torso and Helmet- ( thank you Zabana )
New calves - I made my own last time, and they were too heavy, Big Turc I'm going with yours. They are pretty much 100% movie accurate. Thank you!
Hands - Due to the time constraint I have last time and this time, I ordered a custom set from Shapeways by Mr.Trouble. They need some sanding and what not, but look great overall.
Modify Thighs - Dancin Fool did a great job, but I pepped them poorly and need to modify them accordingly
New Cod piece and ab section - I'm going to do my own ab section, but the cod piece will be that of Dancin Fools as well.
New Shoulders - If I have time, I will design my own, as getting the right scaling is imperative, and I'm best to design them from scratch.
New chest RT - Last time I used a dollar store tri led pod with a Pringles cover over it. It worked well with such limited time.
New bolts - These are from BigTurc. Thanks again for getting these to me. For those interested, they do look great and highly recommend them.
So here we go:
The new torso - First sanding with primer
Lines detailed.Still some pinholes and nicks I need to fix, but will later. Overall, extremely happy. And new helmet pepped.
New RT - Thanks Stealth for your Hero Tutorials. Although I didn't use your method 100% of Youtube, the pre-wired LED idea was golden. Initally I wanted the unibeam look, but in the movie, all you see is a diffused solid light. So that is what I'm going for. I used the rim off this pencil cup holder, and painted it metallic silver, then the casing I made with card stock, fiber glassed it. These are nine 9v white LEDs. Super bright. I also glued tin foil on the interior of the casing to maximize light out put. Actually made a big difference
I used 5 layers of plastic to properly diffuse light. Also had to space out the layers properly to get it perfect. The outcome was dead on, and I couldn't be happier. I also have a clear lens over it as well to make it look like it's behind glass. Picture doesn't capture it well, but it makes look a bit more authentic :
Time for the new helmet -
More work to go, but I hope to have this all done by Halloween 2013. Please give me your feed back, and help guide me to the level of perfection I wish to aspire. I really want this to be movie accurate. These are the models I'm using to keep me in check:
And here is a fan art drawing I did last for you guys. ENJOY!: