You are using an out of date browser. It may not display this or other websites correctly.
You should upgrade or use an alternative browser.
You should upgrade or use an alternative browser.
Iron Man Mark I Suit
- Thread starter Whit
- Start date
Whit
Well-Known Member
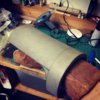
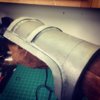
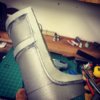
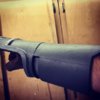
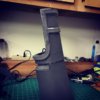
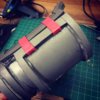
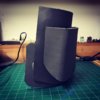
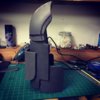
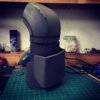
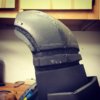
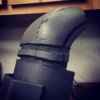
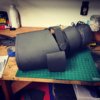
Here is the first batch of images of my IM suit. These are of the RH forearm. I am making the suit out of Eva foam and 3D printed parts. I’ll possibly add some real wires and cables for all the extra stuff, but I haven’t decided that yet.
Attachments
-
 62FBDFFA-A930-46D5-991D-BB6714A65B4A.jpeg1.5 MB · Views: 491
 -
 EB80196F-F769-4870-8088-C01666B8B215.jpeg242.2 KB · Views: 436
 -
 2D28A02B-EE56-4900-9F85-B7D347B0E390.jpeg189.9 KB · Views: 436
 -
 82FF7427-D2C8-4920-9499-4E7BA9ED09B1.jpeg179.6 KB · Views: 430
 -
 DC2F9628-7196-4E05-931D-4741901DA3CC.jpeg212.5 KB · Views: 442
 -
 59CF870E-9E46-4931-B0F6-99713C2FB859.jpeg156.8 KB · Views: 442
 -
 65B7A05E-DEE8-4563-A10A-28D445CEC3EA.jpeg180.2 KB · Views: 419
 -
 7D20F03D-0282-4CEA-B016-FE7B51B5D9ED.jpeg230.1 KB · Views: 408
 -
 305502C3-FB9C-417B-BE9D-48AB704291D5.jpeg222.9 KB · Views: 401
 -
 674A782C-44A2-4195-9D95-FB8A97C99829.jpeg233.3 KB · Views: 408
 -
 ADE03379-5144-43C4-998A-4A032694ED93.jpeg167.6 KB · Views: 383
 -
 3A668F0A-5DA0-432B-9C7E-4DBFB005581E.jpeg368.8 KB · Views: 329
 -
 51F379A1-E7AE-4893-B270-F4F19339A853.jpeg205.2 KB · Views: 385
 -
 B75B8A99-6CEB-4B18-A7A0-8A96F8DE0B5A.jpeg268.6 KB · Views: 413
 -
 0DD4AD75-F4D2-4E2F-BE15-4DE3F551C062.jpeg176.5 KB · Views: 410
 -
 CF3711A2-AD41-43D3-85D5-5474DE26F141.jpeg286.5 KB · Views: 381
 -
 13A2B1ED-923D-4C3A-9B8B-A95EEE31927F.jpeg228.1 KB · Views: 408
 -
 22EF3653-7C83-4B1A-901E-C2A5116EE8BB.jpeg1.1 MB · Views: 431
Last edited:
Whit
Well-Known Member
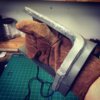
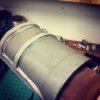
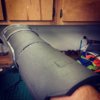
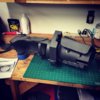
Here at the next batch of images. These focus on the upper RH arm with a shot of me temporarily wearing the two pieces. I am going to have to figure out how to connect them together while allowing as much movement as possible. I will also need to figure out how to hang these off my shoulders so they stay on.
Attachments
-
 F850ACF8-91C5-4FED-9825-9266A22869B0.jpeg209.2 KB · Views: 375
 -
 94001EEC-D276-4378-98BD-A64AAB94B4C9.jpeg300.4 KB · Views: 375
 -
 253ABA3A-F7BC-4C1D-A41A-428182B4D117.jpeg223.2 KB · Views: 363
 -
 8E99A434-2325-4B50-B5B4-25074E5A486A.jpeg189.7 KB · Views: 364
 -
 58DB1F5B-B3D7-4E48-8AA5-4417BBAB8A97.jpeg206.8 KB · Views: 375
 -
 C9CAEAA4-B2E8-4E6E-A1AA-EB991F0ED6E2.jpeg218.1 KB · Views: 388
 -
 CD81E622-24F6-450F-BCC5-70CBD9CEF07F.jpeg305.6 KB · Views: 445
 -
 1F5F5714-A618-4936-9A1D-C96D1E58CA11.jpeg249.8 KB · Views: 372
 -
 33182B49-496C-488A-A956-A5A7978F1FB8.jpeg182.3 KB · Views: 372
 -
 75B68AD2-5F1C-47B6-AEE8-15A22C5ECF33.jpeg173.7 KB · Views: 353
 -
 4348CABF-6AA8-4360-BE52-B41D44327A5B.jpeg164.1 KB · Views: 366
 -
 59B3DC0A-3DC3-401F-8DAB-782BED862C83.jpeg180.9 KB · Views: 365
 -
 B609BEA6-648D-49F2-A3A2-0027D4F06BAB.jpeg232.2 KB · Views: 378
 -
 A4B1FC8B-F341-44E9-B98C-FEB7641D3C11.jpeg271.7 KB · Views: 416
 -
 825CB432-281A-4979-8E31-39E82AAAA3EF.jpeg142 KB · Views: 434
Whit
Well-Known Member
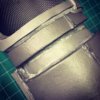
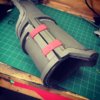
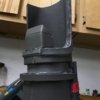
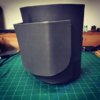
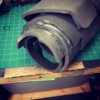
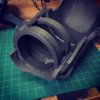
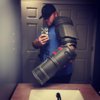
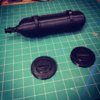
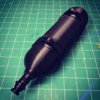
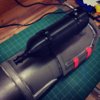
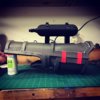
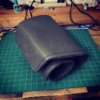
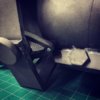
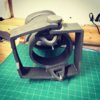
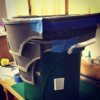
Here are some images of the fuel tank I modeled up and printed. The tank was split into 3 pieces and super glued together. The bands were then slipped on and glued into place to cover up the tank seams. Lastly I modeled up the mounting posts and printed them as well. I need to do some sanding work on these before I think about paint and installation. I may either cut down the posts to embed them a bit into the forearm because I think I made them a bit too tall.
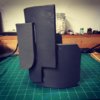
I also modeled up the shoulder discs and printed those. I originally made them out of foam, but they came out too soft so I scrapped them.
I also modeled up the shoulder discs and printed those. I originally made them out of foam, but they came out too soft so I scrapped them.
Attachments
Whit
Well-Known Member
Duly noted. I started on Instagram in order to show to friends and family that are not on the RPF.Please post them here...
IMHO.. there is no reason to post a link off-site.
Mad Monkey
Well-Known Member
Looking good I love the mk1
Whit
Well-Known Member
Getting more done, but I am waiting to get my phone back in order to take some more pics.
Does anyone have or know where I can find some high res close up images of the Mark I suit arc reactor? Not the one in Tony, but the one you can see from the outside of the suit. Finding some images but no clear closeups. Seems like there are also variations from what I have seen.
Does anyone have or know where I can find some high res close up images of the Mark I suit arc reactor? Not the one in Tony, but the one you can see from the outside of the suit. Finding some images but no clear closeups. Seems like there are also variations from what I have seen.
DrCyanide
Active Member
Getting more done, but I am waiting to get my phone back in order to take some more pics.
Does anyone have or know where I can find some high res close up images of the Mark I suit arc reactor? Not the one in Tony, but the one you can see from the outside of the suit. Finding some images but no clear closeups. Seems like there are also variations from what I have seen.
Combining what they say in the cave ("or it could power something big for 15 minutes") with looking at the suit up sequence (0:54 - 0:57) where you can see it's just a lens in front of the reactor Tony is wearing, I don't think there was a second reactor at first.
That said, all suits likely were re-built and upgraded at various points in time. The obvious indicator of this is the start of Iron Man 3, where Mk 1 - Mk 7 show up in glass cases without any battle damage. We know that the Mk 2 was converted into War Machine Mk 1, so it's not the original Mk 2 in that case but a rebuild of it. We know the Mk 2 needed a dedicated Arc Reactor in order to be taken in Iron Man 2, but that would have been a later modification, as Fury implies that Tony wanted Rhodey to be able to take it. Plus if the Mk 2 had a dedicated reactor in Iron Man 1 then the Mk 3 would have had a dedicated reactor, and if the Mk 3 had a dedicated reactor then Tony wouldn't have needed to reuse the Mk 1 chest piece at the end of the film.
All of this to say if you're looking for a reactor that's different than the original Mk 1 chest piece then you might need to specify what film you're trying to look at for a reference.
Whit
Well-Known Member
DrCyanide, totally agree. I did notice that his arc reactor fits into the suit rather than the suit has it’s own arc reactor. I misspoke. I am trying to find as much detail of the housing part of the suit that the arc reactor sits in. The model I show above is what I am trying to find more high res images of. I’m going off some references I have, but they are not complete. It’s probably close enough, but was just curious if anyone had any more insight or images.
Whit
Well-Known Member
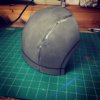
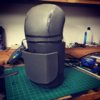
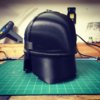
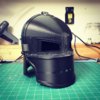
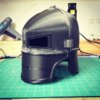
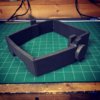
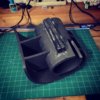
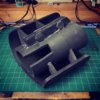
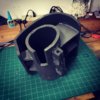
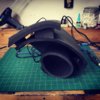
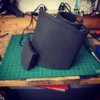
Got my phone back so I was able to take some more pics of my progress. Here is my helmet. Got it all printed and glued together. Still a lot of work to smooth it out and make the seams look more like weld lines but I am happy with it so far. And it fits which is the most important thing.
I plan on having it hinge at the top and will be gluing in some tiny magnets to keep the helmet closed.
Need to think about what I want to line the inside with. I think the original was lined with leather. Might go that route.
I plan on having it hinge at the top and will be gluing in some tiny magnets to keep the helmet closed.
Need to think about what I want to line the inside with. I think the original was lined with leather. Might go that route.
Attachments
Last edited:
Whit
Well-Known Member
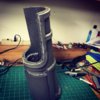
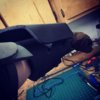
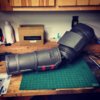
Here is some more work I was able to do over my Christmas break. This is the left forearm. Need to clean up some of the glue but I think it’s shaping up.
Attachments
-
 22D9E50C-3C4C-4AF1-B999-556B4A549BD2.jpeg230.7 KB · Views: 321
 -
 86A979C8-50EF-412D-9702-0099DFD8E06B.jpeg252.3 KB · Views: 334
 -
 03568741-9827-43DE-86BD-2756076B4243.jpeg239 KB · Views: 326
 -
 4C6A16FE-1A8A-48D2-A338-550826D47AE5.jpeg234.6 KB · Views: 333
 -
 939897B1-8BA3-4F07-B0A7-F934CB09D04D.jpeg295.1 KB · Views: 325
 -
 A697AC85-3D36-456A-9A12-C0CAE960DE4E.jpeg236.2 KB · Views: 328
 -
 D1A764B5-76AD-4C06-9F2D-16909C1CA0CF.jpeg244.2 KB · Views: 335
 -
 DA9D4FA6-F95D-4F7A-81F5-86850F817FDD.jpeg221 KB · Views: 337
 -
 4CB4E519-0838-498A-9D70-E85F57215DEC.jpeg174.6 KB · Views: 371
 -
 E8DD94EF-C7EE-42A8-885E-5094B1CD8E0D.jpeg145.1 KB · Views: 340
Whit
Well-Known Member
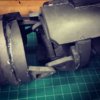
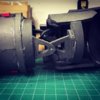
Here is some more progress on my left arm. Made the inner structure and hinge that connects the upper arm to the forearm. Need to do the same for the right side. I did find a few more images of one of the movie suits worn by RDJ. There are some differences between that and the stunt guy suit and even differences between the suit in the cave and the suit at the entrance of the cave when he starts using the flamethrowers.
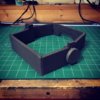
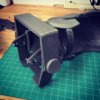
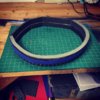
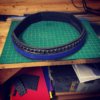
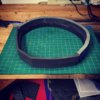
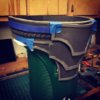
I also started on my “belt.” Long way to go but I am slowly making progress and I am certainly enjoying the work.
I also started on my “belt.” Long way to go but I am slowly making progress and I am certainly enjoying the work.
Attachments
-
 5F4DCAFE-2E2E-4A8E-8B92-2C40E1A47264.jpeg215.5 KB · Views: 283
 -
 29C96CF7-26E9-4188-96EA-FB3567BEABDE.jpeg229.5 KB · Views: 313
 -
 39A9BA6B-1836-477C-977F-179523CEBAB6.jpeg193.5 KB · Views: 292
 -
 8F3F4780-4935-4E98-96C5-F58CED0C5912.jpeg257.3 KB · Views: 303
 -
 79A9EAED-D885-4DB7-8E18-C88580B8AB4D.jpeg253.1 KB · Views: 335
 -
 76070EC3-C24C-4035-AE35-9C3DDA6082C0.jpeg273.7 KB · Views: 316
 -
 52041DD5-F019-48D2-B3EC-5E12982D2250.jpeg260.7 KB · Views: 301
 -
 B70D4EF0-9633-4C0C-8D70-4E4AC283FCE0.jpeg256.6 KB · Views: 300
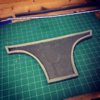
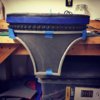
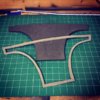
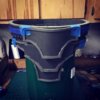
Whit
Well-Known Member
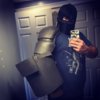
Made some progress on my codpiece as well as made the hinge for my right arm. I have a little bit of movement in my arms, but I have realized I will definitely need a handler if I plan on going to a Con this year. Currently I am using a simple bolt and nut for the hinge, but I may try and get some magnets so I can put things on and take them off easier.
Attachments
-
 26938931-B35B-4C7A-ACA5-41AE161F543B.jpeg301.7 KB · Views: 365
 -
 6A22FB7C-1295-4776-8FD0-7A1AD5EF8FAE.jpeg170.9 KB · Views: 349
 -
 5B22F343-B1C2-427E-92C9-FF5CDCAA4C9A.jpeg283.3 KB · Views: 344
 -
 A7EA6726-1128-4CE6-83CF-D840408A32E2.jpeg204.6 KB · Views: 320
 -
 47A65C19-891C-4AB7-9AD1-8B2100732BBB.jpeg172 KB · Views: 368
 -
 CC068993-B205-4D05-BBCF-4E7B86CC5971.jpeg222.7 KB · Views: 354
 -
 9D4A0C62-C4AC-4484-8DFA-324B273A0326.jpeg225.1 KB · Views: 327
 -
 C902C824-594E-4D6E-83B6-55B14954C71F.jpeg239 KB · Views: 429
 -
 C9AAB4CC-B8B3-40A8-892A-0235F110C237.jpeg257.4 KB · Views: 465
Similar threads
- Replies
- 1
- Views
- 1,067
- Replies
- 16
- Views
- 4,851