jrdorag
New Member
Hey Guys, Everything good?
Finally i had sometime to post here, and i want to share with you my IronMan's Mark50 work, i did it in only 2 weeks for the premiere (25/04 here on Brazil),
HERE WE GO!!!
I really like to do my own 3D models for my armors, so i have sure it will come out just like i want, when i started, only have some images of the trailers and some arts, so i had to figure out how model it, i do some draws and sketches to it


*didn't find the one of the legs... haha
Then i modeled quick as possible and get to one satisfying result


AND NOW IS THE PHYSICAL BUILD
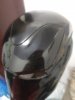
when the model was ready, i finished the helmet to 3D print and the armor for foam, started doing some tests of curvature and seamlines and printing the helmet


After that, started the chest piece, most iron man armors has the chest and abs in separated pieces, but in this one, i decided to build the entire torso in one piece, that causes a little less mobility, but i think is visually better


Then it's just standard foam build until everything is ready for sealing and painting.


Sealing and painting... that's was really hard, my products didn't arrive because the post service here is horrible, then i had to figure out another way to do it, i decided to do some coat of water based resin, so it don't will crack the surface after painting, and will work "for now", i used polyurethane Metallic Red from Mercedes, i normally use as painting process Sealing > Black > Silver > Red, but i didn't had the silver paint, then the red looks a little too dark


After Painting everything and print the helmet and gloves, doing alot of sanding.. bondo.. sanding.. sanding.. more sanding... primer and was ready for paint


To be continued....
Finally i had sometime to post here, and i want to share with you my IronMan's Mark50 work, i did it in only 2 weeks for the premiere (25/04 here on Brazil),
HERE WE GO!!!
I really like to do my own 3D models for my armors, so i have sure it will come out just like i want, when i started, only have some images of the trailers and some arts, so i had to figure out how model it, i do some draws and sketches to it
*didn't find the one of the legs... haha
Then i modeled quick as possible and get to one satisfying result
AND NOW IS THE PHYSICAL BUILD
when the model was ready, i finished the helmet to 3D print and the armor for foam, started doing some tests of curvature and seamlines and printing the helmet
After that, started the chest piece, most iron man armors has the chest and abs in separated pieces, but in this one, i decided to build the entire torso in one piece, that causes a little less mobility, but i think is visually better
Then it's just standard foam build until everything is ready for sealing and painting.
Sealing and painting... that's was really hard, my products didn't arrive because the post service here is horrible, then i had to figure out another way to do it, i decided to do some coat of water based resin, so it don't will crack the surface after painting, and will work "for now", i used polyurethane Metallic Red from Mercedes, i normally use as painting process Sealing > Black > Silver > Red, but i didn't had the silver paint, then the red looks a little too dark
After Painting everything and print the helmet and gloves, doing alot of sanding.. bondo.. sanding.. sanding.. more sanding... primer and was ready for paint
To be continued....