Hi everyone.
I guess I was overdue to start a progress thread (also to help my memory in my old days). Since I am in good shape, I should be able to provide fairly quick updates on my current status. I might ask for tips on electronics (servos, programmable LEDs, jet exhaust, etc.) since I never did my own before (except basic soldering).
The story started when I was doing a Mark 4/6 and wanted to have a different paint scheme. Then came the promo pics for IM3 and I found my target with Mark 39. I was midway in my fiberglassing the pep for my MK 4/6 which mean only one thing: re-start from scratch.


Since winter was coming (thanks John Snow...), working in my garage was no longer an option up here in Canada so I had to move shop to the basement. This meant that fiberglass was no longer an option since it is too toxic to work indoors.
The other constraint was that I did not find accurate Pep files out there at the time (Pepcowboy did very good files when I was 6 months in), so I decided to get a 3D model extracted from a game (I found someone in Europe who did it, a few months later, a generous soul posted a bunch of them on the RPF) and used Pepakura to scale and unfolded them for my size. I did the unfold on 11 x 17 Ledger pages, color printed at Staples, then cut the patterns in PVC foam (Sintra).


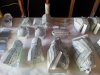
The main advantage for me is that I worked with PVC foam before, and this lower density version I got (which seems to be standard nowadays) is much lighter and easier to cut and shape. After a few weeks, I had basic components in progress.

and ready for a duct tape dry fit to see how the pieces were fitting together:

More on my next post...
I guess I was overdue to start a progress thread (also to help my memory in my old days). Since I am in good shape, I should be able to provide fairly quick updates on my current status. I might ask for tips on electronics (servos, programmable LEDs, jet exhaust, etc.) since I never did my own before (except basic soldering).
The story started when I was doing a Mark 4/6 and wanted to have a different paint scheme. Then came the promo pics for IM3 and I found my target with Mark 39. I was midway in my fiberglassing the pep for my MK 4/6 which mean only one thing: re-start from scratch.
Since winter was coming (thanks John Snow...), working in my garage was no longer an option up here in Canada so I had to move shop to the basement. This meant that fiberglass was no longer an option since it is too toxic to work indoors.
The other constraint was that I did not find accurate Pep files out there at the time (Pepcowboy did very good files when I was 6 months in), so I decided to get a 3D model extracted from a game (I found someone in Europe who did it, a few months later, a generous soul posted a bunch of them on the RPF) and used Pepakura to scale and unfolded them for my size. I did the unfold on 11 x 17 Ledger pages, color printed at Staples, then cut the patterns in PVC foam (Sintra).
The main advantage for me is that I worked with PVC foam before, and this lower density version I got (which seems to be standard nowadays) is much lighter and easier to cut and shape. After a few weeks, I had basic components in progress.
and ready for a duct tape dry fit to see how the pieces were fitting together:
More on my next post...
Attachments
Last edited:


 opcorn


