Danlex9

Well-Known Member
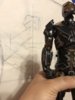
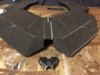
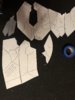
This Iron man suit is one of the many seen in the final act of Iron man 3. It can be seen trying to catch tony during a fall and breaking up into pieces as he hits everything on his way down. I'm treating this one much the same as I did my mark 41 bones suit build (theres a thread on that one too) but with the single difference of IM trying to finish it in a month. Started this project officially on May 3rd now 19 days in I want to show off my progress. Purchased the hottoys figure for this project last year and I am using that as my only reference.

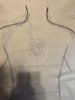
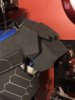
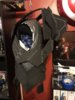
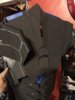
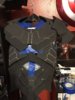
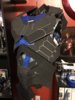
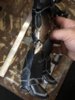
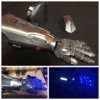
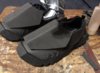
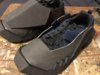
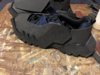
Pictured is the front and back of the figure for starters. The next few posts will show how I've going about this build.
 

Attachments

  • fullsizeoutput_1049.jpeg
    fullsizeoutput_1049.jpeg
    436.6 KB · Views: 744
  • fullsizeoutput_1048.jpeg
    fullsizeoutput_1048.jpeg
    336.4 KB · Views: 798
Awesome choice and good luck with this project !
Maybe this link can be of assistance (kudos to member Balmung):
 
Awesome choice and good luck with this project !
Maybe this link can be of assistance (kudos to member Balmung):
Thanks but I’m actually about 70-80% complete with this suit as I will soon post.
 
So jumping right in, started this same as when I started my mk 41. Taped drawing paper to my wall, drew my body’s outline, pin pointed where I needed the arc reactor and began hand drawing all the flat front facing sections of the armor.
 

Attachments

  • 9943AABC-1F09-4644-8731-27646AF9299C.jpeg
    9943AABC-1F09-4644-8731-27646AF9299C.jpeg
    1.2 MB · Views: 419
  • 356C07FD-3612-43E2-AA08-B85D42F0278D.jpeg
    356C07FD-3612-43E2-AA08-B85D42F0278D.jpeg
    1.2 MB · Views: 467
Once I had the front and back flat pieces drawn I pinned them to a duck tape body form to start drawing the sides. I also taped 1/2 inch foam to the body foam to take in account the thickness of the foam I’d be building with and some free room so it wasn’t resting tight around my body when finished.
When I pinned the front and back to the form I made sure they were equal distant on both left and right side for symmetry.
I also cut the front sternum piece mostly loose so it could be slightly enlarged and made into a more rounded feature.
 
Last edited:
The chest and back were made directly after the torso. Because the figure is 6th scale every part I measure on it I then multiplied by 6.08 (little extra tolerance for my human body).
Because of the 117 nighthawk stealth fighter esq design of this suit making most of the big sections was an exercise in straight edge and compass linear drawing. Tedious but still fun.
 

Attachments

  • 26F69AFB-B42D-4B09-937B-2F8507753915.jpeg
    26F69AFB-B42D-4B09-937B-2F8507753915.jpeg
    1.8 MB · Views: 441
  • 37163614-879B-4536-933F-528D74E85A30.jpeg
    37163614-879B-4536-933F-528D74E85A30.jpeg
    3.1 MB · Views: 401
As far as cutting these parts out and piecing them together I have been using almost exclusively my band saw due to the fact that I can change the angle of the saws table surface and consistently cut the same angles.
This made cutting out the shoulder plates a breeze and they came out fantastic, hope you agree.
 

Attachments

  • 1D6B1A8D-0904-40F5-A6B5-5FF067305860.jpeg
    1D6B1A8D-0904-40F5-A6B5-5FF067305860.jpeg
    1.5 MB · Views: 428
Once I had the chest back and mid section all together I was able make the pattern for the rib cage sections.
At this point I’ve used a combination of 2,4,6, and 10mm thickness foams.
The vast majority is 6mm with wing and waist sections being made of 10mm for strength.
2 and 4mm have been used for filling in gap sections between parts and used to construct the boots in order to keep their size down.
 

Attachments

  • DA4ED1DF-C78C-4E73-9B5E-35E897524498.jpeg
    DA4ED1DF-C78C-4E73-9B5E-35E897524498.jpeg
    1.7 MB · Views: 427
  • 31A617CB-7546-429D-9392-91552A63BA80.jpeg
    31A617CB-7546-429D-9392-91552A63BA80.jpeg
    1.7 MB · Views: 444
  • BB5CA7F9-50A4-4989-8D47-3F5AF4E5FBA4.jpeg
    BB5CA7F9-50A4-4989-8D47-3F5AF4E5FBA4.jpeg
    1.8 MB · Views: 461
  • CA3916D7-4F38-48B9-8590-926E1AAE6CB8.jpeg
    CA3916D7-4F38-48B9-8590-926E1AAE6CB8.jpeg
    1.8 MB · Views: 432
Once the torso was mostly finished I began drawing out the leg portions. Still all done using digital caliper to measure a straight edge and compass to make and mark all the nice sharp lines.
Shout out to this iron man design for bringing back bell bottoms, even if I’m the only one wearing them lol.
 

Attachments

  • 99C8DB0F-E8A6-41AA-A1DC-77AC2539D4B2.jpeg
    99C8DB0F-E8A6-41AA-A1DC-77AC2539D4B2.jpeg
    1.5 MB · Views: 379
  • E39AFF34-1B9B-43CC-BDA8-767AA69DB020.jpeg
    E39AFF34-1B9B-43CC-BDA8-767AA69DB020.jpeg
    1.7 MB · Views: 420
Over this past weekend I took a moment to try everything on. Thighs will need to be secured to my undersuit to keep them from falling as in pics but otherwise good.
Also shoulder pads are just painters taped into place, that’s not how they will sit when finished.
Cod and bum pieces will also be connected with elastic for comfort as I walk.
 

Attachments

  • 801055D6-DFD3-4D4A-BF1B-1913B8C7F244.jpeg
    801055D6-DFD3-4D4A-BF1B-1913B8C7F244.jpeg
    955.1 KB · Views: 491
  • 4EA58095-316C-44F1-8C53-EDC711EA0538.jpeg
    4EA58095-316C-44F1-8C53-EDC711EA0538.jpeg
    884.4 KB · Views: 541
Now technically I started this project last year as I made a comfort cosplay of tony in aim shirt from the end of Iron Man were he seen still wearing the left arm of the mark 15.
As he says “...I got nothing”

So the left arm is basically 100% done. This at least gives me the patterns for the bicep and elbow as the forearms are both different on this suit.

Colors chosen are a metallic pewter, molotow liquid chrome($$ I know right), and a pale grey for the outlining.

Lighting use in glove are adafruits led blue sequins, very small like a tic-tac but very bright. Also low power like .02mA I think.
 

Attachments

  • 13AB22F1-BA41-429A-998F-96ED44E00657.jpeg
    13AB22F1-BA41-429A-998F-96ED44E00657.jpeg
    375.8 KB · Views: 481
  • E52F7FA9-BEC2-41AC-90F5-24C020206463.jpeg
    E52F7FA9-BEC2-41AC-90F5-24C020206463.jpeg
    693.3 KB · Views: 577
  • C43295CF-B123-4CBA-861C-74A7F01A0541.gif
    C43295CF-B123-4CBA-861C-74A7F01A0541.gif
    1,008.4 KB · Views: 1,247
For the helmet I have a pepakura file from Maxcrft shop via Etsy. And the neck will be I think a mark 8 modified neck pepakura file. Everything else is straight hand craft.

Also the silver/white lines are where I’ve already cut the surface of the foam. They’ll spread open and form the panel lines when I hear treat the foam.
 
I've never seen this technique for creating iron man suits before. Did you come up with it or was the idea borrowed from somewhere? This is awesome work you've done in just 19 days, great job man! I've never seen Sneaky done before so this'll be a great suit to see when its finished.
 
I've never seen this technique for creating iron man suits before. Did you come up with it or was the idea borrowed from somewhere? This is awesome work you've done in just 19 days, great job man! I've never seen Sneaky done before so this'll be a great suit to see when its finished.
Same method I used to create my Bones suit just streamlined a bit. Probably not the first to do this but I think I’m just being creative with my drawing abilities is all. You can see the mk41 build below.
 
Just whipped up the boots. Built onto a pair of cushy sketchers. For my boots I contact cement an elastic band around the sole of the shoe but only every few inches. I then glue the foam to the elastic that isn’t glued down. This gives a flex point to keep walking stress from tearing and cracking the foam.

Built with 6mm around the sole for depth, 2mm covering the shoe and 4mm for the top piece to cover the laces.
 

Attachments

  • EBFCA0E5-3B7D-4F90-A4D0-C9E6B6DFFD11.jpeg
    EBFCA0E5-3B7D-4F90-A4D0-C9E6B6DFFD11.jpeg
    827.7 KB · Views: 410
  • 43C56668-7C1F-4C9F-96F8-9126C88FA319.jpeg
    43C56668-7C1F-4C9F-96F8-9126C88FA319.jpeg
    2.8 MB · Views: 423
  • ECA3AFC0-A073-4E93-A2D9-71527F315EE9.jpeg
    ECA3AFC0-A073-4E93-A2D9-71527F315EE9.jpeg
    3.1 MB · Views: 439
  • 3C584C51-4ED4-4DD5-AF65-F937316CDE84.jpeg
    3C584C51-4ED4-4DD5-AF65-F937316CDE84.jpeg
    3.5 MB · Views: 398
Looking great! How are you going to seal the suit and what brand paint are you going to use?
Paint is just craft store acrylic but I think I’m going to thin them down and use my spray gun. Haven’t decided on my sealer yet, I have mod podge on hand but I may use an acrylic clear coat through my spray gun as well.
 

Your message may be considered spam for the following reasons:

If you wish to reply despite these issues, check the box below before replying.
Be aware that malicious compliance may result in more severe penalties.
Back
Top