Iron man electronics add ons

Hi-

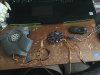
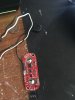
my board IS an Arduino -AND- (minified) Wave Shield.. all-in-one..

microSD card is on bottom.. 'magic' is on top...

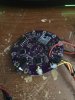
I have not really made the jump to selling these yet, sorry. (I need to re-work the filters for the amp... then looking in production still.. right now I assemble all these boards by hand.. and re-flow in a toaster oven!)
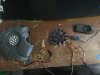
 
All I want is a link to connecting a nano to a wave board
Sorry new to this but can't find a easy term diagram to do it,
I know I am racing ahead and others have had to work it out
But I'm new to the arduino and writing sketches..
I suppose it's going to be a slow learning process.
 
It is... build one step at a time...

then move on from there..


you keep saying: "wave board"..


which one? Have you re-searched any of them?

What are your requirements?

size? money? battery?..etc


No one can help you with a diagram on how to connect a Nano to this mythical 'wave board' :)

Pick/find one.. and lets move on from there.

The Adafruit WaveShield is probably NOT a solution for you IMHO..

why? Because its a 'shield' for the Uno.. (it will for sure, 100% connect to a Nano.. but its designed to be a shield for the Uno.. and hence is much bigger.)..

will you have room for this in your 'project'? (not sure)

I listed the names of a few other boards too... did you bother to check them out?

I dont mind helping.. and even spoon feeding a little bit.. but you gotta do some work on your own here too. ;)
 
Have seen a WT588D board very cheap... would this be worth using with a nano..
To be honest this is all for my grandson.. he has a cattoys mk7 helmet which we
fitted with the kit bought in from china.. it worked but very shortly started to play up
he has started build his own to fit him as the helmet is too big and wanted to fit
electronics to it, and as the last kit started playing up I dont want to waist long delivery
time waiting only for it to let him down,
so I thought I would try a use arduino so as to do it again if we messed up,
but am a bit confused with all the different add on boards and which way to go,
the cost is not an issue , I have the basics running on the Uno
but being new and not an electronics wiz.. its slow and telling a 10 year old, Grandads busy and I
will try and sort it , I though I might find a open source step by step plan to do it on the Net,
he has seen your video with the acdc music and loves it, and I am trying to work it out with the little time I have.
so what I want is The Nano connected to a small sound board with the smallest batteries that will suit ,
sorry if It sound like I am trying to take others hard work with no effort ,but a 10 year old bang your ear drums to get it done is
starting to wear thin.....
 
I have no problems helping you.. *(cant let the grandson down, now can we!?) LOL...

but you have to make 'some' decisions.. and we'll make it work.. or check it out before you need to order.

but in reality.. one of those 'cheapier' add-on boards on ebay DFPlayer, WT588D...etc.. are all only a couple of bucks. (USD at least)..

What "I" suggest you do/need is:

battery pack (I suggest +7.4v li-ion pack).. rechargeable is up to you.
servo(s).. what kind? no clue.. one with enough torque to lift the weight of your intended faceplate.
voltage regulator (+5 or +6 volt one,,,, 7805 is a normal 'go-to'.. while not as efficient as a switching regulator, will work just fine)
some resistors for as many leds you have... (what value? calculate it here: http://led.linear1.org/1led.wiz )
http://led.linear1.org/diagram.png.php?q=YnJvd24gYmxhY2sgYnJvd24gNSAzLjMgMjAgMTAwIDEvOFc=
some transistors (I think I noted the ones "I" used in my thread, but they were SMD versions.. any transistor that is rated for the current you will be supplying to he led/eyes will work)
leds
Arduino
'audio board' of choice.. I can possibly do some more research this weekend on what one I suggest.. I have a couple WT588D boards, that I have never used.. maybe I'll see how difficult they are to work with.

its not that nobody wants to help.. its more like.. each scenario is a little 'unique'.. and adding audio is not something most beginners add/mess with..
 
Sorry guys, I meant to post these the other day, but here is my setup for the replusor. My particular setup goes in a gauntlet with the neopixel rings in the glove portion. Right now I'm in the middle of redoing my glove so the unfinished version is here. My picture of the mark 42 gauntlet pics from last year you can see how bright the 19 neopixels are and if I remember correctly that's not at full brightness. The red sensor in the pics is the Advancer Myoware sensor which senses when I flex my forearm muscle and then when hits a predetermined value (coded in the lilypad), it activates the sounds and lights. Also the board in the picture of the speaker is a mini amp for increased sound.
 

Attachments

  • IMG_0001.jpg
    IMG_0001.jpg
    84.9 KB · Views: 77
  • IMG_0002.jpg
    IMG_0002.jpg
    100.5 KB · Views: 73
  • IMG_0094.JPG
    IMG_0094.JPG
    2.4 MB · Views: 97
  • IMG_0096.JPG
    IMG_0096.JPG
    2.4 MB · Views: 88
  • IMG_0098.JPG
    IMG_0098.JPG
    2 MB · Views: 93
  • IMG_0099.JPG
    IMG_0099.JPG
    2.1 MB · Views: 82
  • IMG_0100.JPG
    IMG_0100.JPG
    2 MB · Views: 78
thats also another good way to 'trigger' things..

* Advancer Myoware sensor

or

* flexible resistance/resistor strips..
 
Well so far with the wt588d I've only got it working in key mode... this would be OK as I've got it to trigger the sounds only by using the led pin as a switch...
Is it possible to add 2 more pin commands to the arduino sketch that trigger the sounds in key mode ,I know the arduino can run 2 commands at once if you edit the code.
How do you add a pin that goes low at the same time the servo moves in the code
 
Back
Top