Imperial Shuttle-Revell snap-tite mystery scale

gt350pony66

Master Member
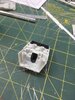
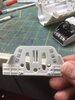
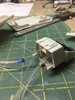
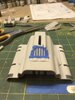
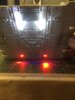
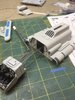
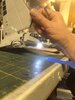
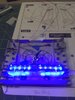
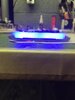
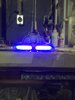
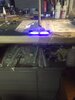
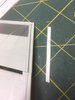
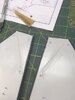
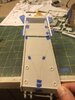
Revell snap-tite Imperial Shuttle...very few parts but I thought I could enhance it a bit. I was going to attempt flashing LED at the wing tips but then thy wouldn't flash in sync right. So I trenched out the plastic where there was no space for FO. I'm going to build this one in flight and make a stand similar to what I did with NC-1717. I started on the wings, the vertical fin was pretty easy but the right and left I had to dig a trench for the .50mm FO. At the front and rear of each wing tip I drilled in about 1/8 inch and trenched at the panel line. I then scraped and sanded down just enough of the wing edge to accept a thin piece of evergreen to cover the FO and it's trench. I glued the FO in place and put tape all over to hold it till it dries.
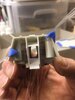
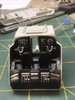
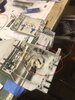
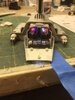
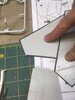
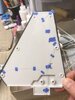
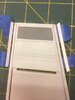
One thing I can't figure out with this kit is, why would they provide a relatively detailed cockpit, an Imperial Officer and Storm Trooper...and then have a completely blacked out windshield. While I realize on film these windows all appear to be blacked out, I wanted to at least have it dark but visible when the cockpit lights up. The window is a piece of clear that's painted black on the back side. I let that thing soak in oven cleaner overnight...whatever that crap is it ain't coming off
 

Attachments

  • IS1.jpeg
    IS1.jpeg
    114.4 KB · Views: 245
  • IS2.jpeg
    IS2.jpeg
    45.6 KB · Views: 254
  • IS3.jpeg
    IS3.jpeg
    38.5 KB · Views: 231
  • IS4.jpeg
    IS4.jpeg
    36.8 KB · Views: 238
  • IS5.jpeg
    IS5.jpeg
    42.4 KB · Views: 247
  • IS6.jpeg
    IS6.jpeg
    38.7 KB · Views: 238
  • IS7.jpeg
    IS7.jpeg
    52.9 KB · Views: 243
Nothing on Shapeways for this except engine grilles, got 'em coming though. still doing google research on appearance. This thing can NOT be anywhere near what it should look like.
 
In the past I have had success removing the Revell pre-paint by soaking it in Isoporpyl Alcohol ( I think the 99% kind or whatever the highest they sell)

Looking forward to the build

As for scale, I believe it is in the 1/110 to 1/121 range, although I have seen it paired with Hot Wheels Tie Fighters and they look good with it. It might also be small enough to display with Bandai 1/144 Tie fighters instead since they are pretty close in size to the Hot Wheels ones

Other things in that range are the Revell pocket Tie Interceptor, Revell pocket X-Wing, Bandai "1/144" A-Wing etc...

The figures in it are way oversized and are pretty much 1/72 figures

The old MPC AT-AT is around 1/100 to 1/110 as well.

Since I have one and no longer need it for a Hoth dio as Bandai have the 1/144 ones, one thing I have wanted to build was the landing platform from ROTJ using the Revell Shuttle and MPC AT-AT

The problem is the Revell Shuttle is so expensive right now
The rubbing alcohol worked like a charm brother! Thanks for the tip. I was dreading trying to shape one from the clear sheet I have. You're the man!(y)
 
Spent a bit of time on the cockpit today, as always exact likeness is never my thing, as long as it looks like something that represents is fine for me. I dolled up the bleek cockpit with some greebs and drilled for some FO. I have to find some dark film for the cockpit glass but Hobby Lobby and the like are shut down right now. Analyzer's tip to get the glass cleaned of pre-paint was excellent, worked perfectly(y)
I slotted the rear wall to allow the FO to pass through without seeing any of it through the doorway I cut in the cockpit back wall. Trimmed it with some tiny half round evergreen painted silver so it would stand out. I also made a downward angled passageway and ran a strand of larger FO in the ceiling so it will illuminate a bit, we'll see if that's enough, if not I have a nano on standby. I've figured out that the supporting LED's that will feed the FO will need to be attached to the upper hull panel and the belly panel done later. I've drilled the belly pan for 2mm LED's spot lights and 2 red leds at the rear. I'm going to try a 1mm string of FO for the center lower chin light, also have to see if that's going to be enough. Fun times with this one so far
 

Attachments

  • IS8.jpeg
    IS8.jpeg
    61.7 KB · Views: 236
  • IS9.jpeg
    IS9.jpeg
    37.1 KB · Views: 228
  • IS10.jpeg
    IS10.jpeg
    44.3 KB · Views: 236
  • IS11.jpeg
    IS11.jpeg
    53.4 KB · Views: 273
  • IS12.jpeg
    IS12.jpeg
    44.1 KB · Views: 259
  • IS13.jpeg
    IS13.jpeg
    49.5 KB · Views: 256
Ok, so I did some masking and painting and some lighting work. I googled images but couldn't find a whole lot that helped besides the 3 spots and the two rear red markers or whatever they are. Those turned out well though. I started to install the 2 chin guns and thought, well I could drill them for FO and put a fast flash LED to them. Too far to drill without melting plastic. So I cut the existing guns off of the mounts and built new barrels out of evergreen tube, that was a bit bigger than I would have liked but they're ok. Pics on that tomorrow. Still need some smoked film foe the windshield but Hobby Lobby is still shut down so I'll have to check if there's an office supply open somewhere. I want the windshield dark like it appears on film but when the cockpit is lit it should be enough to see inside...I hope
 

Attachments

  • IS14.jpeg
    IS14.jpeg
    49.8 KB · Views: 206
  • IS15.jpeg
    IS15.jpeg
    43.9 KB · Views: 209
  • IS16.jpeg
    IS16.jpeg
    37.1 KB · Views: 217
  • IS17.jpeg
    IS17.jpeg
    40.5 KB · Views: 202
  • IS18.jpeg
    IS18.jpeg
    38.5 KB · Views: 217
  • IS19.jpeg
    IS19.jpeg
    63.6 KB · Views: 220
Well friends, this as far as I can go till I get the engine grill from Shapeways. I was hoping it might show up today, but not. Everything else is wired and works ok.
 

Attachments

  • IS20.jpeg
    IS20.jpeg
    65.3 KB · Views: 236
  • IS21.jpeg
    IS21.jpeg
    50.9 KB · Views: 250
  • IS22.jpeg
    IS22.jpeg
    44.6 KB · Views: 261
  • IS23.jpeg
    IS23.jpeg
    48.1 KB · Views: 228
the engine lighting was a bit more work than expected. had to use more LED's and set them back more. also had to use the thicker acrylic at the rear as the thin stuff had hot spots, then I had to place the thin piece in between to knock it down more, but it worked out. I had one of the wing FO snap off so I used a piece of wire sleeve with the strands pulled out and was able to splice it back together as I wasn't going to try to pull the wing apart to replace it. I messed up notching the hull piece for the FO, so once the wings are fixed in place I'll have to make patch panels out of some thin evergreen, but I think it'll look ok. Engine grills finally on the way from Shapeways, and I started back to work this week. We're doing shifts with half crew and lucky me got the late shift so my regular schedule is still a ways off.:rolleyes:
 

Attachments

  • is24.jpeg
    is24.jpeg
    51.6 KB · Views: 211
  • is25.jpeg
    is25.jpeg
    37.3 KB · Views: 187
  • is26.jpeg
    is26.jpeg
    41.3 KB · Views: 195
  • is27.jpeg
    is27.jpeg
    48.1 KB · Views: 200
This little shuttle is really looking nice. The cockpit area and lighting is fantastic! Wish I had your lighting skills.
thanks, i appreciate it. but, i've kinda botched this build. TWO of the FO for one of the wings snapped, I managed to fix one but can't the other, glued inside the wing. also, I didn't think through my assembly process very well. I should have done the wings and belly together and routed the FO differently and THEN married the upper and lower. i also have to make patch panels for the upper to hide the FO. Sooo, at some point I'll have to do another one of these now that i know what i SHOULD have done...oh well
i guess it'll look ok, but it's not right :rolleyes:

That sucks about the fibers

If you are going to do another one, I might suggest the MPC/AMT/ERTL one if you don't already have another Revell one.

It will be something different with out having two "copies"

It seems these are currently cheaper than the Revell ones on places like eBay, plus they are bigger and closer to 1/72 than the Revell kit (I think around 1/87)
it also has a ramp with a Vader figure you can pose walking down the ramp or in the cockpit with the pilots.

There is also a shapeways set for the engine as well as one for the cockpit to better match the filming model's profile ( although it is quite pricey). Both the Revell and THE MPC/AMT/ERTL ones have a very steep and foreshortened angle that matches the full size set piece
awesome idea, I'll take a look for the MPC one(y)
 

Your message may be considered spam for the following reasons:

If you wish to reply despite these issues, check the box below before replying.
Be aware that malicious compliance may result in more severe penalties.
Back
Top