*Finished* Imperial Probe Droid Pod!

Redfinger

Well-Known Member
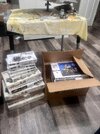
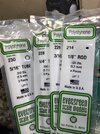
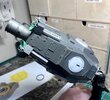
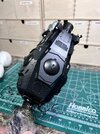
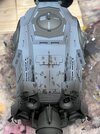
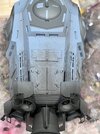
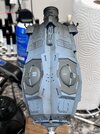
It has begun! A couple of years ago I started collecting the kits, and now I have them!

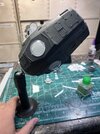
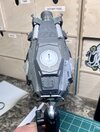
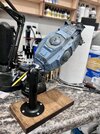
This will be my first studio scale build using all original kit parts! I chose this as my first project since the kits were readily available still and the assembly is fairly straight forward.

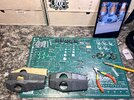
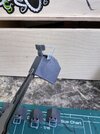
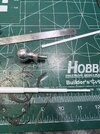
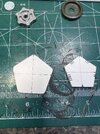
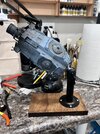
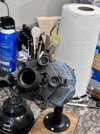
Tonight I laid out all the parts to ensure everything is accounted for. The plan is to mount it on a panavise. Tomorrow I will need to head to the hardware store to get something to bolt it up.

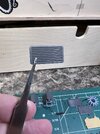
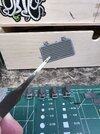
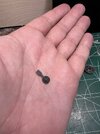
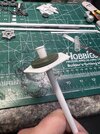
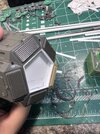
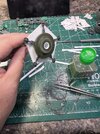
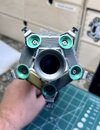
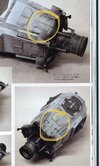
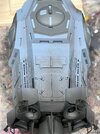
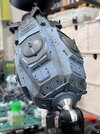
About the only part I am improvising on is the inside of the engine nozzle. I am not lighting the model and I can’t find any reference for what part might have been inside there, so I found a part of just wheel spokes to put inside to replicate a thruster.

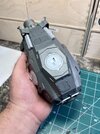
Now to clean everything up and start assembling!! Though this topic has been done many times, I finally feel like I can contribute something here…
 

Attachments

  • 111B48AF-CB7C-4867-BD40-BCD0B9C098A3.jpeg
    111B48AF-CB7C-4867-BD40-BCD0B9C098A3.jpeg
    4.7 MB · Views: 228
  • 065BFBDF-A010-4606-B446-C5DF88A20C76.jpeg
    065BFBDF-A010-4606-B446-C5DF88A20C76.jpeg
    4.5 MB · Views: 231
Wow, I didn't realise there was so much repetition on this guy with the donor kits. Deceptively simple shape with a lot going on. But I guess that can be said for most Star Wars models.

I look forward to seeing this come together.
 
Wow, I didn't realise there was so much repetition on this guy with the donor kits. Deceptively simple shape with a lot going on. But I guess that can be said for most Star Wars models.

I look forward to seeing this come together.
Yup, 5 of each kit. Each side of the hexagonal shape has the same parts.
 
Last edited:
Next steps complete.

All parts cleaned trimmed and prepped. I also built the thruster shrouds, trimmed the grills from the RAD kit and made the small feet assemblies that sit on the nose. Last task for the night was to throw the Lotus chrome plated wheels into a zip lock bag with some over cleaner to strip off the chrome.

I fiddled around some more with the RAD bodies to figure out how I am going to tackle assembling them and making an attachment for the panovise. As time allows, major assembly should finished in the next few days.
 

Attachments

  • 3F0FE262-48F1-46C7-A034-18C76A8FF2EB.jpeg
    3F0FE262-48F1-46C7-A034-18C76A8FF2EB.jpeg
    1.3 MB · Views: 112
  • 6DDBE233-E440-4B94-A34E-352E42FAB657.jpeg
    6DDBE233-E440-4B94-A34E-352E42FAB657.jpeg
    1.3 MB · Views: 112
  • A6E2AA40-4F6B-46D6-AFFE-6238EF6B8CBB.jpeg
    A6E2AA40-4F6B-46D6-AFFE-6238EF6B8CBB.jpeg
    1.3 MB · Views: 117
  • 953928E7-0846-4F75-A80B-730F64BE54B5.jpeg
    953928E7-0846-4F75-A80B-730F64BE54B5.jpeg
    1 MB · Views: 105
  • 170A9663-9DB5-4F69-B40C-A86A0208C5F8.jpeg
    170A9663-9DB5-4F69-B40C-A86A0208C5F8.jpeg
    1.7 MB · Views: 124
Pressing on, due to a winter storm rolling in I ducked out of work early and had more time to work on the pod.

I needed to create a component that would allow my panavise end to attach to the pod while providing support to the model and connecting the two ends.

I used several styrene tubes reinforced w/ 2-part epoxy to create a solid inner rod. This rod connects the thruster area pentagon with the larger nose pentagon. The tube at the nose end passes through the T34 wheel, I heated and stretched it slightly to provide a snug fit. I may fill that portion with JB Weld and then tap the hole to accept the threads for the panavise, or I might just glue it in, I am still undecided.

I also got the hull put together and started to build the rear thruster area, however, thank you to the input of others, it was pointed out that the rear thuster area is actually recessed and not flush, so I had to remove it and start over.

Wrapped the night up by test fitting my mount idea, which I am pleased with and then filling some gaps w/ Tamyia putty.

Once that is cleaned up I will start adding the detail bits on.
 

Attachments

  • 432005EF-00EB-4185-8AEA-79436038775C.jpeg
    432005EF-00EB-4185-8AEA-79436038775C.jpeg
    1.7 MB · Views: 153
  • AC1F2034-7E1B-462D-A296-0555AC93B6DD.jpeg
    AC1F2034-7E1B-462D-A296-0555AC93B6DD.jpeg
    818.7 KB · Views: 153
  • 9E057301-E5DC-4540-8448-1A2874120DC6.jpeg
    9E057301-E5DC-4540-8448-1A2874120DC6.jpeg
    1.7 MB · Views: 135
  • ABC94B96-115A-446A-A6ED-F88DFD85A690.jpeg
    ABC94B96-115A-446A-A6ED-F88DFD85A690.jpeg
    1.9 MB · Views: 145
  • A01AB3B5-E624-48AB-9FF1-94D570B15E0E.jpeg
    A01AB3B5-E624-48AB-9FF1-94D570B15E0E.jpeg
    1.5 MB · Views: 143
  • D22101C2-A1C7-45AD-B3C3-D69EE6F62090.jpeg
    D22101C2-A1C7-45AD-B3C3-D69EE6F62090.jpeg
    1.2 MB · Views: 147
  • FC680E6F-BCC2-418D-9195-BBFD0252A7F2.jpeg
    FC680E6F-BCC2-418D-9195-BBFD0252A7F2.jpeg
    1.7 MB · Views: 178
Assembly is complete. I realize that there are a couple small bits that need to be rotated 180deg up near the nose. I have fixed those, easy fix, just haven updated the pics.

Sounds silly, but it feels like I am holding a part of history here. I have ordered some Archive-X for paint to try them out, so paint will be a couple weeks off yet.

Overall, very happy with how it has turned out!
 

Attachments

  • D73EFD3E-57B3-4357-9997-16569883EA47.jpeg
    D73EFD3E-57B3-4357-9997-16569883EA47.jpeg
    1.6 MB · Views: 135
  • EFF169CE-9898-4BF5-9BCC-3C083393DFE5.jpeg
    EFF169CE-9898-4BF5-9BCC-3C083393DFE5.jpeg
    3.1 MB · Views: 119
  • 62985DD9-E6A4-4443-9B6C-B917288623E3.jpeg
    62985DD9-E6A4-4443-9B6C-B917288623E3.jpeg
    1.4 MB · Views: 122
  • 04EE1058-8AE6-4397-84D0-1DAF14CDC8F3.jpeg
    04EE1058-8AE6-4397-84D0-1DAF14CDC8F3.jpeg
    925.1 KB · Views: 135
So I am starting on the weathering on my pod, overall I think it is a little darker, but I am really excited about how this first weathered panel turned out. I have one more layer off “splatter” I want to do with Dark Grime, but this first layer was done with enamel, so I want to let it dry a bit.

Basically I am trying to recreate the splotchy look as seen in the first photo.

I took a some MIG Starship wash and dabbed it on, then using a clean brush with clean mineral spirits, kind of dabbed and spread the splotches out.

Then using a second brush handle I flicked more of the starship Wash and some Dark Brown enamel paint.

Once this sets I will do the same flick with some thinned Dark Grime, just to add a lighter tone…
 

Attachments

  • A0E91159-9A3A-4167-A075-DA66DE289170.jpeg
    A0E91159-9A3A-4167-A075-DA66DE289170.jpeg
    704 KB · Views: 99
  • AA62565D-5E27-477D-8FBF-3EA137532723.jpeg
    AA62565D-5E27-477D-8FBF-3EA137532723.jpeg
    2.1 MB · Views: 103
  • 2C93F85D-26AD-4C64-8FA6-42364ADDD4F3.jpeg
    2C93F85D-26AD-4C64-8FA6-42364ADDD4F3.jpeg
    2.1 MB · Views: 95
  • FF60A0B5-95B7-4069-BF29-A0D271DB269A.jpeg
    FF60A0B5-95B7-4069-BF29-A0D271DB269A.jpeg
    2.2 MB · Views: 105
I am calling it done. First studio scale build from original kits is in the bag!

The weathering is a little heavy, but I think it still very much reads as Star Wars

I learned a lot on this build and looking to carry that over to future builds. Thanks to those who offered feedback and encouragement!
 

Attachments

  • 738734EE-11F0-47D5-9609-926738F9F8F2.jpeg
    738734EE-11F0-47D5-9609-926738F9F8F2.jpeg
    3.9 MB · Views: 99
  • DAD0028F-E706-4EC3-9545-3741B9E511E5.jpeg
    DAD0028F-E706-4EC3-9545-3741B9E511E5.jpeg
    4.4 MB · Views: 101
  • 7F605932-6CDD-46B0-9ACA-7AEBBB43F060.jpeg
    7F605932-6CDD-46B0-9ACA-7AEBBB43F060.jpeg
    2.3 MB · Views: 98
  • 0EECD352-F6EA-4C4F-86E4-3884D87F4C12.jpeg
    0EECD352-F6EA-4C4F-86E4-3884D87F4C12.jpeg
    2 MB · Views: 89
  • 512CD600-CECD-45FB-883C-65D32624122B.jpeg
    512CD600-CECD-45FB-883C-65D32624122B.jpeg
    2.1 MB · Views: 101
Beautiful and inspiring work! I really want to build one myself. Is there are parts map available for this? Is it 5 kits each of the 3 in the picture of your first post?
 
Beautiful and inspiring work! I really want to build one myself. Is there are parts map available for this? Is it 5 kits each of the 3 in the picture of your first post?

Those are the main parts. You will also need a pack of lamp shades from plastruct and some plastic domes from them as well.

Not included in the picture is a T-34 wheel and the Lotus rim. There is no parts map that I am aware of, but lots of reference out there that clearly shows where the parts go.

Good luck!
 

Your message may be considered spam for the following reasons:

If you wish to reply despite these issues, check the box below before replying.
Be aware that malicious compliance may result in more severe penalties.
Back
Top