IG88 Build

uploadfromtaptalk1432138174336.pngI started with the dream of creating a screen accurate costume of Iggy.
 
I then used this photo to estimate the height of him. He is clearly taller than Vader. Take into account that the camera angle is pointing up, IG88 is 5 feet in the background, and a step down... I approximate that IG88 is between 7'3" and 7'9".
uploadfromtaptalk1432138580068.JPG

Most people who have built him as a prop seem to agree he is more in the 7-8 foot range.

I wanted to see if it could be done. So, I took some pictures of him from ESB, and took a picture of myself. I imported them into a CAD program and scaled them properly. Here was the result.

IG88_Comparison.jpg

I couldn't believe it. It is almost a perfect fit! So, from there I knew that I had to try the impossible.
 
Last edited:
I went ahead and tried to model the head in my CAD software (sketchup). I figured if I could model the head, I could model the rest of the body. Iggy's head is his most distinctive feature (IMHO), and therefore, should be the most accurate. 1 month later, I was able to come up with this.

IG88_Head_CAD.jpg

Yipee! If I could model this, I could model anything (so I thought). I don't have much experience in molding / shaping, costuming, or have any mechanical skills. I am a EE, so I figured I should play to my strong suits (computers, electronics, programming). I decided on acquiring a 3D printer, scanner, and very screen accurate model of IG88. 1 month later, it came in.

IMG_20150520_145545731.jpg
 
I have to note that the 3D scanner wasn't much help. I looked at a few scanners, and talked to a couple people at a 3D printing convention. The technology just isn't there, yet. Here is the best scan I could get from my IG88 model.

IG88_Scan.jpg

Not exactly usable. But, I digress.

The modeling in CAD was a little more difficult than it should have been. A lot of looking back and forth in between screenshots from ESB, and measuring through the CAD program. Finally 3 months later it was mostly complete.

IG88_Total_CAD.jpg

- - - Updated - - -

While modeling in CAD, I started to print out the head. There were a lot of errors while printing. 4 months of printing and I am still fine tuning the printer to be "just right".

Thermal_Detonator_Printing_Issues.jpg

Makerbot_Printing_issues.jpg
 
It took a while to print, but come Mid-February I was finally able to finish printing the Head.

IG88_Head_Print.jpg

I used ABS plastic for the entire build because of its ability to be dissolvable in Acetone. It actually molecularly fuses with itself with the proper amount of acetone. It is almost 1 seemless piece. It was my goal to make the entire costume with the fewest seems possible (to make it easier for 501st approval).
 
Last edited:
Early April came along and I was stressed. I really wanted to get the costume built, painted, and polished for Celebration. This is as far as I got with the rest of the costume.

IG88_Short_Torso.jpg

Needless to say, I was on a war path for the next two weeks. Even during Celebration, I was driving home to work on it more at night.
 
Last edited:
I tried to reach out to a few people with the 501st on day 3 of Celebration. Some seemed interested in seeing the costume. So, on day 4, despite it being far from finished, I took it to Celebration to get some critiques or recommendations from the 501st.

Sadly, due to some parking issues, and the number of pieces / size of the costume, I was dropped off at the other end of the convention wearing the costume.

I ran into some fun people along the way:

IG88_Celebration_Day4.jpg

Haha, I got a lot of flak for my shoes. But I wasn't able to walk very well.

IG88_Celebration_Day4-2.jpg
 
Last edited:
Three hours and what I think was only half a mile later, I made it to the 501st booth. They were very impressed, but those who were there, were not very familiar with IG88, but supportive.

I was able to attend my local garrison's armor party last weekend. I still don't have rifles or grenades, but is closer to where I was hoping I would be at Celebration.

IG88_OC_Troop.jpg

And as a comparison

IG88_OC_Compare.jpg
 
Last edited:
Not that it matters for this build but for future reference, it is best to paint your subject with flat white paint before laser scanning. If you don't want to paint your model then you can cover it in talcum powder. I worked on a laser scanning project many years ago and it seems that they still haven't cracked the shiny surface problem.
 
Okay ... I'm not certain why ... but some of your attachments aren't working for me ... and I'm not on a mobile wireless device ... just my mac with huge cinema display ... please look into it so I can comment properly :)

Chaim
 
Not that it matters for this build but for future reference, it is best to paint your subject with flat white paint before laser scanning. If you don't want to paint your model then you can cover it in talcum powder. I worked on a laser scanning project many years ago and it seems that they still haven't cracked the shiny surface problem.
Thanks for the tip. I didn't want to ruin the model, so, I tried covering it with flour, hoping that would help. It did, but not enough to be worth using the scan. I think the consumer scanners are not there, yet.
 
I am going to try to make this build a little more detailed, hopefully a rough draft to make a CRL.

Like I said before, I started with the Head of IG88. I do not have access to a Derwent Flame Tube, but from other forums, I gleaned the overall measurements. I measured out his head and separated the Head into a several sections to help me break down how to design it. I think these are the minimum amount of sections you would need to accurately make IG88's head.

IG88_CRL_Head_Sections.jpg

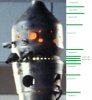
If you can see that, his head is broken up into 10 sections.The bottom Section #1 is not really part of his head, but rather his neck. Although the Derwent Flame Tube utilizes this section as part of the tube.

Section #2 is where we see the Large diameter holes appear. It overlaps Section 1, and has a small band that separates it from Section #3. It is not a pure cylinder because it increases in diameter as it approaches Section #3. It better resembles the bottom piece of a cone in that way.

Section #3 further increases in diameter as it goes up, similar to Section #2, but should be shorter in height (compared to Section #2. Although, its rate of diameter increase is about the same as Section #2.

Section #4 is only visible from a few shots, but as can be seen in this shot, it is stamped with many small holes. This image shoes the "white" light that emanates out of Iggy's head. It is a transition section where it is changing angle ever so slightly from Section #4 to Section #5.

Section #5 appears to not change in diameter, but I believe it does slightly. It is a very short vertical section.

Section #6 increases diameter rapidly, but is a little bit shorter than Section #2, and as such does not appear to increase diameter beyond the largest of Section #2.

Section #7 contains most all the "greeblies" and red lights. A Longer section that does not increase diameter.

Section #8 rapidly decreases diameter as it approaches the top of the head.

Section #9 is separated by a visible divet with some holes in it.

Section #10 proceeds from Section #9 narrowing towards the top of the head. It is separated by a change in the decrease of diameter towards the tip. The tip is not uniformly round in height, and from someone with a Derwent Flame tube, they said that is accurate, and that the tip concaves inward into itself.

Specifics for Each Section:

Section #1. Shall be relatively straight in diameter, and must fit within the rest of the head.

Section #2: Must have 4 large diameter holes equally spaced apart around its circumference, and must increase in diameter from bottom to top.

Section #3: Must not have any holes, and continue increasing in diameter roughly the same as Section #1.

Section #4: Must transition Section #3 with a round edge, and must decrease the diameter of the flame tube. It should have many holes in it only visible from above the line of sight of the Section #3. Roughly 20-40 holes must be in this section. It must also house the "binos"

Section #5: Should be mostly vertical with no hole in it.

Section #6: Should increase in diameter from Section #5 to Section #7 with no holes in it.

Section #7: Should be slightly larger in diameter than Section #3's largest diameter. It Should have 2 large holes for Red "eyes", 9 smaller holes for red lights, 5 small "greeblies", and 1 "scoped lens". Along with about 14 alternating slits near the top of Section #7, alternating with 14 other slits right above the first 14.

Section #8: Should have a "dome" transition from Section #7 to Section #9, and it shall have no holes it it.

Section #9: Shall start with a small "divet" as the transition from Section #8. There may or may not be a couple slits in the transition.

Section #10: Shall not be uniform in height and shall indent on top.
 

Attachments

  • IG88_CRL_Head_Sections.jpg
    IG88_CRL_Head_Sections.jpg
    92.6 KB · Views: 150
Last edited:
Haven't posted in a while, I have been playing around with reducing sizes where I could, none of it really panned out.

So, I will work on the Second portion of the "CRL", the Upper Torso. Despite being a robot, IG88 has the same skeletal figure as a human.

IG88_CRL_Total_Sections.jpg

He has a Head with possibly "eyes".
He has a small neck section.
He has an upper torso with shoulders and a chest region.
His upper torso tapers into his midsection / abdominal region.
His midsection goes into his hips / groin region.
He has legs with thicker thighs than shins.
He has arms with biceps, elbows, forearms, and "hands".

I will focus on the Upper Torso region here.

IG88_CRL_Chest_Sections.jpg

It is fairly easy to describe his upper torso as it can be seen as symmetrical. I have yet to find out what the original builders made his chest from.

Section #1: His shoulder sockets. They are the end of his torso, domed at the end with a small cylindrical inset. They extend uniformly around the socket to the rest of the chest.

Section #2: His shoulder air pockets. They have a rectangular inset into the shoulder.

Section #3: His shoulder "pads". They are assumed to make a "U" shape around his neck with some obvious bulges.

Section #4: His "neck opening". It is assumed to be short and cylindrical.

Section #5: His chest "wheel". This is a detail that is often mis-drawn on models and images of him. It is not quite a wheel like most depict it to be because the edges concave inward at the top near his "neck opening". It is assumed that this feature is replicated on his back.

Section #6: "Ball hinge?". Not sure what to call this. Looks like a ball hinge that was melted into a ball of goop, possible via welding.

Section #7: The bottom of the upper chest. It can be seen that the upper torso looks like a complete separate piece when looking at this section. His upper torso in general is like a "taco" in that it wraps around his shoulders, but is uniformly cut horizontally at the bottom. right below the "ball hinge" it appears to indent towards his body.

Specifics for Each Section:

Section #1: Should be domed at the end, with no opening to allow the arm to be brought on the same plane as the body. There should be a short extension away from the rest of the torso and section #2.

Section #2: should have a couple (2-4) rectangular holes in it, preferably with protection underneath the holes.

Section #3: Should make a "U" shape around the neckpiece and extend down the chest a few inches. Preferably it should have bulges consistent with the picture.

Section #4: Should be cylindrical with a greater diameter than the neck, and extend a couple inches into the torso.

Section #5: Should bulge out from the chest in a round formation, and should have a black mesh material on its right side and hoses into its left side from the front canisters.

Section #6: The "Ball hinge" should look similar to the one here.

Section #7: Should look horizontally parallel to the ground.
 
Haven't posted in a while, I have been playing around with arm proportions, but nothing really changed.

So, I will work on the Third portion of the "CRL", the Midsection.


IG88_CRL_Midsection-1_Sections.jpg

IG88_CRL_Midsection-2_Sections.jpg

His midsection is a little difficult to describe because it is cover by a lot of his "canisters", bandoleer, and hoses.

Section #1: The base layer of his midsection is an elliptical cylinder with hoses attached at various locations.

Front Canisters: He has two sets of front canisters that seem to be the same set of canisters on his left front and right front of his midsection.

Side Canisters: He has two large canisters on each side of him just behind his arms.

Rear Canisters: It is assumed that two canisters are connected together the size of his side canisters in the middle of his midsection back.

Chest Spike: There is a small spike extending a short distance outside the top middle of his midsection.

Specifics for Each Section:

Section #1: Should be relatively flat in the front and the back, and curved on the sides.

Front Canisters: Should be two on each side of the midsection. The canisters should be cylindrical with slightly larger diameter caps at the top and bottom. They should be almost bonded together in the middle of the two canisters by their "through bushings". The left canister of the pair of canisters should have four bushings on its left side grouped with two near the top, one in the middle, and one near the bottom. Those bushings should extend through the canister into the right canister, and should further extend out of the right side of the canister (with the exception of the middle bushing). The top of the canisters should have small nipples at their top cap, and the left pair of canisters should have hoses attached to them. The bottom should have two piston rods extending out and attaching to a single piece.

Side Canisters: Should be visibly larger than the front canisters. There should be one on each side just behind the plane of the arms.

Chest Spike: Should be visible from the front and should not extend past the bandoleer.

Hoses: Should be close to the ESB picture shown in this post.
 
This thread is more than 7 years old.

Your message may be considered spam for the following reasons:

  1. This thread hasn't been active in some time. A new post in this thread might not contribute constructively to this discussion after so long.
If you wish to reply despite these issues, check the box below before replying.
Be aware that malicious compliance may result in more severe penalties.
Back
Top