I need revolver "clicky bits" design ideas...

Rook 3

Sr Member
RPF PREMIUM MEMBER
I have a resin revolver. I want to make it so the trigger moves and the hammer pulls back and clicks forward.

I know that there are "old school" toy revolvers or even cap guns that used rubber bands to accomplish the same thing. I need some photos/design ideas so I can engineer such a thing.

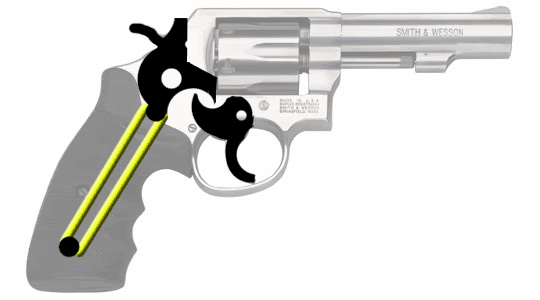
Operate from the assumption that the resin revolver I have is already hollow and "all" I'd need to do would be to fabricate the hammer, trigger and support/pin/bolt positions to make it work.

All I want is to squeeze the trigger and have it go "click."

Any and all help appreciated.

Russ
 
Also, look around for gunsmiths local to where you are. It's pretty common for 'em to have boxes of all kinds of old parts lying around. You might be able to get a metal hammer, trigger, and hand (the part that advances the cylinder when the hammer moves back) for not much cash at all, especially if they came from a POS gun, or were pulled out of a busted gun and can't work in a real gun anymore.
 
I want the design to be simple so I can recreate it as needed, as I said, like the toy guns of old. :)

Thanks for the ideas so far though.

Russ
 
does it need to work single-action as well? (as in, do you want to be able to manually cock the hammer as well as fire it with just the trigger?) That mechanism is slightly more complicated.

Also.. isn't resin rather shock-sensitive? I'd be a little concerned about the falling hammer cracking the resin. Anyhow, I'll try to come up with simple mechanism for you tonight..
 
Here's someplace to start -- simple rubber-band power. :)

revolver.gif


The trick is going to be getting the sear (in this case, the part on the trigger levering up the hammer) back on the other side of the hammer hook after you've fired. The simplest solution is just to partially thumb-cock the hammer and manually move the trigger back into position. A more complex but more realistic option is to use a spring-loaded gate in the hammer hook to allow the sear back inside the curved area. You'll also prolly want to put in a little spring or tiny rubber band to return the trigger to firing position when you let it go.

Seriously though.. the easiest solution prolly will be cannibalizing something already existing, whether from a real gun or a toy.
 
I wouldn't worry about the hammer hitting the resin there, it's pretty strong in that spot.

I wonder if one could make the pivot point of the hammer oblong in shape, so when the hammer falls it pushes back through the open space and resets into the first position.

Good ideas thus far though.

Russ
 
Here's something I threw together quick, so keep that in mind. It also assumes that the barrel of the gun is to the LEFT.

trigger02.gif
(Not To Scale)

White "dots" are pivot points. Red line is a rubberband around five black "pins". Pull the trigger to the right, the hammer goes back to the right. The top part of the trigger will slip past the parallelogram part in the middle, releasing the hammer. The hammer will then travel to the left, under the tension of the rubberband, simulating a firing motion. Release the trigger, and under it's tension of the rubberband, will travel to the left, rotating the parallelogram counter-clockwise which allows the trigger to go back to it's original position. Rinse and repeat for multiple "shots".

Sorry if I didn't explain very well. Also sorry if the picture isn't all that great - if need be, I can work it some more for clarity.

-G
 
That's a good idea, but doesn't it put the trigger behind the hammer (unlike the regular arrangement of the hammer behind the trigger), assuming as you said the barrel is to the left?

Neat design.

Russ
 
<div class='quotetop'>(Rook 3 @ Jun 2 2006, 08:47 AM)</div>
That's a good idea, but doesn't it put the trigger behind the hammer (unlike the regular arrangement of the hammer behind the trigger), assuming as you said the barrel is to the left?[/b]
Yes, in my drawing it does. However, this is just a detail of the mechanical guts. At the top of the "hammer" section, you can have an offset to place the actual visually exposed hammer on top of, or behind the trigger. Here's an example where both the hammer and trigger modules have been offset to put the trigger in front of the hammer:

trigger03.GIF


<div class='quotetop'>(Rook 3 @ Jun 2 2006, 08:47 AM)</div>
Neat design.[/b]
Thank you very much. I'm not a mechanical engineer or anything, but this sometimes this stuff really gets my brain moving.
 
This thread is more than 17 years old.

Your message may be considered spam for the following reasons:

  1. This thread hasn't been active in some time. A new post in this thread might not contribute constructively to this discussion after so long.
If you wish to reply despite these issues, check the box below before replying.
Be aware that malicious compliance may result in more severe penalties.
Back
Top