ProfCoppersmith
New Member
(I hope this is in the right forum, if its not: I'm sorry. Mods please correct me if I'm posting this in the wrong place. Thanks)
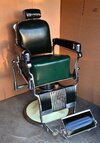
I'm working on a set piece for work that is based on a 1950's Takara Belmont Barber Chair. The problem is that it's leaking hydraulic fluid. It doesn't need to be functional, so I want to just drain it fully so I can get it cleaned up (preferably without making an even bigger mess in the prosses) and start turning it into a miniature navigation bridge for the set it goes on.
Any help would be awesome here. I've been trying to find info on this chair and have yet to find anything useful. No manuals or maintenance instructions. It may just be too old and obscure.
Thanks in advance! ^_^
")