Astrokid248
Well-Known Member
NOTICE: I'll be adding pictures in a few hours once I find my hard drive, but until then I'm posting this anyways so I don't forget I wanted to post this/save this somewhere I'll forget/forget just how terrible my first attempt at prop-making was. Thanks for your patience!
My first build log! I tackled the Hylian shield over the summer when I had two days of free time, but screwed it up. I'm getting started on it again in a few weeks, but I wanted to put my rookie mistakes up first. I actually made two shields, both of which are inaccurate and incomplete.
Attempt #1
I didn't get any pictures of this one, but it's currently my practice shield for learning the martial style Link uses. When I got Twilight Princess, I was also given the official playthrough guide, so I freehanded a design directly onto my wood from the artwork in that guide. I used three pieces of 3/4" furniture grade plywood and attempted to sand it down to the right curvature. When I gave up on it, the curvature was basically octagonal, the shield was proportionally taller than the game model, and the entire thing was too small/too heavy. The width was 16".
Attempt #2
I decided to slog through Volpin's flickr to see if there was any process I could glean from his previous work. I instead found the actual shield build log. Thanks Volpin!


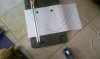
I purchased his plans, and made a back view from my own research. This was printed out to have a width of 20", and then chopped up for each individual portion of the shield.


I made the backing board out of 3/8" kinda-plywood, with one solid piece and one piece cut to match the raised edges of the back. This was cut with a jigsaw, and I'm kind of proud of how well I followed the pattern.

I had to improvise a glue stand with an anvil and a really rickety aluminum tube. Safe? No. Effective? Enough. I drilled holes for where I'd eventually attach the straps and handle, and inserted t-nuts with a bit of epoxy.
Here, I did the same thing I did in attempt one, but with pink insulation foam instead of plywood.

I tried to get the right curvature with an orbital sander. (I failed.)

After I got the entire face curved, I cut the border from a second piece of foam, and then cut the border off of the curved face.

I glued the curved border on top of the flat border, and shoved the center back inside of it. (I made the mistake of angling my exacto knife, so it was far from a perfect fit.) This gave me what would have been a matched curvature if I had actually executed properly. Everything was tacked together with spray glue, and I learned why you don't tack insulation foam together with spray glue. Why I thought glue would be different than paint, I dunno, but I did. Bad move.

I also carved the four filigree pieces from foam. Now, Volpin said he specifically didn't do this because of the foam not holding an edge well. This wasn't my experience. After shanking my hand with the exacto, I got a process down that allowed it to have the right shape, and where I messed up I slopped on some spackling. When I redo everything, I'll do it with styrene bones and clay fill, but the foam does work in a pinch.

And then the entire thing got spackled because I miscalculated the curvature.

Next, I went inside and brought the shield with me to confirm my growing suspicions. This is the point where I realized that my shield was just not gonna be accurate. I raise the edge too high and didn't curve the inside enough, and the interior was too thick to start with. 16" barely fit my little t-rex arms, but this 20" made me look...well, exactly like what I am. (Goofy selfie so you can see just how off the size was.)

So I did the only thing I could think of: see what happens when you spray paint insulation foam. I coated the whole thing in 2-part epoxy and then sprayed the crap out of it, and the places I missed formed satisfying voids.
Attempt #3 (in progress)
Planned changes: I'll size my plans to 18". I actually bothered measuring my arm, and that should fit perfectly. Same process on the foam carving, but I purchased some Loctite spray glue that is safe for use on foam. I'll curve it before I cut out either the outer shape or the raised perimeter, and then I'll experiment with using a heated cheese wire instead of an exacto knife so that everything stays clean/perpendicular. When I raise the perimeter, instead of putting a full piece underneath, I'll put in a piece cut in half. That should make the edge short enough. Instead of using spackling, I want to hard-coat the foam and use bondo so my edges are cleaner.
Will update as things move along. Quick question: if I purchase plans from another propper, but the plans are only for half the prop, requiring my embellishment, can I sell a prop made from those plans? Because of all the recasting crapolla going around, I want to be sure before I attempt to sell anything. (Obviously I'd give Volpin credit, but I'm not sure if that's enough in this situation.) If anyone has knowledge on the matter, please let me know.
My first build log! I tackled the Hylian shield over the summer when I had two days of free time, but screwed it up. I'm getting started on it again in a few weeks, but I wanted to put my rookie mistakes up first. I actually made two shields, both of which are inaccurate and incomplete.
Attempt #1
I didn't get any pictures of this one, but it's currently my practice shield for learning the martial style Link uses. When I got Twilight Princess, I was also given the official playthrough guide, so I freehanded a design directly onto my wood from the artwork in that guide. I used three pieces of 3/4" furniture grade plywood and attempted to sand it down to the right curvature. When I gave up on it, the curvature was basically octagonal, the shield was proportionally taller than the game model, and the entire thing was too small/too heavy. The width was 16".
Attempt #2
I decided to slog through Volpin's flickr to see if there was any process I could glean from his previous work. I instead found the actual shield build log. Thanks Volpin!
I purchased his plans, and made a back view from my own research. This was printed out to have a width of 20", and then chopped up for each individual portion of the shield.
I made the backing board out of 3/8" kinda-plywood, with one solid piece and one piece cut to match the raised edges of the back. This was cut with a jigsaw, and I'm kind of proud of how well I followed the pattern.
I had to improvise a glue stand with an anvil and a really rickety aluminum tube. Safe? No. Effective? Enough. I drilled holes for where I'd eventually attach the straps and handle, and inserted t-nuts with a bit of epoxy.
Here, I did the same thing I did in attempt one, but with pink insulation foam instead of plywood.
I tried to get the right curvature with an orbital sander. (I failed.)
After I got the entire face curved, I cut the border from a second piece of foam, and then cut the border off of the curved face.
I glued the curved border on top of the flat border, and shoved the center back inside of it. (I made the mistake of angling my exacto knife, so it was far from a perfect fit.) This gave me what would have been a matched curvature if I had actually executed properly. Everything was tacked together with spray glue, and I learned why you don't tack insulation foam together with spray glue. Why I thought glue would be different than paint, I dunno, but I did. Bad move.
I also carved the four filigree pieces from foam. Now, Volpin said he specifically didn't do this because of the foam not holding an edge well. This wasn't my experience. After shanking my hand with the exacto, I got a process down that allowed it to have the right shape, and where I messed up I slopped on some spackling. When I redo everything, I'll do it with styrene bones and clay fill, but the foam does work in a pinch.
And then the entire thing got spackled because I miscalculated the curvature.
Next, I went inside and brought the shield with me to confirm my growing suspicions. This is the point where I realized that my shield was just not gonna be accurate. I raise the edge too high and didn't curve the inside enough, and the interior was too thick to start with. 16" barely fit my little t-rex arms, but this 20" made me look...well, exactly like what I am. (Goofy selfie so you can see just how off the size was.)
So I did the only thing I could think of: see what happens when you spray paint insulation foam. I coated the whole thing in 2-part epoxy and then sprayed the crap out of it, and the places I missed formed satisfying voids.
Attempt #3 (in progress)
Planned changes: I'll size my plans to 18". I actually bothered measuring my arm, and that should fit perfectly. Same process on the foam carving, but I purchased some Loctite spray glue that is safe for use on foam. I'll curve it before I cut out either the outer shape or the raised perimeter, and then I'll experiment with using a heated cheese wire instead of an exacto knife so that everything stays clean/perpendicular. When I raise the perimeter, instead of putting a full piece underneath, I'll put in a piece cut in half. That should make the edge short enough. Instead of using spackling, I want to hard-coat the foam and use bondo so my edges are cleaner.
Will update as things move along. Quick question: if I purchase plans from another propper, but the plans are only for half the prop, requiring my embellishment, can I sell a prop made from those plans? Because of all the recasting crapolla going around, I want to be sure before I attempt to sell anything. (Obviously I'd give Volpin credit, but I'm not sure if that's enough in this situation.) If anyone has knowledge on the matter, please let me know.
Attachments
Last edited: