Hulk Cosplay/Costume/wall decor.

Rocket Rider

Active Member
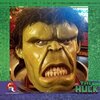
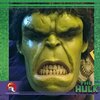
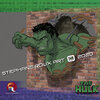
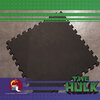
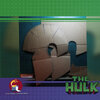
This past holiday season new project. It's mostly - for now at least - going to be a wall decor for my studio. A prop, if you will. But I can't promise I won't turn it into a cosplay once I get more comfortable with the size of it (roughly 8'5") and a few articulation issues I anticipate.
At any rate, here are both the first design and a better simulation of what I have been meaning to ornate my studio wall with for a looong time!
I hope you like it!

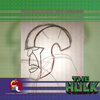
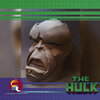
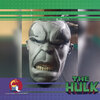
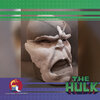
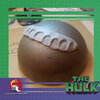
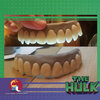
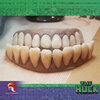
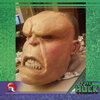
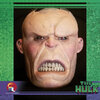
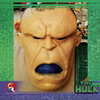
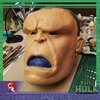
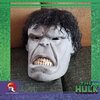
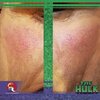
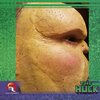
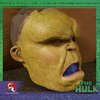
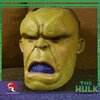
I started with a basic head shape out of E.V.A foam and built the face features making sure the most relevant volumes were there- even if it meant exaggerating them.
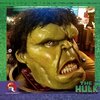
 

Attachments

  • IG square WIP 00.jpg
    IG square WIP 00.jpg
    694.2 KB · Views: 121
  • IG square WIP 00-B.jpg
    IG square WIP 00-B.jpg
    805.7 KB · Views: 101
  • IG square WIP 01.jpg
    IG square WIP 01.jpg
    482.6 KB · Views: 107
  • IG square WIP 02.jpg
    IG square WIP 02.jpg
    480 KB · Views: 100
  • IG square WIP 03.jpg
    IG square WIP 03.jpg
    450.4 KB · Views: 107
  • IG square WIP 04.jpg
    IG square WIP 04.jpg
    488.2 KB · Views: 119
  • IG square WIP 05.jpg
    IG square WIP 05.jpg
    452.3 KB · Views: 114
I then used Foam Clay over it. I got lucky with the brand I picked - Masked Dad Workshop - as I found out later on, there are a tiny differences in texture and the way it cures from one brand to the other.

It was a first for me and I figured its potential pretty quickly. The face was done in a day and a half, over a weekend. I made the teeth with translucent Sculpey clay and the gums out of Firm ( grey ) Super Sculpey.
 

Attachments

  • IG-square-WIP-08.jpg
    IG-square-WIP-08.jpg
    133.2 KB · Views: 95
  • IG-square-WIP-07.jpg
    IG-square-WIP-07.jpg
    121.3 KB · Views: 108
  • IG-square-WIP-06.jpg
    IG-square-WIP-06.jpg
    125.6 KB · Views: 100
  • IG-square-WIP-08-B.jpg
    IG-square-WIP-08-B.jpg
    129.9 KB · Views: 110
  • IG-square-WIP-10.jpg
    IG-square-WIP-10.jpg
    129.3 KB · Views: 95
  • IG-square-WIP-11.jpg
    IG-square-WIP-11.jpg
    138.9 KB · Views: 99
  • IG-square-WIP-14.jpg
    IG-square-WIP-14.jpg
    157.6 KB · Views: 98
I did a wig test and I got lucky with the one I picked up from Amazon. Hulk could end up looking more like a jacked Little Richard if you place the wig hastily. This being said, with just a little time spent adjusting, there is barely any trimming at all to make it look decent. That is something I'll really address in the end, anyway.
I sensed I had to paint the face in flesh tones colors at first, if I wanted to have some sort of glow/translucency on an otherwise pretty opaque material. That implies I would have to apply the treatment to the rest of the body. Great.
Somehow, he looks creepier in pink.
I made sure any effect - such as rosacea, veins, and liver spots - would be painted on this skin tone, before I applied the gamma green layer.
 

Attachments

  • IG-square-WIP-21.jpg
    IG-square-WIP-21.jpg
    248.3 KB · Views: 73
  • IG-square-WIP-20.jpg
    IG-square-WIP-20.jpg
    243.8 KB · Views: 78
  • IG-square-WIP-19.jpg
    IG-square-WIP-19.jpg
    227.3 KB · Views: 76
  • IG-square-WIP-18.jpg
    IG-square-WIP-18.jpg
    270.2 KB · Views: 79
  • IG-square-WIP-17.jpg
    IG-square-WIP-17.jpg
    267.5 KB · Views: 66
  • IG-square-WIP-16.jpg
    IG-square-WIP-16.jpg
    295.3 KB · Views: 80
  • IG-square-WIP-15.jpg
    IG-square-WIP-15.jpg
    309.9 KB · Views: 78
A few more pics, with details on the rosacea FX. Brush painting detail - like the veins and liver spots - with a natural sponge gentle dab. same technique was used for the layers of gamma green skin tones. It's starting to look like what i had in mind. I am glad I opted for the pink skin tone prior to the green. I stay in charge as to where I want the green to take over and where I don't.
The cheeks in particular, I try not to cover them too much and ruin the FX I was so lucky to get in the first place!

"If It ain't broken"... "Less is more"... and All That Jazz!
 

Attachments

  • IG-square-WIP-22.jpg
    IG-square-WIP-22.jpg
    103 KB · Views: 66
  • IG-square-WIP-23.jpg
    IG-square-WIP-23.jpg
    117.4 KB · Views: 66
  • IG-square-WIP-24.jpg
    IG-square-WIP-24.jpg
    137.2 KB · Views: 76
  • IG-square-WIP-25.jpg
    IG-square-WIP-25.jpg
    131.1 KB · Views: 68
  • IG-square-WIP-26.jpg
    IG-square-WIP-26.jpg
    137.5 KB · Views: 73
I made the eyes totally custom too, as the ones I had were too small for the size of the head. I'll show the details later. For now, I was so excited with the first try-out with the wig AND the painted head that I decided to play with the lighting and found myself inadvertently recreating one of Alex Ross' iconic Hulk covers. I hadn't even glued the eyebrows but the character was already there!

For the record, I am 6'6" and that's me on the last picture. Yep, That's how big the head is... ;)
 

Attachments

  • IG-square-WIP-27.jpg
    IG-square-WIP-27.jpg
    104.8 KB · Views: 100
  • IG-square-WIP-28.jpg
    IG-square-WIP-28.jpg
    137.6 KB · Views: 87
  • IG-square-WIP-29.jpg
    IG-square-WIP-29.jpg
    140.9 KB · Views: 79
  • IG-square-WIP-30.jpg
    IG-square-WIP-30.jpg
    125.3 KB · Views: 88
  • IG-square-WIP-31.jpg
    IG-square-WIP-31.jpg
    104.4 KB · Views: 111
  • La-big-head.jpg
    La-big-head.jpg
    126.9 KB · Views: 106
Last edited:

Your message may be considered spam for the following reasons:

If you wish to reply despite these issues, check the box below before replying.
Be aware that malicious compliance may result in more severe penalties.
Back
Top