You are using an out of date browser. It may not display this or other websites correctly.
You should upgrade or use an alternative browser.
You should upgrade or use an alternative browser.
Horizon's Baby T-Rex
- Thread starter Broilermaker
- Start date
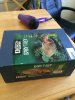
I mentioned in another thread how i'm amazed these kits keep turning up and this is another example of how nice all their kits were. I wish someone would have bought the rights to the molds and reissued them. I thought 80 was pricey for the one i got back in the mid 80s but now it's way up there.
Broilermaker
Sr Member
Ok, I have found out that locktite super glue does not work on this resin, so tomorrow I will go to the model store and get some zap a gap
Broilermaker
Sr Member
I am cheap also, I didn't think I paid that much for the kit but then I remembered how long I wanted it before buying it, so it must have been pricey
Broilermaker
Sr Member
Voodoocaster
Well-Known Member
Could you do me a favor and post a picture of the model with a soda can or something?
I always wondered about the size of this kit.
Some unasked advise,..i think the kit is made in vinyl and not resin.
Vinyl is sensitive to heat which is a good and a bad thing.
The good is that you can dip the parts in warm water and get a perfect fit,.the bad is that over time the heat of the sun or environtment could distort the shape of the model(especialy a big hollow kit like this).
If i were you i would fill the kit up with expanding foam so the shape will maintain.
Also vinyl is known to cause reactions (no curing of the paint)with enamel and or oil paints so a primer is a must if you want to use these kind of paints.
The primer can't be enamel based either or you'll run the same risk,...so an acrylic/alkyd primer maybe even lacquer primer is advisable.
After that you are good to go with any kind of paint including enamel/oilpaints.
Looking good so far,..can't wait for the paint to go on.
Succes
Last edited:
Axlotl
Master Member
Could you do me a favor and post a picture of the model with a soda can or something?
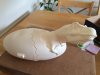
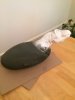
You can just see a little bottle of Zap-A-Gap under his chin.
That should give you a pretty good idea of the size.
Looks to be about 16-18 inches. Much bigger than I expected.
Broilermaker
Sr Member
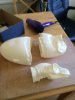
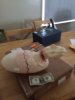
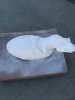
Yes you are right it is vinyl, thanks for the advice on the paint, I will start out with laquer sanding sealer, and then prime it. The egg is about 13" long, 5.5" tall, 7" wide, tip of the nostril stands at about 8.5" tall, wished I'd filled it all before I trimmed it. As far as scale a dollar bill is 6" long
Attachments
Voodoocaster
Well-Known Member
Thanks!!")
You could still fill it,...just make a small hole in the bottom of the egg and spray some isolation foam in it.
After curing you can fill the hole.
You could still fill it,...just make a small hole in the bottom of the egg and spray some isolation foam in it.
After curing you can fill the hole.
Last edited:
Broilermaker
Sr Member
Broilermaker
Sr Member
Broilermaker
Sr Member

Voodoocaster
Well-Known Member
You've got my full attention!
I'm curious where you will take it.
I'm curious where you will take it.
Broilermaker
Sr Member
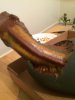
Ok base colors are on. They are rust, light brown (hard to tell apart from rust, wood, and gloss olive drab. This is the base coat and does NOT represent the colors this will be. I read a long time ago that to paint a bird realistically you paint it black first, so that is where I am coming from 
Broilermaker
Sr Member
Should I show the steps for the next part? Yes or no you guys decide
Broilermaker
Sr Member
Broilermaker
Sr Member
Voodoocaster
Well-Known Member
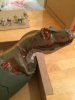
Hey that's neat!:lol
Nice yellow stripe on the green,..the brownish/red is that supposed to be blood?
I will be following your steps.
Nice yellow stripe on the green,..the brownish/red is that supposed to be blood?
I will be following your steps.
Broilermaker
Sr Member
No it is just a base coat I have steps I need to do before I deal with those areas
Similar threads
- Replies
- 17
- Views
- 1,750
- Replies
- 19
- Views
- 1,110
- Replies
- 22
- Views
- 840