Historical prop: The plutonium carrying box for the Fat Man bomb

Ross Sackett

New Member
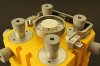
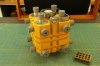
I've been lurking for a couple years and have greatly enjoyed the creativity and maker comradery here on the RPF, and decided it's finally time to post something. I'm becoming interested in replicas of historical artifacts. I realize this might not be exactly what this forum is about, but here is my prop replica of the magnesium box used to carry the fist-sized plutonium "pit" for the Fat Man bomb dropped on Nagasaki. There are only a few reference photos of the original box on Tinian, but they show enough to reverse engineer the main details. Thanks for the inspiration, everyone!

Replica 2.jpg
 

Attachments

  • Replica 4.jpg
    Replica 4.jpg
    7.9 MB · Views: 712
  • Rep;lica 3.jpg
    Rep;lica 3.jpg
    8.8 MB · Views: 760
Last edited:
This is pretty amazing. I had no idea the cores were carried or transported in such a fashion, but it makes a bit of intuitive sense. You could have honest to god told me this was a prop from Fallout and I'd have believed it, though. Very well realized.

I'm assuming this is a 3d print, but the 'prongs' look like rubberized cane feet, so I'm not sure. Do you have any WIP pictures? Did you model an interior? Can it open?
 
Thanks. It is a scratch build of Last-a-Foam tooling board, ABS, phenolic, machined aluminum, a dial thermometer, and #6 test tube stoppers (just like the original). It is full scale, so the main body is approximately a cube about seven inches across. The body paint is acrylic, with Alclad aluminum and silver Rub'n Buff on the metal(lized) parts. It is lightly weathered to an approximation of seven decades of lab shelf grime.

There are several photos of three different variants of the original boxes, but the interior details remain obscure (and might still be classified). Here's Alex Wellerstein's blog on the pit boxes: http://blog.nuclearsecrecy.com/2014/03/28/plutonium-box/
 
Last edited:
Here's a WIP montage
Top row: gluing up a cube of tooling foam...machining the grooves on router table...laying down the body paint
Middle row: attaching the painted and weathered test tube stoppers...machining the aluminum 'plugs'...test fitting the plugs
Bottom row: heat bending the ABS handle...metallizing the handle and attaching the phenolic scales...the first all-up fitting

Total elapsed time: about one month, with time out for an Italian vacation.

WIP montage.jpg
 
Looks great!
We made one for a film recently. For your plutonium core, you can use a stainless steel dog food bowl gulping deterrent ball. They are very close to the size of the real cores.
 
This thread is more than 6 years old.

Your message may be considered spam for the following reasons:

  1. This thread hasn't been active in some time. A new post in this thread might not contribute constructively to this discussion after so long.
If you wish to reply despite these issues, check the box below before replying.
Be aware that malicious compliance may result in more severe penalties.
Back
Top