Help With Molding A Stone Guard?

NathansPROPS

Active Member
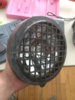
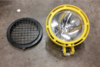
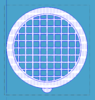
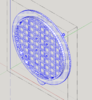
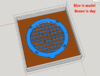
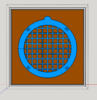
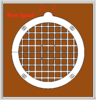
Hello All, I was wondering if I could get feedback and advice on the “proper” way to mold something. It’s a stone guard for a light and is a bit tricky for me to come up with a way to mold it. The original part of the light its off of was made from a manufactured injection mold of it. I know it will be a two part mold but still need help figuring out where the pour spout will be and the best way to mold it so that there’s not too many air bubbles or holes in it. I don’t have access to a pressure pot so its sort of crucial that the guard part of the stone guard that protects the bulb comes out not too thin in areas. Below I have provided Orthographic views of the model I 3d printed for anyone to download and draw on for posting a way of molding it. I am a visual person so drawings with explanations work best for me to understand something. I have also provided a mock up model of the mold I was thinking of doing as well and have labeled the parts of it. Any suggestions would be most appreciated.
 

Attachments

  • Screen Shot 2019-01-08 at 10.48.59 AM.png
    Screen Shot 2019-01-08 at 10.48.59 AM.png
    68.9 KB · Views: 181
  • Screen Shot 2019-01-08 at 10.49.07 AM.png
    Screen Shot 2019-01-08 at 10.49.07 AM.png
    93.9 KB · Views: 164
  • Screen Shot 2019-01-08 at 10.49.13 AM.png
    Screen Shot 2019-01-08 at 10.49.13 AM.png
    123.5 KB · Views: 170
  • Screen Shot 2019-01-08 at 10.49.19 AM.png
    Screen Shot 2019-01-08 at 10.49.19 AM.png
    121 KB · Views: 166
  • Screen Shot 2019-01-08 at 10.49.35 AM.png
    Screen Shot 2019-01-08 at 10.49.35 AM.png
    219.4 KB · Views: 179
  • Screen Shot 2019-01-08 at 11.08.05 AM.png
    Screen Shot 2019-01-08 at 11.08.05 AM.png
    166.1 KB · Views: 174
  • Screen Shot 2019-01-08 at 11.08.13 AM.png
    Screen Shot 2019-01-08 at 11.08.13 AM.png
    93.1 KB · Views: 170
  • Screen Shot 2018-11-27 at 7.05.35 PM.png
    Screen Shot 2018-11-27 at 7.05.35 PM.png
    65.2 KB · Views: 175
What material are you making it out of?
That mesh pattern is going to be a pain to cast. You could do it the way you've planned, but I suspect you'd need several air vents to prevent bubbles from forming in there.
Is it necessary for the mesh portion to be cast in one piece with the frame? If you could split the model in two parts so that the mesh portion can be poured flat as a one part mold, that would really simplify your casting.

Or if you could eliminate the step in from the outer ring to the bottom ring around the mesh so that the whole thing can be poured up in one open-faced part.
 
the material for casting is more important here than tricks with moulding. Its a basic two part mould. The final cast part will have to be durable enough to hold together. Generic cheap casting resin could work, but its strength and longevity is the question. If I were casting the part I would use MPK90 high impact plastic.
Casting Resins - Hobby Silicone

A "pour" should work but I suggest coating the mould with graphite powder first. You can get more than enough for cheap by picking up a lock and key lubrication tube of graphite. A little goes a long way and be warned, its messy if youre not careful. The graphite will coat the silicone like glass not allowing air to be trapped. The air bubbles just slide right off when the mould is shaken and tapped as the material settles.
I say the pour method should work as when ive had to make the same type of parts, some would pour, others needed a pre fill, close mould, then fill/pour all in one shot.

Youll likely need two other vents on either side to vent the air as the material is poured. If not youll just burp it until the material is curing or on the floor.
 
What material are you making it out of?
That mesh pattern is going to be a pain to cast. You could do it the way you've planned, but I suspect you'd need several air vents to prevent bubbles from forming in there.
Is it necessary for the mesh portion to be cast in one piece with the frame? If you could split the model in two parts so that the mesh portion can be poured flat as a one part mold, that would really simplify your casting.

Or if you could eliminate the step in from the outer ring to the bottom ring around the mesh so that the whole thing can be poured up in one open-faced part.
Hello and thank you for the response, I was planning on making it out of smooth on Onyx resin. Ideally it is important for the mesh to be one piece with the rest of the part. I do understand what your saying with regards to taking the mesh and making the part two separate pieces that can work and I will keep that in mind. The reason the mesh part has a step is because I was modeling the original light design and thats how it is, Im trying to make a accurate reproduction of the light in hand.
Heres some photos, My light to the left and the Real light on the right (PHOTO CREDIT THANKS TO CYRIX9445)

the material for casting is more important here than tricks with moulding. Its a basic two part mould. The final cast part will have to be durable enough to hold together. Generic cheap casting resin could work, but its strength and longevity is the question. If I were casting the part I would use MPK90 high impact plastic.
Casting Resins - Hobby Silicone

A "pour" should work but I suggest coating the mould with graphite powder first. You can get more than enough for cheap by picking up a lock and key lubrication tube of graphite. A little goes a long way and be warned, its messy if youre not careful. The graphite will coat the silicone like glass not allowing air to be trapped. The air bubbles just slide right off when the mould is shaken and tapped as the material settles.
I say the pour method should work as when ive had to make the same type of parts, some would pour, others needed a pre fill, close mould, then fill/pour all in one shot.

Youll likely need two other vents on either side to vent the air as the material is poured. If not youll just burp it until the material is curing or on the floor.
Hello and thank you for the response, I plan on using Smooth On's Onyx casting resin for the part. These lights that I'm making were off road lights for cars and trucks. Thats why they have that stone guard there to protect the bulb. Plus the original Light was manufactured in "Rugged DuPont Nylon Housing" same for the Guard. Thats a very interesting way of casting with the graphite. I too will keep that in mind, Also robstyle I do appreciate you telling me that ill need more vents for the mold, But Could you possibly Take one of the orthographic view photos or any of the photos i provided and Draw where you would place the vents? Im more of a visual person and it would be much appreciated.
 

Attachments

  • IMG_2020.JPG
    IMG_2020.JPG
    596.8 KB · Views: 159
  • Screen Shot 2019-01-09 at 12.30.12 PM.png
    Screen Shot 2019-01-09 at 12.30.12 PM.png
    1.2 MB · Views: 151
Last edited:
Instead of having a pour spout, I'd try a squish mold. Squish molds work well for parts with thin sections, like your grid.

Here's how to make one.


If you use a water based clay, you can wash it out of the grid before making the second half the mold. That would be easier than picking out oil based clay.

To minimize bubbles without a pressure pot, I'd use Onyx Slow. Let the resin sit for a couple of minutes before pouring and skim off any bubbles that form. Pour into the bottom half of the mold in a long, thin stream.
 
Squish mold sounds like a good plan.

If you are more comfortable with a pour, I would turn the part 135 degrees. It will allow air to rise up through the 45-degree grid instead of getting stuck on the horizontal sections, and won't need an extra vent on the tab, which you would need if the part was only rotated 45 degrees.

He will have to vent the posts on the back of the part to prevent trapped air from keeping the resin out of that part of the mold.
 
Youll have to complete the mould, pull a test casting, see if and where any troubled air pockets may be before adding the aforementioned vents. Its easier to cut them into the silicone than attempt to guess where they would be needed while moulding.

If youre goal is to make these as a replacement for an actual vehicle, the casting material would not only need to be impact and stress resistant but UV resistant as well. Even the materials I use would break down under sun and weather if left exposed for extended periods or over time.

After sleeping on it, I think he could make the mold with the pegs pointing down. Then he might not need to vent it. I'd have to see the part myself to know for sure.

He could add some Smooth-On UVO to the Onyx to make it more UV resistant.
 
Youll have to complete the mould, pull a test casting, see if and where any troubled air pockets may be before adding the aforementioned vents. Its easier to cut them into the silicone than attempt to guess where they would be needed while moulding.

If youre goal is to make these as a replacement for an actual vehicle, the casting material would not only need to be impact and stress resistant but UV resistant as well. Even the materials I use would break down under sun and weather if left exposed for extended periods or over time.
robstyle So what I'm understanding from what your saying is, Go ahead and mold the piece in a squish method mold? Via Then cast it to see where the problems are in the casting and fix it by making vents in those trouble areas? Is this correct, By correct i mean what you are suggesting? I will indeed add the UVO Pigment to all of these plastic parts for the light to deal with the UV Rays from the sun.

After sleeping on it, I think he could make the mold with the pegs pointing down. Then he might not need to vent it. I'd have to see the part myself to know for sure.

He could add some Smooth-On UVO to the Onyx to make it more UV resistant.
Zinger To which pegs are you referring to? The 4 in the middle of the mesh or the ones on the outside ring? Or Both of them? If you need any photos of the part, I have had it 3d printed and are able to take more photos of it if it will help. Just let me know.
 
I dont know what a squish mould is, i just suggest not over complicating things. The master part is easy to pull from a standard two part mould. Ive never used the onyx material. People that do moulding/casting usually stick to what they know works from prior experience. Thats why I suggested the MPK high impact plastic.
Ive also no working knowledge of the UV additive mentioned nor do I know how it coupd possibly react to the graphite I suggested.

Me, I would just make a standard two part mould then pull a test casting to see where any potential trouble spots are.
 
Zinger To which pegs are you referring to? The 4 in the middle of the mesh or the ones on the outside ring? Or Both of them? If you need any photos of the part, I have had it 3d printed and are able to take more photos of it if it will help. Just let me know.

I was worried about the pegs on the outside ring. I couldn't tell from the pix your posted how the ones in the mesh connect to the rest of the part.

Think of it this way. As you lower the top of the squish mold into the bottom half, any cavities that project up into the top half will trap air. You're going to have to vent those.
 
I dont know what a squish mould is, i just suggest not over complicating things. The master part is easy to pull from a standard two part mould. Ive never used the onyx material. People that do moulding/casting usually stick to what they know works from prior experience. Thats why I suggested the MPK high impact plastic.
Ive also no working knowledge of the UV additive mentioned nor do I know how it coupd possibly react to the graphite I suggested.

Me, I would just make a standard two part mould then pull a test casting to see where any potential trouble spots are.

A squish mold is just a two part mold that is optimized for thin sections and doesn't require an opening for pouring the resin. They are a little harder to make than a standard two part mold because you have to be more careful getting the clay layer right. Other than that, they are the same.
 
This thread is more than 5 years old.

Your message may be considered spam for the following reasons:

  1. This thread hasn't been active in some time. A new post in this thread might not contribute constructively to this discussion after so long.
If you wish to reply despite these issues, check the box below before replying.
Be aware that malicious compliance may result in more severe penalties.
Back
Top