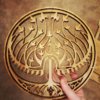
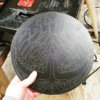
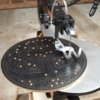
I've started work on a weapons display for my replica Prince Nuada sword and spear weapons. Gonna go for a a traditional Japanese standing sword display with the Royal Seal of Bethmoora as a backing. I'm going to cast it in bronze so I can get that golden look that we see in the movie on various items bearing the seal. Here is the current template I'm putting together. Cut from ply, I'm going to coat and seal this up for a smoother finish so that it will have a better way getting out of the sand mold I will make with it, as well as retain better, smoother detail for less cleanup/sanding work with the final bronze casting. Diameter for this thing ended up being 10"
You are using an out of date browser. It may not display this or other websites correctly.
You should upgrade or use an alternative browser.
You should upgrade or use an alternative browser.
Hellboy 2 Royal Seal weapons display
- Thread starter Shonuff
- Start date
Agreed. I've resigned myself to stay away from foams and resin replica making and instead spend my efforts on the legit medium of pieces. In this case can't quite go with gold for obvious reasons, but bronze is great to work inI love nice METAL replicas.
yup, got a glowforge a while back and its been awesome for so many projects nowThat's going to be very cool!! Was that laser cut?
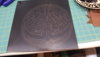
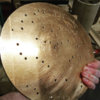
My template started to warp, making it less than ideal for sandcasting. Decided to forgo the bronze casting process and all that it entails and instead just cut and file it out of a solid 1/4" thick sheet of Bronze. I sprayed one side with a standard black chalkboard paint, giving it a light coat and used my glowforge to cut in the guidelines. Now on to the grueling part. Will try and pace it out, shoot to cut out one negative space piece a night to keep my sanity. Should be ready in bout a month :\
Attachments

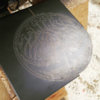
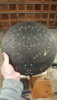
Bit of progress on this piece. I got the main form cut out from the rest of the plate. The loss of the excess weight will make it far easier to maneuver for cutting out all the interior pieces. Picked up a good tip from watching Clickspring and will be taping off the bottom for when I move on to the next phase. So not looking forward to all that clean up filing :c
Attachments
It'll definitely take some time and patience. luckily a scroll saw and some good metal cutting blades and jewelers blades will make the detail cutting relatively painless. It's the filing and finish sanding that comes at the end that's gonna be the real pain. But in the end will have a nice one of a kind piece that hopefully feels straight out of the Del Toro - Hellboy universeThis is a large undertaking. It's going to take a bunch of brute force to pull this off.
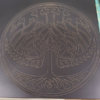
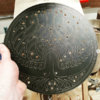
There are two types of holes that I needed to drill. The pilot holes are for starting the cuts with the scroll saw, and the Leafing holes are purely decorative. The seal has holes through most of its leaves in the design in the movie which are the ones you see drilled in on the piece. Here's the design overlay I used to measure the diameters and placements:
Attachments

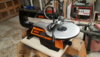
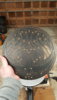
My new scroll saw arrived and now on to the laborious part. I spent the day setting up and trying out different types of blades to see which gives the easiest cut. Haven't quite found an ideal one yet, so if anyone has some advice, suggestions or recommendations I'd love to hear it. The saw takes 5" blades, pinned or unpinned, but definitely prefer pinned. It took a good amount of time just to free out that first section. Investing in a workshop stool so as not to kill my neck as this will be my life now for the foreseeable future. 1 down, 38 more to go. I promise I wont be posting every time I make it through a section, but will prolly do a halfway and finished post along the way. Cheers yall!
Attachments
It's going to be time consuming, but worth it. I love my scroll saw, they are so useful... but you have to be patient.
When your cutting metal with a scroll saw a couple things to keep in mind. Keep the blade and the work piece cool. You might use a spray bottle with water and spray it periodically. You might use wax on the blade to accomplish the same thing. Cutting any metal will wear and break the blades over time, expect to use multiple blades. Check the teeth on the blade often, so you can replace them before they break in the middle of a cut. Side loading the blade wears them more (meaning very sharp turns). Wear safety glasses as blades break and small metal pieces may jump when freed from the big piece.
Good luck!! It's a great idea!!
small update. I got 3 sections out and started to learn a few lessons along the way. I'm going to take it back to the drill press for starters and add holes near all terminations points (corners and choke points). This will help speed thing along as cutting out maneuver space is a lot of wasted time. I'm also generally leaving about 1 mm of distance between the cut and the border line to give me enough room to finesse with the files later on. Also just for general info, there are brasses and bronze variants that contain a small amount of lead, which generally makes them softer and easier to cut. I opted to go sans lead on this project. It makes every bit of cutting slower but on the plus side no health risks. Getting a jewelers saw soon as some of my blades are not playing nice with the scroll saw. These are finer blades which either snap on the saw when tension is applied or fail to get gripped by their pinless adapters. Speaking of scroll saw, here's a tip: when purchasing make sure to check what the stroke distance is. I got a WEN 3921 which is decent for its relatively low price, but it only has a stroke distance of a little over an inch, meaning I'm only using about 1/5 of the teeth on my blades. The bigger the stroke the more material can be taken away per cycle. Now back to drilling ")
Attachments
Its those thin sections around the outer part of the ring that got me concerned. I'm half tempted to just make that a complete circle and have them disconnectedLooking good and thanks for posting your lessons learned - I am already sweating out that tight bottom section on your behalf!
Similar threads
- Replies
- 1
- Views
- 346
- Replies
- 2
- Views
- 368