Heavy Weapons Wolf Predator 1:1 Armor build (3d modeled)

laellee

Master Member
RPF PREMIUM MEMBER
Hey there, first post on the Predatorium, thought I'd share progress on a project and hopefully get some feedback.

My endgame is a complete 1:1 Wolf predator, the heavy weapons version from AVP:R, wearable but primarily for display. I've been pulling references heavily from the Hot Toys sixth-scale figure, beats the heck out of screen-grabbing from action scenes with all the detail the armor has.

Hot Toys figure:

272714


The first area to tackle has been the hard armor itself and accessories, those pieces being the most-labor-intensive for me. I'm a 3d artist by trade (and by no means have the space or skill set to hand-sculpt those parts), so 3d modeling and printing works out best to get those pieces going. I model the individual bits right onto a digital mannequin of the wearer, so hopefully I can knock out a lot of the scaling and fitment issues early on and save time later :)

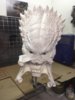
Enough of my jabber, here's where I am with it. I started off with the torso pieces, still needing detailing and hosing, but it's a start:

Rear kit work
272715

272716
272717


Torso armor and cannons:
272720

272718
272719


Well, that's where I'm at so far. Next up, I'd like to get the claymores (on the front bandolier) and belt/cod pieces wrapped up, and then the articulated whip and shuriken. Thanks for taking a look!
 
Привет !!! У меня 3D модель головы! Вы сделали модели для 3D-печати? мы можем переключиться. или я могу купить 3D модели брони и другие детали
 
Looks fantastic! I'd like to see the finished cleaner kit. There are two predators I like the best, the P1 and the wolf predator thanks for sharing. Please don't start a topic and then disappear, I'd like to see the hole thing done if possible, Great start!!
 
Looks fantastic! I'd like to see the finished cleaner kit. There are two predators I like the best, the P1 and the wolf predator thanks for sharing. Please don't start a topic and then disappear, I'd like to see the hole thing done if possible, Great start!!

Thank you!

Ha, no disappearing, I've got someone waiting for a set so I'm in for the (hopefully not so long) haul. :) The cleaner kit is about ready for print, I already have the hinge mechanisms in and slotting for neodymiums to keep it closed. The kit's interior panels are separate, so I can come back and give them more attention after I get through the forearms/legs/etc...

Managed a start on the claymores this afternoon, the finals will have battery doors and seats for lighting. Nice break from larger panels (y)

272721
 
[QUOTE = "laellee, post: 328564, member: 15074"]
Спасибо!

Ха, не исчезаю, у меня есть кто-то, ждущий сета. :) Комплект для чистки почти готов к печати, у меня уже есть шарнирные механизмы и прорези для неодимов, чтобы держать его закрытым. Поэтому я могу вернуться и уделить ему больше внимания после того, как у меня есть ноги и т.д. ...

У финального дня будет на батарейках двери и сиденья для освещения. Хороший перерыв от больших панелей (У)

[ATTACH = полный] 272721 [/ ATTACH]
[/ QUOTE]
model stl please ! or where can I download?
If I was looking for STL begging, I would be on Facebook. Sorry, but no, not in any language. Best.
 
[QUOTE = "laellee, post: 328567, member: 15074"]
Если бы я искал попрошайничество STL, я был бы на Facebook. Извините, но нет, не на любом языке. Лучший.
[/ QUOTE]I'm not asking for free. what is the price of models? I want to buy myself STL models
 
[QUOTE = "laellee, post: 328567, member: 15074"]
Если бы я искал попрошайничество STL, я был бы на Facebook. Извините, но нет, не на любом языке. Лучший.
[/ QUOTE]I'm not asking for free. what is the price of models? I want to buy myself STL models
OK, I will message you if they become available to purchase.

Cheers
 
A long holiday weekend and work kept me away from this for the most part, but I did manage a little bit this afternoon. A poor render, but the cod plates are nearly done along with the jaw-buckle (neither is nearly as flat as they appear here). Also started working out some animal skulls for his necklace and belt loops (y) Thanks for looking!

272747
 
A long holiday weekend and work kept me away from this for the most part, but I did manage a little bit this afternoon. A poor render, but the cod plates are nearly done along with the jaw-buckle (neither is nearly as flat as they appear here). Also started working out some animal skulls for his necklace and belt loops (y) Thanks for looking!

View attachment 272747
hi !!work on your project is super!!! I can help you, send mail to project the mask predator wolf ! stl model / because I am interested in the model of the costume of the predator .
 

Attachments

  • image1.jpeg
    image1.jpeg
    154.5 KB · Views: 457
Had to get caught up on commission work last week, hopefully now I can get more on this done. Started on the left gauntlet this evening, Once I get the panel door roughed in and proportioned, the rest should go pretty fast. Nice to see that the left and right gauntlets are completely different designs, rather than the phone-it-in cookie cutter mirroring or pauldrons/biceps/gauntlets/greaves/etc/etc/etc... (y)

Anyway, first batch of files is off to the printer, so hopefully I will have some physical pieces to show shortly. Renders are great, but nothing beats holding the real thing.;) Thanks for looking!

071719 door start.png
 
If you can get me some physical models or files I can work on integrating with my wii setup so we can have a simple plug and play setup. I am looking at changing a servo used to allow a proper lattice wrap around on the arms.


Basically you have to torque isolate the servo with a block as above inside the body and then route the wires in a split loom assembly.
 
do you have measurements on the main lift arms. Eyeballing things I think I can hide everything in what a 12 inch channel guide with a metal wrap around

trim the ends and you have a good hinged assembly. I was using a geared driven lift assembly on my setup.
 
I am just going to assume you posted in the wrong thread. Nearly everything I've been hit with since joining this forum has been disappointing. We can write this last one off as a mis-post, the new setup I get can be confusing....

I'm an RPF guy, spent a lot of years building props. I'll be finishing this. Hope you all finish yours.

Your setup is closer to the dual cannon setup I was looking at doing on my current back pack. My issue is weight, yours is very light weight compared to mine weighing in at about 60 pounds.

I have determined at this point my best bet is to sculpt a close facsimile on the cannon and then vacuum form a unit with 1/8" ABS plastic. I need a hollow cavity to fit the servo, wiring, cat5 balun, and wiring for the LED and laser arrays.

Electronics and code I can do. Wiring and soldering I can do. Once I get a newer apple laptop I will work on getting up to speed on cad software and the 3-d modeling needed for printing. I am just trying to take shortcuts on my builds to speed up turn around.

Your setup was what I tried to mirror.

Now forgive my communication prior. I am looking at getting a root canal and I am feeling rather exquisite...

Good luck on your root canal....

Again, you are talking about your own, ideas, perhaps designs, and inceptions. Weight? Not sure about the rest. So let's start again.

I am recreating the Heavy Weapons Wolf Armor from AV:p. I base-design and model everything before implying more, including electronics, but I do accept the idea of space and development. Eventually, I can incorporate microcontrollers for movement, although two cannons creates a bit of a logistical problem.

Now, I am going to guess that you are really working this out for weight. I went through weight issues working with an Iron Man, specifically, working a Vulcan gattling gun on War Machine's shoulder. Vac is the best way to go unless you need movement, then supported harness.

Hope that helps.
 

Your message may be considered spam for the following reasons:

If you wish to reply despite these issues, check the box below before replying.
Be aware that malicious compliance may result in more severe penalties.
Back
Top