S0ren
New Member
Aka: Why did I think this was a good idea?
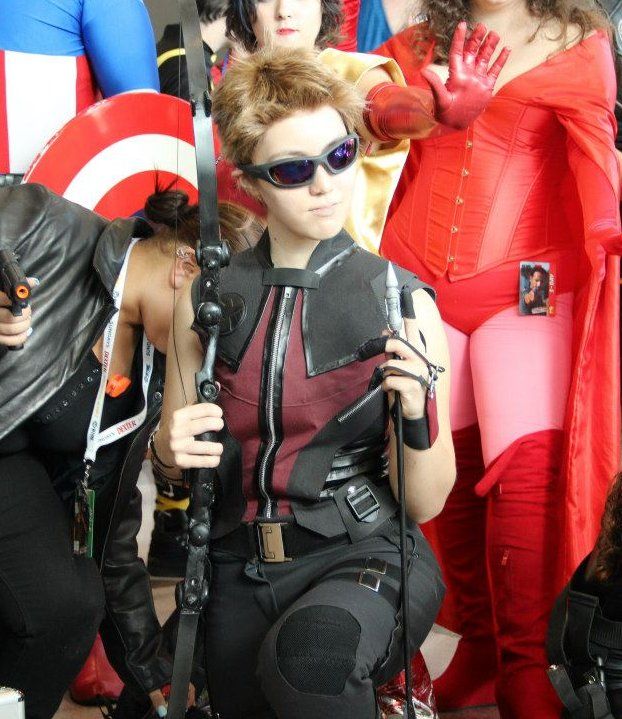
So first of all, mad props to the Hawkeye thread, I couldn't have done this without you guys. That being said, I'm still doing it. I got it to a "wearable" stage for NYCC, but that was after a mad dash with a hot glue gun and an entire tube of E6000. There were so many things wrong. But to start off, here was what I ended up wearing:

My biggest challenge is that, hi I'm a 5'2 girl with a very girlish waist-hip ratio. Everything had to be scaled down quite a bit which is always problematic with screen costumes.
I'm completely scrapping the top but reusing the same materials and general patterns though I'll definitely be padding out my torso and shoulders as much as possible. My original plan was to sculpt and cast all of the trim in Task 13 semi-rigid resin (more on that later) which I'll be doing with V.2. ETA is late March for a con, but we'll see was happens.
To the details!
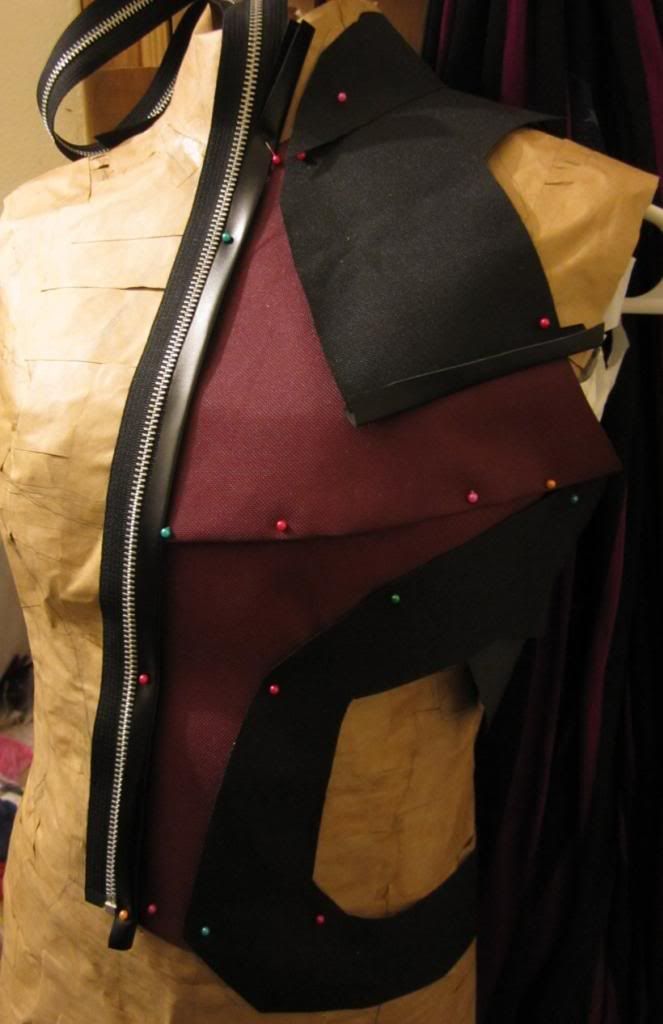
The vest is made of a midweight cordura so (my top half) is pretty weather proof. It's stiff, but it contributes to the whole body armor feel. I ended up drawing the outfit lines directly onto a paper tape body form and deriving the pattern from that. PS: This is usually a bad idea.
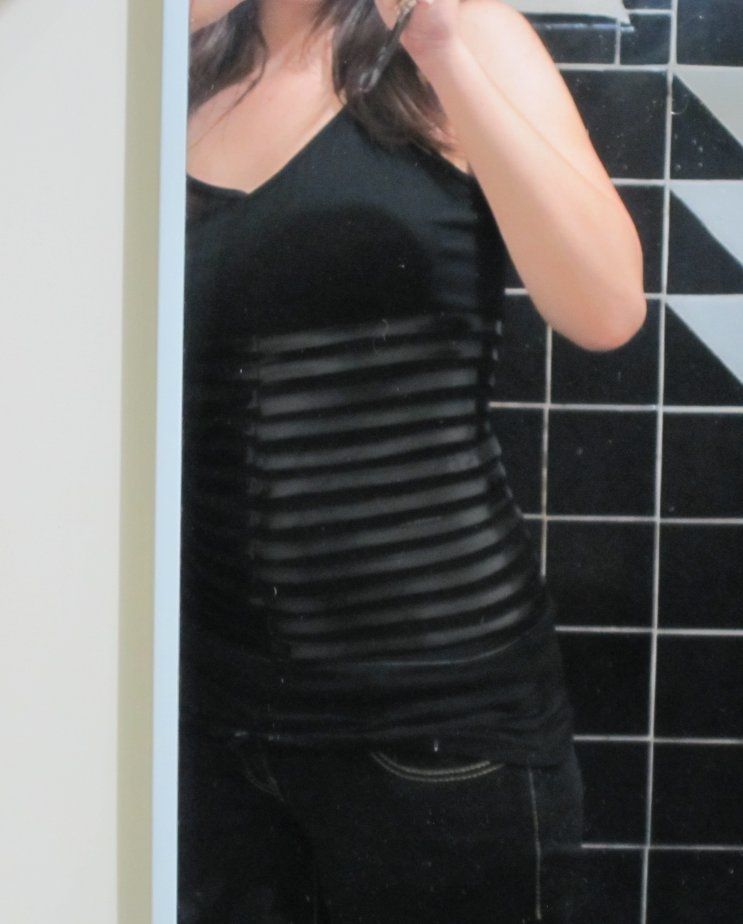
After staring at pictures forever, I determined that the ribbed undershirt is a separate shirt that's attached to the vest at the front (hence the cutout)
I ended up making the ribbed shirt quite tight so all of the ribbing would lay flat, but that only accentuated the girly waist
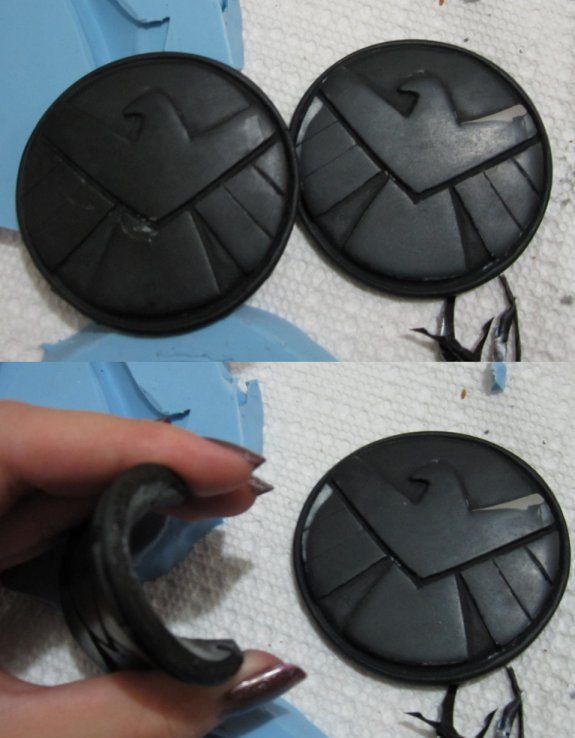
The SHIELD patch is just a super sculpy model. I'm afraid the depth is a little off, but I'm still quite happy with it. I molded it and cast it in the aforementioned Task 13 resin. It's a black semi-rigid plastic which was perfect for the patch. It's got some give, but it's sturdy. On the downside, 3 of the 5 patches that I cast developed air bubbles ~3 weeks after casting and literally exploded. Like... House of the Living Dead style. Not quite sure what happened there.
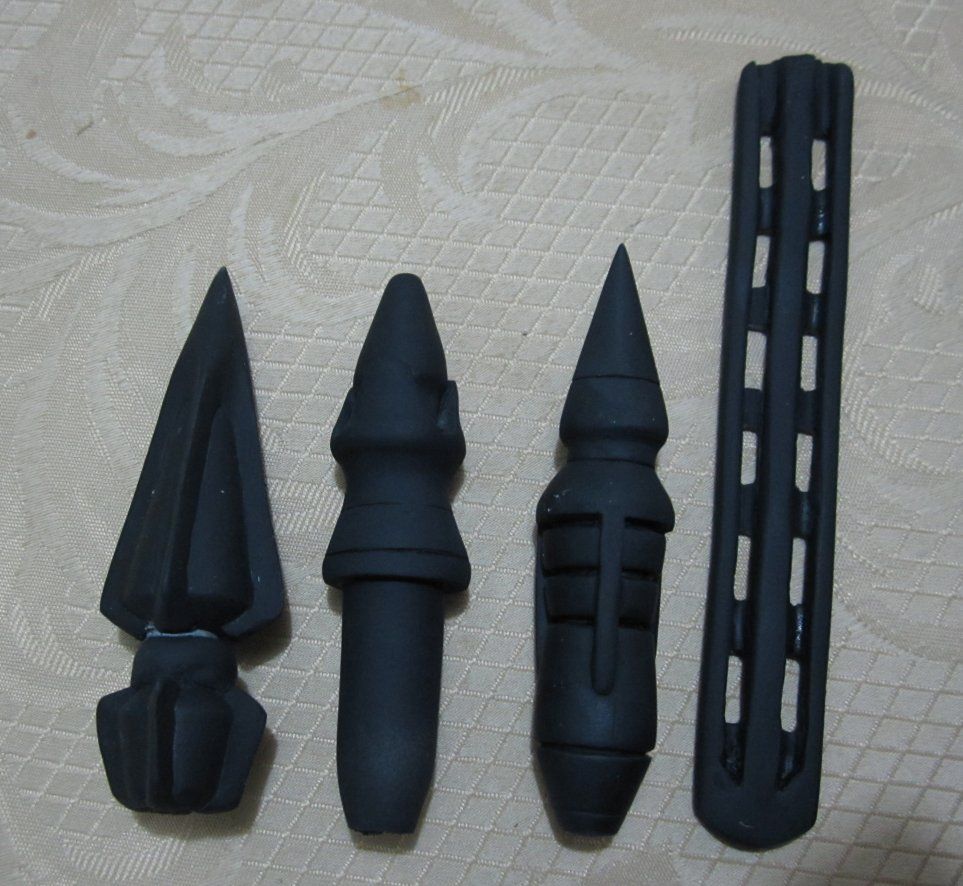
The screen-used arm guards exist, but they're too big for my forearm (since he has two) so I just sculpted and cast a new set out of the Task 13.
I was in the middle of a set of arrowheads, but ended up having to paint and use an original for nycc. Hopefully I'll get these finished up and cast.
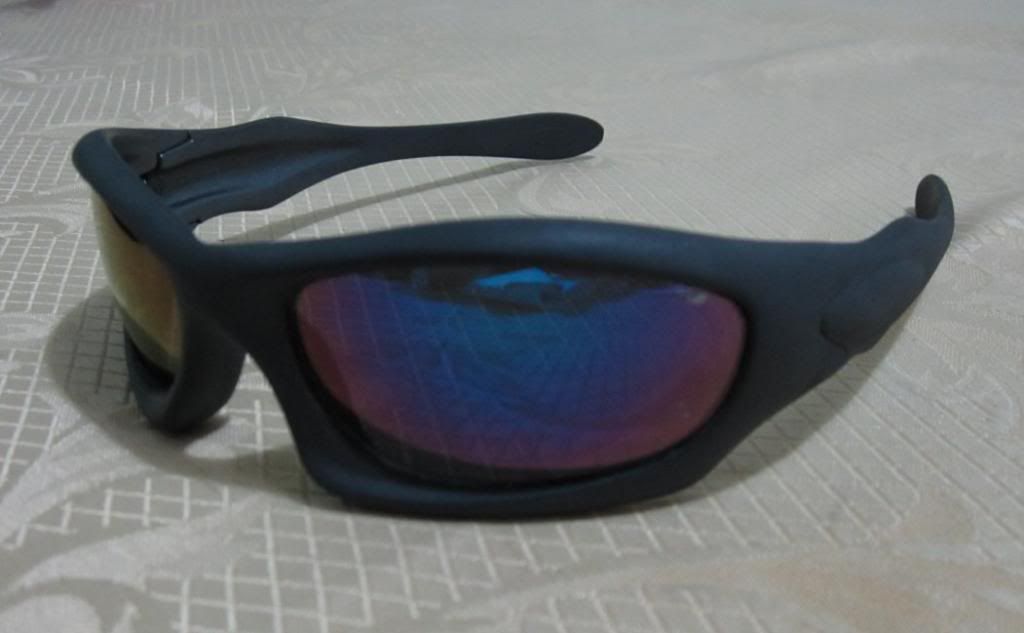
The sunglasses were a lucky find at a NYC street fair. They're Oakley knockoffs that were a tacky plastic-y silver but had the purple lenses that I wanted. I sanded the shape down to fit the original a bit better, taped off the lens, and sprayed it flat dark grey. I love how they look irl, but they tend to photograph way too light so I'll probably repaint them satin black.
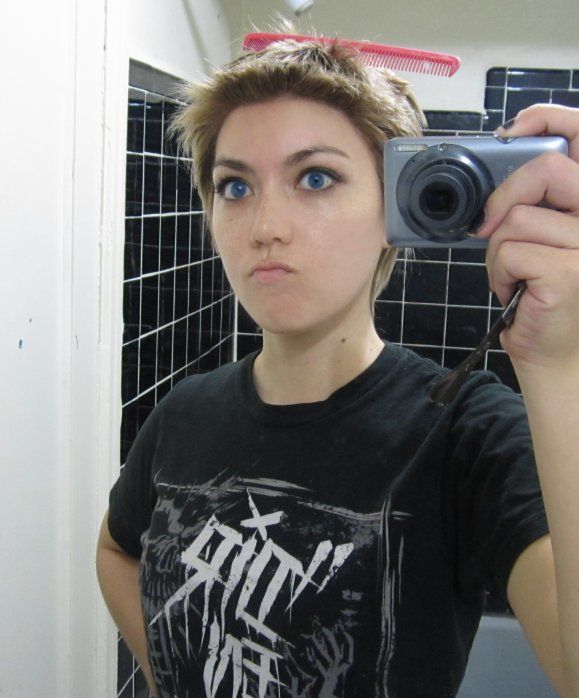
The wig is a lace front (I have mid-back length hair ahahahah~) that I got off of eBay pretty cheaply because the style was horrific. It was a good quality wig, though, so it was thick enough to chop down to this length. It still needs some work (it rebelled at nycc, unfortunately. Chicken hair!) I bought contacts, but got eyelash extensions right before the event so I decided to just keep my sunglasses on all day :facepalm (Also duck lips!)
I'm stupidly proud of the pants and will be reusing them, but I lack good pictures (funny how that works...) The knees were made by stitching three sections of 3" wide heavy knit elastic into the octagonal shape. I applied heat 'n bond to the reverse side of the knees, cut the fabric into a slightly smaller octagon, turned the edges inward, and ironed the fabric to itself (hence the heat 'n bond). I then top stitched the knee pads to the open knee area. All of the weird patches are the same stiff cordura as the top, but I may need to substitute in something with a little give because... Hips.
Hopefully decent pics later. Boots are stand-ins, unfortunately. I hand-sewed the shooting glove out of a reasonably thick leather and attached everything with mitten clips! On the plus side, I've actually used it as a shooting glove with good result.

Alright. The bow. I'm not a props person. At all.
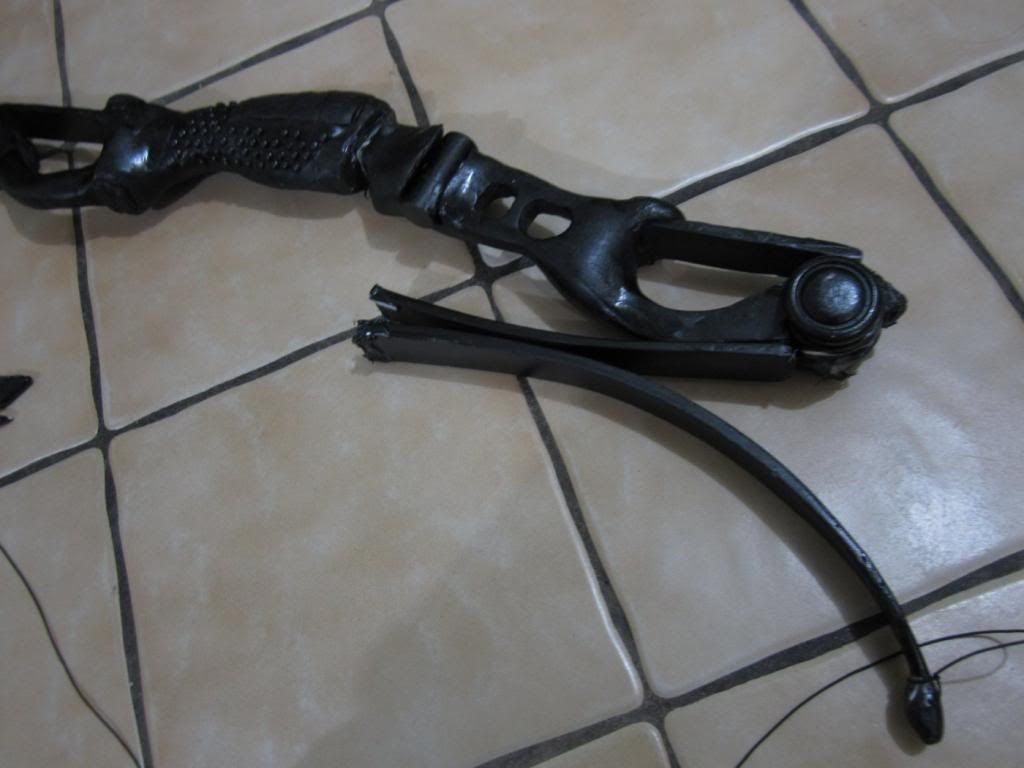
In any case, I've determined that my flipping mechanism works... If I have enough time to do it properly. It had been raining heavily for a week up until the con so it was way too humid to do anything. I ended up casting the four limbs and epoxying them together with the original clay riser for time's sake :wacko
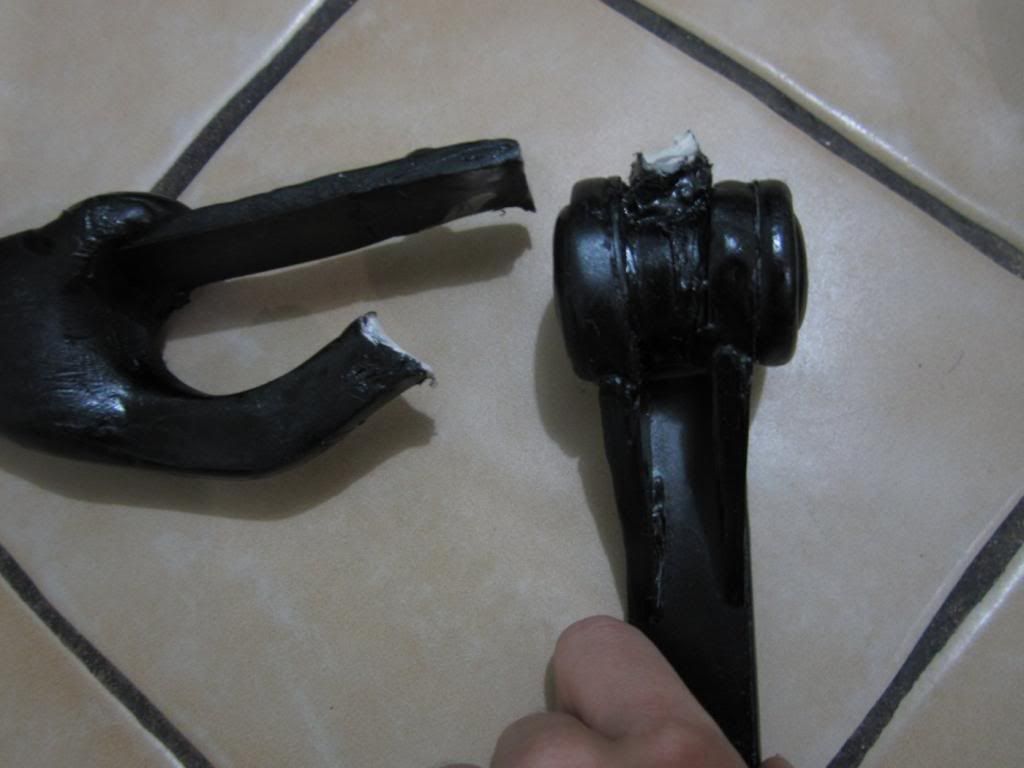
The limbs are set to go for V2, but the riser definitely needs a ton more sanding and general cleaning work. I got tackle-hugged by a little girl at the con which split the riser in half at the thinnest point, but it's a pretty clean break.
Here's the full bow:

As a note, the shape is somewhere between a resting bow and a fully drawn bow. I knew I wouldn't be able to put much pressure on it so I didn't want to shape it into one extreme or the other.
The archery range where I shoot had an actual Hoyt Buffalo for sale (!) so I got to mess with that a bit. It certainly helped figure out several pieces and also how far I'd have to scale it down (the Buffalo is basically my height).
I've also got the custom joints built for the limbs, but decided that I'd favor durability and just stick everything together with some scrap pieces. It held up for the day minus the little girl incident, but I snapped it apart so you can see where I was going with it.
That's how it should look folded. The limbs are just thick enough to house several rectangular rare earth magnets cast directly into the resin. The joint is the main piece that keeps the limbs stable, but the magnets do help take some of the pressure off. They also make the snap... snappy.
The outer joint is basically a ring with a triangle. Four on each side facing inward with all of the rings lining up. A small cylinder pin pushes through all of the rings so the outer limbs can free-pivot upwards. Pictures soon because that explanation kinda sucks.
The inner joint is the more difficult one since it folds in. I have it so the riser has a cylinder piece while the limb has two large rings attached to the flat triangular pieces that rotate around the cylinder. This is all held together with two permanently attached end caps. (Super messy picture, but bear with me)
The big problem is that it can support... basically no weight since it folds inwards. I'm going to have to rig an extra lock into it somewhere.
I'm using a near-slack super thin elastic string that puts absolutely no pressure on the limbs, but I'd like to try something a little thicker because nocking my arrows for pictures was incredibly awkward with such a thin string.
Basically from here I need to clean up everything and mold/cast the riser once it's satisfactory, then make new joints.
Quiver is also in the works, but more on that later.
So yeah! ... :confused How did this become so difficult...
So first of all, mad props to the Hawkeye thread, I couldn't have done this without you guys. That being said, I'm still doing it. I got it to a "wearable" stage for NYCC, but that was after a mad dash with a hot glue gun and an entire tube of E6000. There were so many things wrong. But to start off, here was what I ended up wearing:
My biggest challenge is that, hi I'm a 5'2 girl with a very girlish waist-hip ratio. Everything had to be scaled down quite a bit which is always problematic with screen costumes.
I'm completely scrapping the top but reusing the same materials and general patterns though I'll definitely be padding out my torso and shoulders as much as possible. My original plan was to sculpt and cast all of the trim in Task 13 semi-rigid resin (more on that later) which I'll be doing with V.2. ETA is late March for a con, but we'll see was happens.
To the details!
The vest is made of a midweight cordura so (my top half) is pretty weather proof. It's stiff, but it contributes to the whole body armor feel. I ended up drawing the outfit lines directly onto a paper tape body form and deriving the pattern from that. PS: This is usually a bad idea.
After staring at pictures forever, I determined that the ribbed undershirt is a separate shirt that's attached to the vest at the front (hence the cutout)
I ended up making the ribbed shirt quite tight so all of the ribbing would lay flat, but that only accentuated the girly waist
The SHIELD patch is just a super sculpy model. I'm afraid the depth is a little off, but I'm still quite happy with it. I molded it and cast it in the aforementioned Task 13 resin. It's a black semi-rigid plastic which was perfect for the patch. It's got some give, but it's sturdy. On the downside, 3 of the 5 patches that I cast developed air bubbles ~3 weeks after casting and literally exploded. Like... House of the Living Dead style. Not quite sure what happened there.
The screen-used arm guards exist, but they're too big for my forearm (since he has two) so I just sculpted and cast a new set out of the Task 13.
I was in the middle of a set of arrowheads, but ended up having to paint and use an original for nycc. Hopefully I'll get these finished up and cast.
The sunglasses were a lucky find at a NYC street fair. They're Oakley knockoffs that were a tacky plastic-y silver but had the purple lenses that I wanted. I sanded the shape down to fit the original a bit better, taped off the lens, and sprayed it flat dark grey. I love how they look irl, but they tend to photograph way too light so I'll probably repaint them satin black.
The wig is a lace front (I have mid-back length hair ahahahah~) that I got off of eBay pretty cheaply because the style was horrific. It was a good quality wig, though, so it was thick enough to chop down to this length. It still needs some work (it rebelled at nycc, unfortunately. Chicken hair!) I bought contacts, but got eyelash extensions right before the event so I decided to just keep my sunglasses on all day :facepalm (Also duck lips!)
I'm stupidly proud of the pants and will be reusing them, but I lack good pictures (funny how that works...) The knees were made by stitching three sections of 3" wide heavy knit elastic into the octagonal shape. I applied heat 'n bond to the reverse side of the knees, cut the fabric into a slightly smaller octagon, turned the edges inward, and ironed the fabric to itself (hence the heat 'n bond). I then top stitched the knee pads to the open knee area. All of the weird patches are the same stiff cordura as the top, but I may need to substitute in something with a little give because... Hips.
Hopefully decent pics later. Boots are stand-ins, unfortunately. I hand-sewed the shooting glove out of a reasonably thick leather and attached everything with mitten clips! On the plus side, I've actually used it as a shooting glove with good result.
Alright. The bow. I'm not a props person. At all.
In any case, I've determined that my flipping mechanism works... If I have enough time to do it properly. It had been raining heavily for a week up until the con so it was way too humid to do anything. I ended up casting the four limbs and epoxying them together with the original clay riser for time's sake :wacko
The limbs are set to go for V2, but the riser definitely needs a ton more sanding and general cleaning work. I got tackle-hugged by a little girl at the con which split the riser in half at the thinnest point, but it's a pretty clean break.
Here's the full bow:
As a note, the shape is somewhere between a resting bow and a fully drawn bow. I knew I wouldn't be able to put much pressure on it so I didn't want to shape it into one extreme or the other.
The archery range where I shoot had an actual Hoyt Buffalo for sale (!) so I got to mess with that a bit. It certainly helped figure out several pieces and also how far I'd have to scale it down (the Buffalo is basically my height).
I've also got the custom joints built for the limbs, but decided that I'd favor durability and just stick everything together with some scrap pieces. It held up for the day minus the little girl incident, but I snapped it apart so you can see where I was going with it.
That's how it should look folded. The limbs are just thick enough to house several rectangular rare earth magnets cast directly into the resin. The joint is the main piece that keeps the limbs stable, but the magnets do help take some of the pressure off. They also make the snap... snappy.
The outer joint is basically a ring with a triangle. Four on each side facing inward with all of the rings lining up. A small cylinder pin pushes through all of the rings so the outer limbs can free-pivot upwards. Pictures soon because that explanation kinda sucks.
The inner joint is the more difficult one since it folds in. I have it so the riser has a cylinder piece while the limb has two large rings attached to the flat triangular pieces that rotate around the cylinder. This is all held together with two permanently attached end caps. (Super messy picture, but bear with me)
The big problem is that it can support... basically no weight since it folds inwards. I'm going to have to rig an extra lock into it somewhere.
I'm using a near-slack super thin elastic string that puts absolutely no pressure on the limbs, but I'd like to try something a little thicker because nocking my arrows for pictures was incredibly awkward with such a thin string.
Basically from here I need to clean up everything and mold/cast the riser once it's satisfactory, then make new joints.
Quiver is also in the works, but more on that later.
So yeah! ... :confused How did this become so difficult...
Last edited:
 Damn, I'd love to get pictures with your comic Hawk sometime...