You are using an out of date browser. It may not display this or other websites correctly.
You should upgrade or use an alternative browser.
You should upgrade or use an alternative browser.
Hasbro ROTJ AT-ST (IMPROVED)
- Thread starter Keith
- Start date
11B30B4
Well-Known Member
Damn, just Damn... I have one of these sitting in my closet waiting to be built; however I had never considered doing all this enhancement work. In comparison I would be way out of my league. But your build has sparked an flicker of inspiration. Perhaps I will give it a try in the future. Great job and great detailed pictures
Amish Trooper
Master Member
Were you planning on offering any of the mods that you did? You did a great job and would love to see mine look half as good.
Unfortunately no. I asked about this early on. They were all scratched parts. :cry
steveo
Sr Member
Unfortunately no. I asked about this early on. They were all scratched parts. :cry
Dang it!
Laspector
Master Member
Do you plan on attaching it to a base? Mine seems to topple over real easy. I found some wooden dowels that fit perfectly into the hole on the bottom of the foot. I plan to put a countersunk screw up in the base from the bottom and into the foot. I would just glue the dowels into the base but I like the idea of a screw in case I ever need to remove it from the base.
Do you leave the joints articulated or do you permanently fix them to not move anymore?
Do you leave the joints articulated or do you permanently fix them to not move anymore?
Keith
Sr Member
Do you leave the joints articulated or do you permanently fix them to not move anymore?
Read 1st post.
No plans for a base. It stands up just fine on its own.
Keith.
Laspector
Master Member
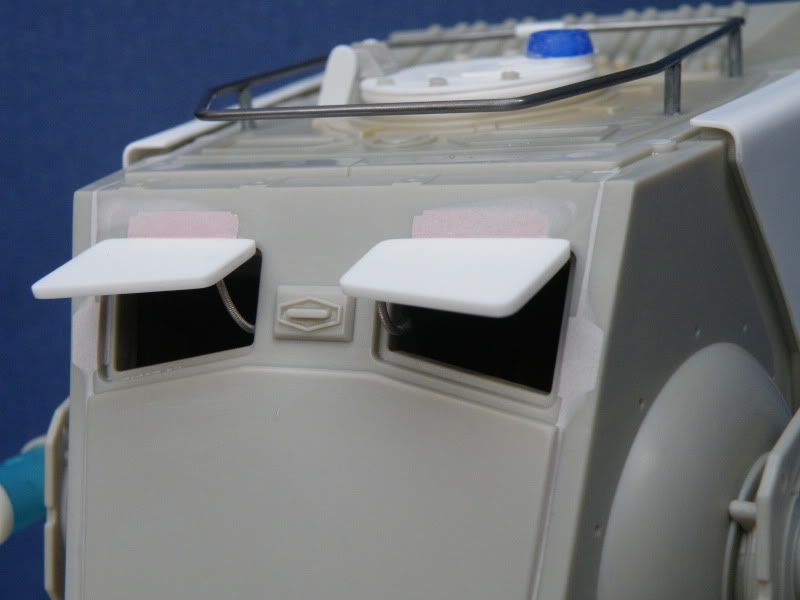
I've got some styrene sheets of plastic and a heat gun and a hair dryer. I'm trying to do the bend for the head side panels. I can't seem to get the perfect bend the way you did. Everything keeps warping. I'm using about 8x8' pieces and trying to bend them before cutting out the shape like you said. Is there some trick to getting the bend right without it warping? I'm laying it off the side of a table (about 2' hanging off the side). I am using a board over the part that is on the table and another board over the part that is hanging off, hoping to get a good straight crease as the plastic softens and bends down. But the part on the table tends to warp even though I am applying pressure to it...Any tips?
EDIT. Ah I see, just takes lots of trial and error. I'm new to some of these techniques so please excuse me when I babble.
Are you just using an Exacto blade to cut your styrene or are you using some other kind of tool?
EDIT. Ah I see, just takes lots of trial and error. I'm new to some of these techniques so please excuse me when I babble.
Are you just using an Exacto blade to cut your styrene or are you using some other kind of tool?
Last edited:
Keith
Sr Member
I bent the plastic for the sides of the head the same way you are doing it. I can't see how the part of plastic that is covered can warp with the heat. Try heating it less, use different plastic or covering it in a cold damp cloth before adding the board.
As for cutting it to size. I made a template out of card. Draw around it and cut it with scissors, saw and knife. Clean up with a file and sandpaper.
To be honest, it sounds like you are worrying too much about how to do things. Thinking about doing some of this stuff can dive you around the bend. You just have to get on with doing it. If something turns out wrong, do it again another way.
Keith.
crackerjazz
Sr Member
To be honest, it sounds like you are worrying too much about how to do things. Thinking about doing some of this stuff can dive you around the bend. You just have to get on with doing it. If something turns out wrong, do it again another way.
These are words of wisdom. I've rarely had anything execute exactly according to plan. Those few times when they do, are, of course, a cause for great rejoicing!
") . But the best ways to do things I've discovered only after first trying out what I thought was the right way. I've learned so much by making my own mistakes.
. But the best ways to do things I've discovered only after first trying out what I thought was the right way. I've learned so much by making my own mistakes.
Last edited:
Junk Pilot
Sr Member
I so want to get one of these. I would like to know how you managed to get the shape of the hand rail.
Similar threads
- Replies
- 12
- Views
- 1,401
- Replies
- 4
- Views
- 1,036