I'm completely hopeless drawing or painting so much as a straight line, so what's the secret to getting the chipped and scratched look so effectively? Any time I try it, it looks like a kindergartner scribbled on a prop.
To follow on from
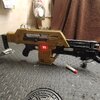
joberg's answer... I used a couple of techniques on the rifle above.
Everything got a couple of coats of grey plastic primer. As others have mentioned the only parts that were a bit problematic were the softer plastic parts - the stock and the bottom of the magazine. These needed some light sanding and a few very light coats of primer before the primer would adhere.
On the metal parts I used a very similar 'reduction' technique to the one described by
joberg. They got a coat of satin black. Then a couple of coats of airbrushed Alclad II metallic lacquer (50/50 Steel and StainlessSteel). Once that had cured I airbrushed a light coat of Vallejo chipping fluid over that and let that dry. The final coat(s) were matt black acrylic. Once that was dry I used a damp/wet scouring pad (like Scotchbrite) to rub back through the matt black. The dampness activates the chipping fluid, and the matt black paint flakes and peels away in a realistic way to reveal the metallic finish underneath. I also used a wooden toothpick to scratch the paint, and wire wool to add finer scratches and wear.
On the shroud I used an alternative 'additive' method. The parts were sprayed with Revell NATO Olive Drab from a spray can. Once that was dry the wear and the scratches were brush-painted on using Vallejo Neutral Grey acrylic to mimic the underlying primer coat under the green/brown.
To answer your question about how to make the wear look effective... there are lots of people on this board and elsewhere who are far better qualified than me to give you a definitive answer. But for what it's worth I think there are three main factors to consider. At least these are what I'm considering when I attempt such effects.
1. Location. Wear and tear is not evenly distributed, and occurs primarily on certain parts of an object while other parts remain pristine. Corners and edges are the usual places, as long as they're exposed and not protected by other parts of the object. So I look at a prop and work out in my own mind which bits of it would naturally bang or rub against things when it was in use and concentrate the damage there. Other places that accumulate wear and tear are elements that are used a lot - bolts, screws, switches, levers etc...
2. Randomness. Although the damage tends to occur in specific areas, the appearance of the damage is random. We tend to unconsciously produce order and pattern when painting or otherwise producing detail. You have to fight quite hard against that - otherwise you end up with patches of wear that are too regularly positioned and/or of similar size and shape. I combat this tendency by letting the paintbrush 'dance' over the surface in a very light stippling motion, varying the pressure and direction as I go. Even then I often go back and add a bit more to one area or use a Q-tip to remove some paint to ensure a natural irregularity. Using the side of the bristles to 'stutter' along an edge can produce a nice natural broken appearance.
3. Quantity. Less is more. One of the biggest beginner mistakes is doing too much. It's much easier to add more wear and tear than to remove it if there's too much. So I always start with what I think is too little (even on a heavily worn prop like the rifle). Then I stand back and look at it for a while until my eye starts to see the areas that need more, that don't quite 'pop' enough, and where the detail needs to be enhanced a bit more by dirt or washes. Weathering will often take me three of four sessions, each one adding to the last. And I always try and finish at that sweet spot when 'enough is enough' and before I get to that fatal 'just a little bit more.... oh ****, that's too much' moment!

Bonus tip: reference material is invaluable. Not just photos of the actual props you're imitating (though those are vital) but pictures of real world wear and tear across a range of materials -worn and rusty metal, old wood, sun-faded paint, scratch patterns, dirt and grime that collects in crevices and details. Having that on hand will really help.
Edit: I learned SO much about weathering and wear techniques from this amazing armour modeller -
Night Shift. His work is absolutely exceptional, and he's a brilliant teacher, showing his methods and materials as he goes along and explaining why he uses them. I think anyone who wants to replicate real-world objects in a realistic way (regardless of subject or scale) should have his YouTube channel bookmarked!