Hasbro Hero X-Wing Conversion with 3D Printed Parts - Files no longer available!

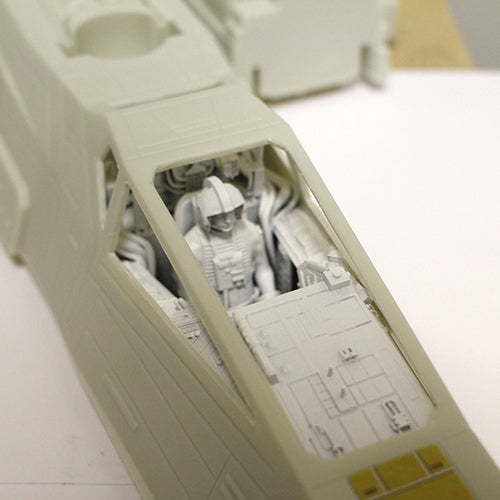
As promised here are the STL files. (Removed)

Mods, if this is not the proper place to share these, I will remove them and find some other way to share them.

These files worked on my CR-10S and Elegoo Mars, but may need slight modification to be printed on your own 3D printer. Slight shimming, filing, sanding and re-scribing will be necessary. You are free to modify them to your liking, and if you do, please share them, since they probably will be better than the ones I have uploaded.
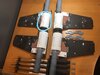
1/8 x 3/4" aluminum bar (Available at Home Depot) was used to strengthen the middle part of the wing along with some brass square tubing (I forgot which one)
K&S brass tubing, 9/32, 5/16 and 1/8 copper where used on the lasers. The holes for mounting the wings are K&S 1/4 inch brass tubing, but solid rod will work as well, and was found at my local Home Depot for a heck of a lot cheaper than my hobby store.

Let me know if I have forgotten to mention any other information. Warning, all of these parts took several days to print.

Please do not sell these files. I don't know why I say this, because the unscrupulous ones will do so anyway....

Good luck.

TazMan2000
 
Last edited:
[QUOTE = "TazMan2000, post: 5047131, membro: 7510"]
Come promesso, ecco i file STL.

Mod, se questo non è il posto giusto per condividerle, le rimuoverò e troverò un altro modo per condividerle.

Questi file hanno funzionato sul mio CR-10S ed Elegoo Mars, ma potrebbero aver bisogno di lievi modifiche per essere stampati sulla tua stampante 3D. Saranno necessari leggeri spessori, limatura, levigatura e riscrittura. Sei libero di modificarli a tuo piacimento e, se lo fai, ti preghiamo di condividerli, poiché probabilmente saranno migliori di quelli che ho caricato.
La barra in alluminio 1/8 x 3/4 "(disponibile presso Home Depot) è stata utilizzata per rafforzare la parte centrale dell'ala insieme ad alcuni tubi quadrati in ottone (ho dimenticato quale)
Tubi in ottone K&S, rame 9/32, 5/16 e 1/8 ove utilizzati sui laser.

Fammi sapere se ho dimenticato di menzionare qualsiasi altra informazione. Attenzione, per stampare tutte queste parti sono occorsi diversi giorni.

Si prega di non vendere questi file. Non so perché lo dico, perché quelli senza scrupoli lo faranno comunque ...

In bocca al lupo.

TazMan2000
[/CITAZIONE]
really thanks so much
but do I have to change the measurements or is it already ready in scale?


It is already in scale with the Hasbro Hero X-Wing. A tiny bit of shimming with thin styrene may be necessary.

TazMan2000
 
The wings were meant to be printed on an FDM printer with 'ironing' enabled, so as to lessen sanding. You may have to re-scribe the panel lines like I did. I wanted to keep them thin but with ironing, my CR-10 tends to melt the excess in to obscure them.
There is a V notch in the bottom of the outer wing skin to accommodate the bend in the top of the wing center. Only one side of the wings were included. I'm assuming everyone can mirror them in their slicer software.

TazMan2000
 
Last edited:
thanks for the files. cant wait to start. I am fortunate that I have a great model builder here in town I know and he is guiding me through some difficult area . Perhaps you have heard of him... Randy Cooper.
 
thanks for the files. cant wait to start. I am fortunate that I have a great model builder here in town I know and he is guiding me through some difficult area . Perhaps you have heard of him... Randy Cooper.

Very few Star Wars fans on this site haven't heard of Randy Cooper. He's quite an inspiration to me and a lot of us.

TazMan2000
 
Very few Star Wars fans on this site haven't heard of Randy Cooper. He's quite an inspiration to me and a lot of us.

TazMan2000

hello taz sorry if I ask you two questions:
meanwhile, I can't understand how you made these pieces that I marked in the photo
Second question, from the files for 3D printing you have to print everything by 4 right? 4 X laser, 4 X wing etc ....

thanks ;)
 

Attachments

  • InkedIMG_1818_LI.jpg
    InkedIMG_1818_LI.jpg
    2.4 MB · Views: 227
After reviewing Alegundam 's request, I put up a set of mediocre instructions. Along with that, I found that I mistakenly omitted a part that is supposed to go underneath the Wing Root. The new part is called the Wing Root Shim.

Not everything has to be printed 4x. Only the wing/laser parts.

Download updated zip in post #121.

TazMan2000
 
Using LePage All Plastics CA glue, I glued the PLA printed parts to the insides of the rear of the X-wing. They are still holding strong. The CA part of the glue seems to be dried out but the "activator" pen that you "colour" onto your surface seems to still work.

So I decided to colour in a small panel with the pen, and, according to the instructions, wait about 30 seconds before putting on CA glue. I used another brand, but it didn't seem to matter as most CA glues are almost exactly the same formula. I used a paper towel to apply the glue to the panel I coloured and then sanded it down after it dried.

Afterward I applied some Vallejo paint to it and to another untreated section, and let it dry for a day or two. As most of you know, Vallejo paints seem to take at least 10 days to fully cure, so I was surprised that tape didn't pull anything off after a two day cure of the treated part. The tape pulled almost everything off of the untreated section. I took a 600 grit sandpaper to the Vallejo paint on the treated section and it held up quite well. Of course it sanded off, but it didn't flake off.

At least I don't have to boil glue sticks. :D

TazMan2000
 
Last edited:
Not an STL file, but you can order parts from here: (Owner is a member here, I believe).


I used a section of a free model off of thingiverse that I heavily modified, in 3D and added lots of styrene parts to it. There are a few cockpits and x-wings in thingiverse that you could resize and modify if you want to go in that direction. I haven't seen anything in an STL specifically designed for the 1:18 X-wing.

TazMan2000
 

Your message may be considered spam for the following reasons:

If you wish to reply despite these issues, check the box below before replying.
Be aware that malicious compliance may result in more severe penalties.
Back
Top