Hasbro Black Series (HBS) Boba Fett mod

Inquisitor Peregrinus

Master Member
RPF PREMIUM MEMBER
I will say the worst thing about this helmet is that I don't already have three of them. :p Most of what it comes with, I can use, with minor to major alteration. Only a few things need to be flat-out replaced. This is on par with the best of the Black Series helmets so far (Kylo Ren, Stormtrooper, Luke Pilot). As I said over in the discussion thread, I was tempted for a second by the Prototype helmet coming out this summer, but I'd rather fill the dent and damage in the dome and have darker plastic to work with. I have always found it easier to see what I'm doing than white plastic.

I've already worked with Hasbro's previous toy Boba Fett helmet (several, actually) and Rubie's recentish hard-plastic Boba Fett helmet. Both had their own pros and cons, and I've held those up against this one. I can drop the old Hasbro helmet out of the running, easily, but some of the pieces are good for other projects.

- Rubies only has the dent to fill. HBS has all the topical damage to fill and smoothe.
- Rubies has an inaccurate notch in the left mandible, which needs to be filled and re-cut. HBS has no notch at all.
- Rubies has inaccurate connector molded on right cheek plate, which needs to be drilled out and replaced. HBS has accurate, separate cast-metal connector.
- Upper-right earcap on both needs drastic work.
- Rubies has better right-lower earcap. HBS may be able to be re-worked, may need to be replaced.
- Left earcap is fine on both.
- Rear "keyslots" on Rubies need to be drilled out and filed. HBS has them open already.
- The visors of both need replacing/supplementing, but the HBS' is much easier to remove.
- HBS has full interior. Even though I intend to supplement/replace much of it with WhiteShadow liners, the extant pieces make good raw material for mixed-media approach.

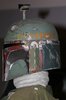
The HBS also has electronics, but they are self-contained to the right earcap substrate. I am still weighing options, there. Before I get started, here are all the pieces (minus the right-upper earcap) laid out for consideration:

HBS 001 -- Parts 01.JPG

HBS 010 -- Parts 10.JPG

HBS 002 -- Parts 02.JPG

HBS 003 -- Parts 03.JPG

HBS 004 -- Parts 04.JPG

HBS 011 -- Parts 11.JPG

HBS 005 -- Parts 05.JPG

HBS 009 -- Parts 09.JPG

HBS 008 -- Parts 08.JPG

HBS 006 -- Parts 06.JPG

HBS 007 -- Parts 07.JPG

HBS 012 -- Parts 12.JPG


Over the next couple days I'm going to be stripping off the paint apps and filling the front and back pieces and the left earcap, marking what and where I'm going to be cutting stuff off and out of the liner pieces, and focusing a lot of attention on the right earcap.

I am waiting for news from t-visor.com regarding replacement visors for these helmets, I plan to start setting aside funds for three WhiteShadow liner kits, and I'm going to do the same for more accurate rangefinder pieces. I'm holding off on doing anything with the outer dome until I know whether anyone who has a helmet with missing paint apps or crooked killstripes wants to swap.
 
Looking forward to following along on this! I'm hoping to do similar things with mine:
  • Thin down the right ear pieces
  • Replace the stalk with an aluminum one I had lying around
  • Fill any gaps between the pieces
  • Fill in all the molded damage and repaint in gloss white
 
Looking forward to following along on this! I'm hoping to do similar things with mine:
  • Thin down the right ear pieces
  • Replace the stalk with an aluminum one I had lying around
  • Fill any gaps between the pieces
  • Fill in all the molded damage and repaint in gloss white
Oh, man, I could do a whole thread just on the right ear. :lol: Things I'm looking at so far there:

- Replace the contact points and clip mount. I don't need a removable assembly. The base is going to be perma-mounted to the helmet, with wiring passing through from the electronics inside.
- Portions of the outer earcap need to be removed and attached seamlessly to the base. Rubie's did the same thing with theirs.
- The bottom "wedge" of the outer earcap and its matching number for the lower earcap both need to be extensively reshaped. I don't know yet if that's going to get to the point of removal and replacement with more accurate details from Levi's Shapeways offerings.
- Part of the reason the rangefinder sits low is the stalk is about 5mm too short, so that needs replacing. But the other part of the reason is it's seated about 5mm too low in the housing. The rotation point is going to need to get moved up, the front wall of the earcap base is going to get built up, and then we'll see.
- Power and electronics... I am going to replace the spring-loaded actuator with a servo, that's for sure. I don't know how much of the extant electronics will turn out to be worth keeping, or if I should just replace the whole kit and kaboodle with something from, say, Hyperdyne Labs. I'm also getting rid of the AA battery and its housing. Probably going to go with a flat Li+ or LiPo or like that, housed behind one of the inner earpieces. Also have to make considerations for fans, mic, and speakers -- placement and power demands.
 
Small update for tonight. I've been focusing on the front half of the helmet body -- outer and inner faceplate. The paint apps proved invulnerable to both acetone and rubbing alcohol, and anything stronger tends to dissolve the plastic, too, so I used the one other effective solvent I have in good supply right now: elbow grease. An hour and a lot of sandpaper later, this is where the outer faceplate is:

DSC02638.JPG


The inside I'm only partially sanding, where I'm actually going to be painting, that being basically the "cheekbone", "tusk", and lower visor frame. Everyplace where the inside of the outer shell will be visible past the liner. I've also got the first speaker exciter mounted. The other will follow once I tackle that side of the inner faceplate:

DSC02639.JPG


For the inside piece, I cut out the "X" bridge at the bottom of the visor, and then turned my attention to the right cheek area, because that's where the connector is. I removed the smooth-panel area backing off the cheek plate, cut out the "perf sheet" textured bits (which removed the 1/16" "tubing" portions), as well as the perf-textured bit along the bottom (I still need to grind off the raised edge on the bottom of the cheek plate and a 1/8" continuation back into the earcap area of the outer piece). I cut out the center of the round detail to a diameter of 7/8" and used that to site my speaker exciter, then enlarged it to its final size (sorry for the blurry -- I apparently bumped the camera as I took the picture):

DSC02644.JPG


I have a 3/4" CPVC pipe cap that is getting cut down and opened up on one side (for the wire mount to fit through) to act as a cover for the speaker exciter. You'll see what I have in mind for all that in the next update probably, but for now, here's the still-too-tall cap in position:

DSC02643.JPG


As you can see I still have some final clean-up to do. Plus, I'm re-doing the detailing. I ground the cylindrical details off and am replacing all of that molded-in stuff with better-thought-out actual greeblage from my bitz box to look like something that would be behind the Borden connector, as well as where it would go. Bits of 1/16" up to 1/8" tubing and other peripheral greeblies pending. I'll get to work on the other cheek while I wait for supplies to arrive next week. I've also cleaned up the edges of both the cheek piece and the main inner faceplate where I cut it out for reasons that will become clear with said supplies...

DSC02641.JPG


Other main thing to note there is that I've filed the edges of those openings in the "cheekbone" area to square them off where there were concessions made for the piece not binding to the die.

I wasn't entirely focused on the face, though. I've also got the rangefinder assembly... well... disassembled:

DSC02646.JPG


I need cut off the portions of the outer earcap that should be part of the base, and glue them onto that. The top curve ends at the right place, but I have to bring up the front edge a bit. Some thin plastic epoxied in there and a little bit of scrap styrene to fill it out. I need to do a lot of filling and such, but that's later:

DSC02649.JPG


DSC02650.JPG


For the outer cap bit, I ground the extraneous stuff off the rangefinder trigger and out of the earcap, taped off the opening, and epoxied the trigger in place. Once that's cured, I'm going to glue some rare-earth magnets to the backside of the flat facing piece and glue that in place. As the rest of it comes together I'll mount their opposite numbers in the earcap base. No pictures of all that yet, and I have other considerations to comment on at that time. Stay tuned...
 
Teeny update for tonight. Got two packages today. Here's a very, very rough preview of where the fans go -- only two per helmet, but this shows their relative positions in context of both outer shell and inner piece:

KIMG0244.JPG


KIMG0242.JPG


And I got some fabric that matches the perf texture:

KIMG0246.JPG


After the inner faceplate gets painted, this is getting glued down to the appropriately-textured portions. More tomorrow.
 
The interior vents in that center-back inner piece are all getting closed. The air is ducting around to center-front to blow down over the face and keep the visor clear.
 
A bit like war, these past few weeks. Occasional bouts of much productivity interspersed with irritatingly long periods of not being able to work on it for one reason or another. The biggest things that have happened are:

- I gave in and pre-ordered the white Prototype helmet through GameStop. I have to work on one to see what it's like. So this one is being repurposed into a color-corrected Fenn Shysa -- my favorite Mando, and one I am frustrated hasn't been brought fully into the new canon (I say 'fully' because Fenn Rau in Rebels is heavily inspired by the other Fenn), due mostly to an unwise surname. So it will be built up mostly as an ESB Boba, just with no dent, much-reduced damage and weathering, and different markings.

- I've ordered the rangefinder stuff from Hyperdyne, and gotten the power requirements from them so I can work up the battery systems.

- I've ordered WhiteShadow's v2 helmet interior (including dome liner).

- I've drafted a pattern for a helmet seal, a la Jango's in AOTC, that will be made from the same fabric as the flight suit:

DSC02674.JPG


This made me finally realize something that I'd not quite consciously registered, despite coversation with Mr Mold Maker that trod very close to it. We had been mentioning that the damage stencils lined up perfectly in places, but not all places. When I had been looking to site the left-mandible notch, the 1:1 template I printed fit... okay through most of the cheekbone, but was way too long at center-front. Where, in that pattern above I note the one seam is located at the "helmet bend" point... The original helmet (presuming the original sculpt, as all six castings were identical out of the mould) has a slight kink at around the midpoint, where the earcaps are. Here's the sometimes-called "Pre-Production 3", one of the ones Joe Johnston decoed:

Johnston 3 left side.jpg


...I can't help but wonder if that being absent on the HBS is just enough of a difference that, propagated down the cheekline, it's made the tusks that fraction of an inch shorter. I almost hate to say it, but the Rubies helmet from a few years ago is scoring against this one in that respect and with the right upper earcap... This can be corrected, if one is insane enough :cautious: -- but most probably won't want to bother. Especially because it'll mean scratch-building a new visor that much longer at the bottom. I still haven't heard back from T-visor Dot Com. I'm gonna poke them again, and this time include a request for a longer-in-front option (basically, two options for where they cut it).

Also, dr_slurpee's sent me his wonky dome in exchange for mine, and it should be here any day now. While I grit my teeth and endure that waiting game, here's what little I have gotten bth done and photographed...

I nearly have the cut down interior dome piece ready to roll as a crown band:

DSC02676.JPG


I have to grind down most of the friction clips, to right where the catch-point is. There's a little bit of minor filing yet to do around some of the details, and I need to grind down most of the center-front tab, for reasons that will become clear in another update. From the way it fits, I'm going to build up those nice flat areas with shaped padding to fit the shape of my head. The trick will be to get it to match the look and color of the rest of the padding, but I'm gonna see what I can do with WhiteShadow's first.


I got ahead of myself and hit the left earcap with filler primer and sanded it back down:

DSC02682.JPG


The moulded-in damage on this piece is shallow enough, the filler primer did the trick. No bondo-ing required. I've cut off the friction clips for this and the right-lower earcap, backed off the slots for same in the rear helmet portion (can't in the front half, due to how the inner piece fits exactly against the inner surface) and filled all the slots with epoxy putty, sanded smooth. I need to take pictures, so that'll be in the next update. The earcap substrates have more work yet to do on them, which I'll follow up with later (probably in the next update, too).

The right earcap is starting to take shape. The lower portion is much like the left side. So not much brainstrain there. But. The other thing I noticed while working with the whole thing is that the third reason the rangefinder sits low is the right-upper earcap itself is sitting too low on the helmet:

DSC02686.JPG


The spacing between the points I indicated there? Between upper and lower earcap? On the original, that's 5/8".

Yeah. I know, right?

So what I've been banging my head against there is that I have to find a way to re-mount the earcap base higher without being able to just cut the substrate and shift it up. Too much interlocking stuff. Where I'm at now with the one seriously confusticating and bebothered portion of this helmet is...

The outer earcap cover has had the portions that should be part of the base removed. I opted to over-cut here, rather than have them be too short on the base when all is said and done. Everything else got ground away, and the trigger is glued flush with the outer face:

DSC02677.JPG


DSC02678.JPG


The piece that formerly screwed into the cap has had the rangefinder stops cut off and everything on the face filed and sanded flat. I've glued my ubiquitous .010" styrene over the whole face. 5mm rare-earth magnets are epoxied into the old screw holes and that will help keep them from getting pulled out of their holes:

DSC02679.JPG


DSC02680.JPG


Next step is filling in all the holes from the back side with epoxy putty and gluing this piece into the cap. Then filling the gap around the edge with more epoxy putty and cleaning everything up. That's a post in its own right, once I get there.

Lastly for now, the right-upper earcap base... now only partially re-worked. The pieces cut off the outer cap are glued on and reinforced:

DSC02681.JPG


I haven't done much else yet, as I've been focusing on the back side to figure out how best to solve the mounting problem. About the only thing I need to make sure of is that there are holes drilled to reach the two screws in the substrate. Fixing the base to the helmet does solve a number of potential problems. The base, once completed, can be used to take care of repositioning the servo and wiring pass-throughs in the substrate. The rest is gravy.

It's not as much as I wanted to post, but I've kept y'all waiting for several weeks when I'd wanted to make slightly more rapid progress than this. I hope to be back with more before the weekend. Cross your fingers.
 
Last edited:
Wow... That's what y'all fixed on? I know that's the Pre-Pro 3 (amongst its several names). It was just one I knew I had a straight-on side shot of from when Master Replicas was 3D scanning it. The six helmets were all identical out of the mould, before the dent was added to five of them. Never mind paint apps, the bottom edge of all of them is the same. The ESB Hero shot you posted, MMM, has the same "kink".
 
Wow... That's what y'all fixed on? I know that's the Pre-Pro 3 (amongst its several names). It was just one I knew I had a straight-on side shot of from when Master Replicas was 3D scanning it. The six helmets were all identical out of the mould, before the dent was added to five of them. Never mind paint apps, the bottom edge of all of them is the same. The ESB Hero shot you posted, MMM, has the same "kink".

I believe it was just a friendly correction buddy. We can not presume what you know. As you simply called it the “original helmet” it could also cause confusion for newer members of the hobby who may not even know what the PP3 is. In any case,if sharing the photo of the ESB hero offends you, I apologize. I will not post again in your thread.(y)
 
Last edited:
This thread is more than 3 years old.

Your message may be considered spam for the following reasons:

  1. This thread hasn't been active in some time. A new post in this thread might not contribute constructively to this discussion after so long.
If you wish to reply despite these issues, check the box below before replying.
Be aware that malicious compliance may result in more severe penalties.
Back
Top