Has anyone made a Millenium Falcon chess table?

I was once told the original top was an aluminum disk with a black tape type film applied. I have no way to verify that. I wonder if you could somehow anodize the checkerboard pattern onto an aluminum disk??? That might also be durable.

Dave
 
I've been told you can anodize to a mask, so I'm going to find out if it's possible and how clean the mask can be. If the anodize mask can be just paint, then that would be perfect.

After I find out this, I'll sort out how to attach a lug to the back of it for the process. Hopefully that can be done without warping the thin plate.
 
Perhaps a turned adapter with a wide face where it would meet the plate.

Then you could use VHB or some other type of industrial tape to adhere the two.

-Gary
 
It would be a bit more costly, but a machined plate with a recess for the center circle........have that center circle just be a cover for the screw that holds the main plate to the table top. In other words a second recess for the bolt that would be hidden underneath that center disk. The center disk could even be held on with a magnet should anyone want to easily disassemble it for transport etc....

Dave

yeah, have already planned to have the playing surface removable using magnets if I can get them to stay glued on ok. ultra rare magnets are really good at breaking glue joints.
 
I have some really good news on the table.

The fiberglass master (the buck I'm told) for the top of the table, easily the most complicated piece, is done and will be delivered to me Monday.

I'm really delighted my friend Tracy, who originally did the cabinets for my Star Wars collection, was able to do this for me.

Check it out:

tabletop15.jpg


tabletop16.jpg


tabletop19.jpg


tabletop20.jpg
 
that is ALOT of saw dust...

looks great, any news of the playing surface? Or the base?

It is a lot of chips for sure, and that's just the last part of it.

I have spent the last couple of weeks testing all kinds of different processes for the actual playing surface. I will get back three more tests Monday afternoon. From that and the others I already have done, I'll decide on which to do them. There may be a couple of different options.

I already have 24 playing surfaces underway in preparation for the final process.

The foot of the table also has a fiberglass buck done as well. I haven't decided to use that yet however since it needs to be solid.
 
Last edited:
A few more progress photos.

Cutting aluminum playing surface to finished diameter

tabletop05.jpg


Preparing playing surface mount for lathe to spin for graining the aluminum surface. On the lathe it will be turned round for attaching aluminum discs.

tabletop06.jpg


Wood master for table foot, though not much to see.

tabletop4.jpg
 
Wow! This really looks like it's coming together great. :thumbsup
Thanks for sharing the progress shots, Philip!
 
After many tests for the actual grid playing surface, I've settled on using matte black vinyl stickers.

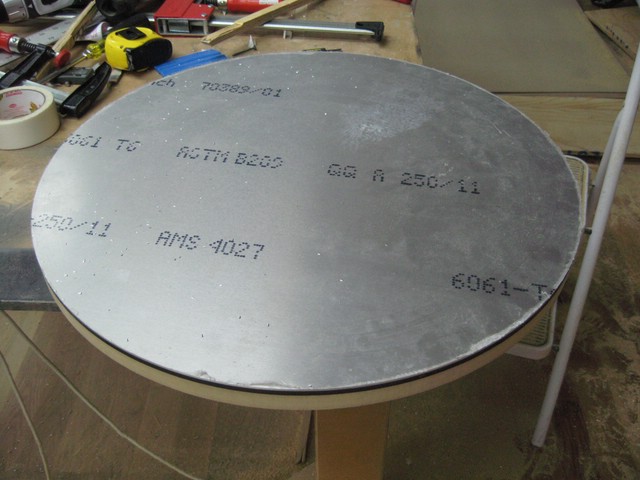
It was always going to be a sheet of 6061 Aluminum with the circular grain pattern on the surface. Actually getting to this part surprisingly wasn't as easy as I anticipated because it's a pretty large piece at over 23" diameter.

I learned quite a bit about many possible processes for the surface, almost all of which work to some extent, but in the end, only the vinyl on aluminum keep the look of the prop while providing acceptable wear capability.

Other processes tested:

Paint / laser etch: Painting the entire piece black, then lasering off the paint. This actually works very well, but in the end, the paint can be easily scratched and the aluminum will oxidize in time. Which means it really needs to be clear coated. I also did a clearcoat test, but you can clearly see the difference in thickness between the painted area and the aluminum, and it also didn't look like the prop. I could still see using this process and having automotive clear applied and buffed out for a table that might see some wear, like the one I plan to put in my office for actual use.

Anodize / laser etch: I anodized the entire piece black and then laser etched off the black dye, which also looks great, but leaves the anodizing on the aluminum. A detail on anodizing is that first the material is anodized, then tinted. You can't actually etch off the anodizing with a laser. It looks very good, you can still see the aluminum grain, but it's not metal colored. It's more of a flat white color.

Alodine / Paint mask / laser etch / Anodize: I had the bare aluminum treated with Alodine (a process that prevents aluminum from oxidizing) applied a very special anodizing lacquer paint mask to the entire piece, laser etched off the area I wanted to anodize black, and had it anodized. Good idea, bad result. The laser etching process actually burned in some of the masking material into the aluminum, so the anodizing wasn't very good, even terrible in some places.

Anodize / paint mask / laser etch / acid etch: I anodized the entire piece black, applied the masking laquer to protect the black I wanted to keep, laser etched off the mask and the black anodize dye, then they acid etched the rest of the anodize off, but the edges of the etched area exhibited a ghosting along the edge as a byproduct of the process. It looked good, except for these ghosts.

Anodize / Teflon tape mask / laser cut / acid etch: I anodized the entire piece black, applied a very special Teflon tape to protect the black I wanted to keep, laser cut and peeled off the mask, then they acid etched the rest of the anodize off. I only could source 1" wide tape for this test, but this was the best result. There were problems though. Any bubble in the masking material could allow removal of the black anodized. I also was worried that the bare aluminum would oxidize in time, as mentioned before. I did see an example of this in my test, and the 24" wide material costs $408 to buy, just pushing the total cost too high, even for this admittedly expensive project.

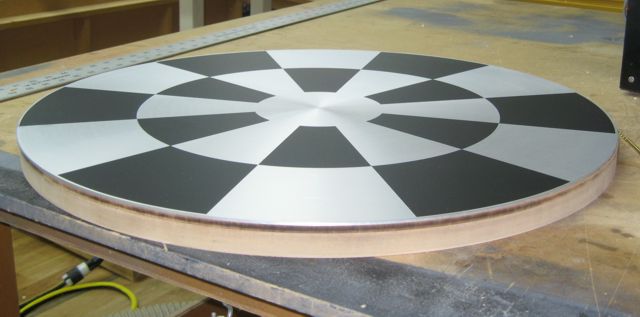
Alodine / Vinyl sticker: This is the one I've gone with. After graining the aluminum, I had it treated with Alodine, which as I mentioned before is a process that prevents the aluminum from oxidizing. It also gives the sticker a better surface to stick to. Then I had a matte black vinyl sticker cut and applied. This is definitely the closest appearance to the prop, will probably wear better than the other methods, and for all we know, might be exactly the same way the prop was done.

Here it is:

tabletop-vinyl.jpg
 
Last edited:
Thank you for the extremely thorough testing and detailed explanation; it's truly what this project needs to be properly executed. (y)thumbsup
 
We finished the new dimensioned key masters this week as well. Several slightly different master keys have been sent to Chris Jones (Fettpride) to see about molding. They were run slightly larger than the finished size needed, and have holes and a "glue pocket" in the bottom as I realized when I saw the master for the top there would never be room to use your hand to screw these in from the bottom. The pocket is there to ensure no glue escapes when attaching them in on the finished tops. These don't have the edges rounded yet, as Chris will be tinkering with that during testing to ensure they come out perfect.

keys-to-mold.jpg
 
Back
Top