You are using an out of date browser. It may not display this or other websites correctly.
You should upgrade or use an alternative browser.
You should upgrade or use an alternative browser.
Hand stitched Kermit the Frog puppet replica!! (Early builds/old patterns)
- Thread starter ecl
- Start date
ecl
Sr Member
Here’s the one I built using these patterns! He’s far from perfect, but overall, I’m quite happy with him, considering he’s my first puppet build. I learned a lot about the process, and ecl’s tutorials were invaluable. Thanks, ecl!
Neat! Thanks for sharing, and I’m glad to hear the tutorials helped out. I like the way the fleece looks on your build, it has a very natural look to it.
kirks007
New Member
Just wanted to post the Kermit I made for my son’s third birthday! He/we/I loved it and can’t thank ecl enough for the tons of advice, patterns, and instructions.
Kermit was a hit. I don’t think I’ve used my normal voice for a week because my kid only wants to talk to Kermit")
Thanks again, ecl!
Kermit was a hit. I don’t think I’ve used my normal voice for a week because my kid only wants to talk to Kermit
Thanks again, ecl!
Attachments


ecl
Sr Member
Just wanted to post the Kermit I made for my son’s third birthday! He/we/I loved it and can’t thank ecl enough for the tons of advice, patterns, and instructions.
Kermit was a hit. I don’t think I’ve used my normal voice for a week because my kid only wants to talk to Kermit
Thanks again, ecl!
That’s fantastic, and the kind of thing that makes sharing the build process/journey worth it. Great looking build!
GALACTICABEETSB
New Member
Hey ecl! ive seen your kermits and omg they are awsome! ive gone through trial and error trying to make a realy good pattern but ends up horrible and with me ending up with no material left. i bought more but i would love if you can spare me some patterns, my daughters birthday is comeing up and shes 4 and loves the muppets and i thought it would be a blast for her if i make her a kermit puppet! ive built 2 now and they look horrible think you can help me with the patterns ecl!?That’s fantastic, and the kind of thing that makes sharing the build process/journey worth it. Great looking build!
Last edited:
Hello there Ecl
I have been following your work silently for a while now and your work inspires me and makes me see it is possible to make A Kermit replica of my own. I have been following your older post where you posted drawn-up tips and tutorials on his construction which have been a massive help in getting me to understand and start toying with designs for my Kermit. One thing I wanted to ask for your help on is the creation of the mouth plate pattern. I believe you showed how to install it but not draw it out itself. Is there a certain way you went about it or another case of just simple trial and error until you get it right?
I have been following your work silently for a while now and your work inspires me and makes me see it is possible to make A Kermit replica of my own. I have been following your older post where you posted drawn-up tips and tutorials on his construction which have been a massive help in getting me to understand and start toying with designs for my Kermit. One thing I wanted to ask for your help on is the creation of the mouth plate pattern. I believe you showed how to install it but not draw it out itself. Is there a certain way you went about it or another case of just simple trial and error until you get it right?
ecl
Sr Member
Hello there Ecl
I have been following your work silently for a while now and your work inspires me and makes me see it is possible to make A Kermit replica of my own. I have been following your older post where you posted drawn-up tips and tutorials on his construction which have been a massive help in getting me to understand and start toying with designs for my Kermit. One thing I wanted to ask for your help on is the creation of the mouth plate pattern. I believe you showed how to install it but not draw it out itself. Is there a certain way you went about it or another case of just simple trial and error until you get it right?
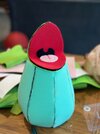
Hi! Trial and error really is involved with just about every part of making a Kermit, at least, it was for me in the early process. When doing the mouthplate, I generally decide how wide the back edge will be. From what I’ve been able to gather, this is usually around 3.25 inches to 3.5 inches. The mouthplate does not need to be big (it’s quite small on the originals as well), which will also make it easier to manipulate expressions too. His mouth also in a way looks like a ‘beak’ tapering to a fairly sharp point at the front. So keeping that in mind, you can get a pretty good natural shape. But I’ll go ahead and include a sketch below that would work, but this one is sized a little bigger (for my older bigger Kermits)—just resize to what you want. Also, note that the top mouthplate is a little longer than the bottom one—Kermit has a slight overbite.
mouth_8.5x11 copy.pdf
Here’s how a mouthplate can look, although people will do different things to finish off the surface where your hand will grab it.
best wishes with the build!!
amoon39
New Member
Hi, is there another link to this? I know this was several years ago, but it will not open for me. Thanks! Love your workRe: Custom Kermit the Frog puppet replica!!
I've uploaded PDF files of the patterns via my google drive link here:
https://drive.google.com/drive/folders/1yORPMoEfYCEfyP7AwcRTB0dFqvEHz3bz?usp=sharing
I made notes on each file which ones should be printed out on 11x17 pages and 8.5x11. Hopefully that works! Also one tip is to print them out on either thicker paper or cardstock--not really 100% necessary--but it'll make them easier to work with when tracing onto fabric. Mainly pertains to the collar graphic, as it tends to move around during tracing.
View attachment 785353
division 6
Master Member
JonathanLillo
New Member
I would like some help with the Kermit puppet replica.Re: Custom Kermit the Frog puppet replica!!
Thanks for all the comments! Much appreciated. It's been awhile since I've had so much fun making something so I'm glad to share the experience. I'd have to say, puppet making is kind of addicting. I've begun to think of what other characters i might attempt to make next. Nothing for sure yet though.
The Master Replicas Kermit is really cool. I jumped on it the second it was released years ago, as there really weren't any options to buy full scale Muppet replicas. He has his inaccuracies, but it's a neat piece. It's still disappointing to me that the license was passed onto the dreadful efx after Master Replicas went away....meaning we'll never see any new product.
As for the sword, I only have three swords in my collection (all customs). This one was made by Scott Roush (bladesmith in Wisconsin. He makes some really neat knives as well). I always have to sneak one in a picture whenever the chance arises haha!
cincinnatisara
New Member
Hi, there!
First, thank you so much for sharing all of this! It is amazing!! My 8 year old is hoping to be a puppeteer and we have been working on creating various puppets for him. He has his sights set on Kermit next! Did you ever share your pattern? I’m not very crafty (although working toward getting better as my kid continues to insist we make new puppets) - I’ve never made my own pattern and worry I won’t get it right. If you are willing to share I would be so grateful! Thanks you!
First, thank you so much for sharing all of this! It is amazing!! My 8 year old is hoping to be a puppeteer and we have been working on creating various puppets for him. He has his sights set on Kermit next! Did you ever share your pattern? I’m not very crafty (although working toward getting better as my kid continues to insist we make new puppets) - I’ve never made my own pattern and worry I won’t get it right. If you are willing to share I would be so grateful! Thanks you!
propmaker2012
Active Member
It puts mine to shame. It's beautiful. I could get the right pattern. Where did you get your patters?After quite some time experimenting and practicing, I went ahead and made a puppet replica of Kermit the Frog; something that I've wanted to do for years, but wasn't sure if I would be able to do.
Materials: Dyed "Antron" type fleece from Etsy, dyed felt, Ultrasuede, armature wire (for the fingers), ping pong ball spraypainted white and halved for the eyes, black "velvet" adhesive for the pupils, contact cement for gluing parts for the hands, feet, and mouth plate, foam for the body, and stuffing for the limbs.
Patterns: The pattern for the head was a slightly modified version of one that was discussed in a thread here on RPF years ago. It seemed like a pretty good pattern to start with. The patterns for the arms,legs, and feet were slightly modified from the Master Replicas photo puppet. Hands were made separately and then attached to the arms for maximum articulation.
First thing was to practice the "Henson" stitch, which turned out surprisingly easy to pick up, even though I have minimal experience with sewing. I simply found on YouTube several great tutorials. The fleece is also very forgiving and stretchy, so the seams can be hidden quite well with a little bit of fluffing with the needleafterward.
View attachment 895674
View attachment 895675
View attachment 895676
Next was building up the body. Here's a pic of it in its early rough shape. (sitting over my MR replica
View attachment 895677
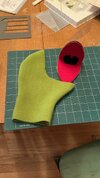
Next was getting the fabric to fit over the body, which took a lot of stretching, trimming, sewing in the seams, to get it to look right.
View attachment 895678
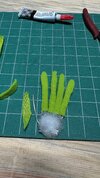
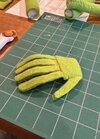
The hands are simply made from small pieces of thin cardstock with wires epoxied onto it. The paper you see underneath is a pattern I drew up to use as a sizing guide. The palm was partially sewn on, and bit of stuffing added. Finger fabric was glued with contact cement. One thing of note is that all of the "joints" in his arms and legs have been left without stuffing, to ensure maximum pose-ability. It's something that occurs on the original puppets that i wanted to replicate.
View attachment 895679
View attachment 895680
View attachment 895681
Working on a leg and foot
View attachment 895682
"Game of Muppets"
View attachment 895683
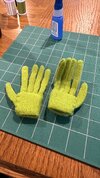
Messing around with limbs:
View attachment 895684
I ended up dyeing the felt slightly darker as the stock I found was too light
View attachment 895685
"Who am I?!" Here's a pic of the head already stitched onto the body, but the arms pinned in place. It was very important to utilize the pins during sewing to keep things from shifting around:
View attachment 895686
In progress but getting there!
View attachment 895687
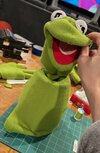
And below is pretty much the almost finished piece. Just need to stitch on the collar and attach the eyes, which I'll probably do via velcro so that I can easily remove them. Keep in mind this is a puppet, so the head is not filled with anything. I've added some stuffing for the pictures, as well as a tall cup that is holding his head up. I'll be building some sort of armature inside for display purposes since I don't really plan on using it as a puppet anyway. I have yet to add the holes in the hands for the hand rods but will do that at a later date.
View attachment 895688
View attachment 895689
View attachment 895690
View attachment 895691
Kermit has always been a favorite of mine, so this was one amazing experience! Probably the most fun prop building project I've ever attempted. Took just a little over a month on this piece, not counting the week or so spent experimenting and practice stitching.
Version 3 Kermit; the final one I made. Inspired by the earlier Kermit look:
View attachment 895692
cincinnatisara
New Member
Desperately looking for a pattern to get started!
This turned out to be a much longer post than I originally intended, but ecl I want to give you a huge thank you for this thread as well as share my experience making the frog we all know and love!
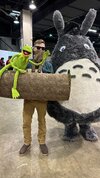
I followed your direction and patterns in this thread to do a cosplay of Kermit that I'm going to be bringing back every con I go to for the foreseeable future. The level of detail that you put into every post here made this process way easier than I ever could have imagined. I had never sewn anything before in my life, so I was prepared for the first version of Kermit I put together to be absolutely terrible, and while looking back at the first appearance he made does make me very glad that I made some revisions, even that first version had my wife and I saying "It's Kermit!" after just a quick glance. Through all the cons I've already brought him to, the number of times I've heard, "OH S*** IS THAT KERMIT THE FROG?!" has been amazing, and the overall experience is the closest I think I'll ever come to having true VIP status. Instagram even shut down the first account I opened for the cosplay because they claimed I was, and I quote, "impersonating a celebrity." I had to make sure that the bio of the current account very clearly says "cosplayer" and "parody." I've got a few of the in-progress and out-and-about pictures attached here for y'all to enjoy!
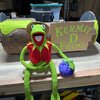
Thank you so much for making and sharing the most easily accessible blueprints for a fine Kermit the internet could have hoped for! Here's my v1 Kermit when he was first finished!

That all said, what this process really drilled into me is that I am not that good at crafting, and I noticed a few areas where 3D printing some parts could supplement my lack of crafting skills while also upping the durability of Mr. Frog for repeated, live useage. Here's the list (if anyone's interested):

0.4mm nozzle print (left) vs 0.2mm nozzle print (right) (with mouth plate print in the back-right!)

I'm more than happy to share the .stl files with anyone who wants them!
While the final product is nowhere near completion, here's the upgrades I'm working on with v3:
If you didn't skip ahead and made it to this point, I'm amazed at your attention span! Thanks again for reading, and let me know if any of you want more details or any of the .stl files for any of the parts!
I followed your direction and patterns in this thread to do a cosplay of Kermit that I'm going to be bringing back every con I go to for the foreseeable future. The level of detail that you put into every post here made this process way easier than I ever could have imagined. I had never sewn anything before in my life, so I was prepared for the first version of Kermit I put together to be absolutely terrible, and while looking back at the first appearance he made does make me very glad that I made some revisions, even that first version had my wife and I saying "It's Kermit!" after just a quick glance. Through all the cons I've already brought him to, the number of times I've heard, "OH S*** IS THAT KERMIT THE FROG?!" has been amazing, and the overall experience is the closest I think I'll ever come to having true VIP status. Instagram even shut down the first account I opened for the cosplay because they claimed I was, and I quote, "impersonating a celebrity."
I had to make sure that the bio of the current account very clearly says "cosplayer" and "parody." I've got a few of the in-progress and out-and-about pictures attached here for y'all to enjoy!Thank you so much for making and sharing the most easily accessible blueprints for a fine Kermit the internet could have hoped for! Here's my v1 Kermit when he was first finished!
That all said, what this process really drilled into me is that I am not that good at crafting, and I noticed a few areas where 3D printing some parts could supplement my lack of crafting skills while also upping the durability of Mr. Frog for repeated, live useage. Here's the list (if anyone's interested):
- I initially used a ping-pong ball for the eyes, but my dexterity on the crafting there was... less than amazing. So for v2 and beyond, I've been 3D printing the eyes. For v2.0 I used a 0.4mm nozzle, then for v2.1 I used a 0.2mm nozzle which greatly improved the detail. They're a bit hard to clean if they get dirty, and you can see the layer lines if you look close, but from a couple feet away there's no chance anyone's clocking that they're printed. You can also print the washers and screws to save a trip to the hardware store!
0.4mm nozzle print (left) vs 0.2mm nozzle print (right) (with mouth plate print in the back-right!)
- I also ended up 3D printing the hand plates. The epoxy-on-cardboard method kept coming undone, so I modeled a hand plate that had holes in a solid block that could just have the wires glued into it while being surrounded on all sides by a permanently attached structure. It also has a space for a magnet so that Kermit will be able to hold things, and has a spot for a clip connector so that I didn't have to permanently attach the arm rod.
- The last thing that I used the 3D printer for in v2 was the mouth plates. Cardboard wasn't flexible enough and the cuts I had with craft foam sheets in v1 were asymmetrical at best. I printed the plates out with a TPU filament that's very flexible and has been responding well to the adhesive I've been using to adhere the mouth felt to it.
I'm more than happy to share the .stl files with anyone who wants them!While the final product is nowhere near completion, here's the upgrades I'm working on with v3:
- 3D printed body core. I have an idea that involves armiture wire in the right arm because currently it's a little too floppy when he talks and the fishing line gets in the way of putting on cosplays for Kermit
- The washers for the eyeballs are now designed so that they can hold magnets against the felt behind the eyes (so Kermit can more easily wear hats)
- I'm refining my Henson stitch technique because I realized I had been making the stitches much too far apart
- I have a Bambu P1S with the AMS attachment, so I tried printing the eyes as a single object, but I think I need to redesign the print file because it keeps printing a noticeable line on the layer where it first shifts from white to black. Not sure how to fix it yet, but the 2-part eyeball is still the best looking option for now
- Using a different sort of fleece that I sourced from Puppet Pelts. The v1 and v2 used their "Greenzilla" Nylafleece, but v3 will be using the "Frog" Fuzzelle. The Nylafleece is softer and stretchier but is prone to pilling. The Fuzzelle seems like it might be less comfortable, but is supposedly based on the original antron fleece that the Muppets used, so hopefully it lasts a little longer without starting to pill.
- Created a pattern for the body covering instead of freehanding it. This only works for this version because I have the 3D printed body that I can base all the geometry on, but I'll still scan and upload that if anyone's interested
- I revised the hand plate design because the glue holding the finger wires in on the last one didn't last as well as I'd hoped. While the wires don't come out of their sockets they do turn in place much easier than I'd like. I'm adjusting it to where the formerly solid block with 4 finger holes now has two parts that sandwich around two U-bent wires. The technique here is that the index and middle fingers are the same wire, and the ring and pinky fingers are the same wire. This will make it so that the wires can't turn unless explicitly turned. I'm going to glue the two parts of the block together around the wires, then use a soldering iron to melt the plastic of the block around the edges (because I've found that mechanical bonds are MUCH more reliable than glue alone)
- Upgrading the log he sits on to be more of a stage with curtains reminiscent of those on the Muppet Show stage
If you didn't skip ahead and made it to this point, I'm amazed at your attention span! Thanks again for reading, and let me know if any of you want more details or any of the .stl files for any of the parts!
Attachments
-
 IMG_010.jpg1.6 MB · Views: 117
 -
 IMG_011.jpg1.4 MB · Views: 117
 -
 IMG_013.jpg1 MB · Views: 106
 -
 IMG_014.jpg594.6 KB · Views: 105
 -
 IMG_009.jpg1.4 MB · Views: 104
 -
 IMG_008.jpg1.3 MB · Views: 113
 -
 IMG_007.jpg1.6 MB · Views: 104
 -
 IMG_005.jpg947 KB · Views: 126
 -
 IMG_004.jpg697.5 KB · Views: 139
 -
 IMG_003.jpg1.4 MB · Views: 119
 -
 IMG_002.jpg481.8 KB · Views: 143
 -
 IMG_001.jpg1 MB · Views: 156
 -
 IMG_016.jpg1.2 MB · Views: 117
Similar threads
- Replies
- 85
- Views
- 27,650
- Replies
- 2
- Views
- 503
- Replies
- 0
- Views
- 336