Hand stitched Kermit the Frog puppet replica!! (Early builds/old patterns)

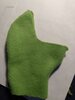
no worries; the thread has been growing a bit. I can't even remember what I posted before haha. The ones in this thread are my very early builds, but the techniques used are essentially the same. For Kermit, I made the heads foamless, so the shape is generally the hand when in use. The removable foam inserts I cut for them are for when on display only.

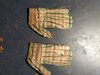
You're correct, I attach the mouth plates to the head using contact cement; a part of the pattern folds over onto the mouth-plate, as seen below. The notes were from very early on when my pattern was not as refined, so I had to do some test fitting and trimming. The photos below are of my later pattern, which I was able to get to fit without trimming, but the method of attachment is more easily seen here. I know some people have also tried sewing the fabric to the mouth plate and then gluing the rubber parts in later from behind, although based on the kermit I saw in an exhibition, it appeared to be glued (edge of the fabric was visible). But either works. :

View attachment 1326927
Thanks so much!
 
I began construction on my replica today, I can't do anymore as of right now, because my rubber hasn't come yet. I modified your earlier pattern a bit, and made it a bit smaller, because I am a teenager and have smaller hands. I am really excited to keep working, I haven't been this excited a build since I started puppet making!
 

Attachments

  • IMG_20200720_180528751.jpg
    IMG_20200720_180528751.jpg
    2.3 MB · Views: 238
It’s getting there! You could trim some of the extra fabric off To get a tighter fit. In my older builds I used tape to hold it in place so that I could figure out where to cut.
 
It’s getting there! You could trim some of the extra fabric off To get a tighter fit. In my older builds I used tape to hold it in place so that I could figure out where to cut.
yeah, I did that a little after(though some of it was already cemented on. I will post a picture of where I am now. i definitely have things i want to change in my next version. this is a big learning curve for me, i have only done foam head builds before, never hand puppets like kermit, so I think my next version will end up looking a lot better. This one is ending up looking a little more like constantine lol. I definitely will make the next one bigger, because i shrunk this one down to fit my hand size, but i shrunk it way to much.
 
Last edited:
IMG_20200722_120607119.jpg
IMG_20200722_120800932.jpg

Quite the dismal failure, but after I finish I know what to change with my next
Question, since this turned out like this, do you think it's worth finishing or should I just move on to version 2
 
Quite the dismal failure, but after I finish I know what to change with my next
Question, since this turned out like this, do you think it's worth finishing or should I just move on to version 2

It wouldn’t really call it a failure; the fact that you were able to put something together means that you’ve started practicing the foundation of how it all works, and from then on it’s just a lot of refining and practice. When I first started making my Kermits, I made dozens of heads—each one a slight revision of the other, until I found a solution I liked. Plus, if you make something you think is ‘wrong’ or doesn’t look right, you’ll start to see why that is and what to change, and that’s more important than just luckily getting it perfect on the first try (which never happens, in any situation).

Personally, I would just jump version 2. That’s what I did; just kept starting a fresh one, but learning from the previous ones. Although it can use up a lot of fabric, so it’s a good idea to practice on less expensive material until you get closer to where you want it.
 
I made a new head, and I'm a lot happier with this one, I haven't put the mouth features on yet and it definitely has its inacuracies but I'm gonna finish this one I think. Would love to hear your thoughts on it because I don't know really what to change with the head pattern, even though it's still very wrong
 

Attachments

  • IMG_20200724_163858149.jpg
    IMG_20200724_163858149.jpg
    2.7 MB · Views: 331
  • IMG_20200724_164036799.jpg
    IMG_20200724_164036799.jpg
    3.8 MB · Views: 337
  • IMG_20200724_142618870.jpg
    IMG_20200724_142618870.jpg
    2.6 MB · Views: 324
I made a new head, and I'm a lot happier with this one, I haven't put the mouth features on yet and it definitely has its inacuracies but I'm gonna finish this one I think. Would love to hear your thoughts on it because I don't know really what to change with the head pattern, even though it's still very wrong

Nice, it’s a noticeable improvement! One good thing that I’m seeing is that you’re getting the ‘cheeks’ to show up prominently; often times the opposite happens—the head ends up looking too tight. Generally, if you wanted to change something with the head pattern, or make adjustments, just look at what you want done. Like if you think there’s too much room on the top of the head, just take away some of the top profile on the pattern. If you think the mouth is too roomy, you can do the same, just remove some away from the pattern around the mouth. It’s really just making small changes and then seeing where it goes.

Looking at What you have there, I would just say maybe you could either scale down the pattern a little; it just looks a bit roomier than It needs to be. But the general idea is there. What size eyes are you working with currently? The eyes are very important size-wise. I’d say they’re just a little bigger than they should be here.
Thanks so much for all the advice, your right the mouth should be less roomy, because the roominess makes the head look a little flat because my hand isn't up against it. Also I'm using 40mm ping pong balls
 
Stuffed his head with tissues to get a better feel for what his optimum shape would be. This design is closer than I thought, I see what you mean about the eyes though, I think, in addition to making them smaller I should put them a little farther down and draw the eyes farther down too(please excuse the messy workspace)
 

Attachments

  • IMG_20200726_170904335.jpg
    IMG_20200726_170904335.jpg
    2.3 MB · Views: 251
Stuffed his head with tissues to get a better feel for what his optimum shape would be. This design is closer than I thought, I see what you mean about the eyes though, I think, in addition to making them smaller I should put them a little farther down and draw the eyes farther down too(please excuse the messy workspace)

That is shaping up quite nicely!! Overall its getting more refined each time I see it. The head shape is looking a lot more defined and sharp, and that’s in the right direction. Smaller eyes would be better, something in the 35mm size should work (which is great, as they’d be closer and more accurate in size to the original Kermit I saw). I’m assuming since you said you’re using ping pongs, that they‘re 40mm diameters. Also, try to make the eyes a bit closer together; that will help too. It varies somewhat on the originals, so I recommend taking a look at a few references; some of the older ones have wider spaced eyes, but generally there’s maybe a little over a half inch of space between the eyes.

My workspace is a mess too when I’m working on stuff.....a clean workspace probably means nothing is getting done haha!
 
Last edited:
Ok, so I was able to make both the legs and that was streightforward enough, but I'm having trouble with the hands, I am going to epoxy the armature wire on, but as far as making the fleece covering, I am a little apprehensive. I take I should just copy the pattern on the fleece and stitch it together as normal, but then how do I get the structural part inside?

Btw thank you for all your help and encouragement so far
 

Attachments

  • IMG_20200802_175114374.jpg
    IMG_20200802_175114374.jpg
    5.6 MB · Views: 204
Ok, so I was able to make both the legs and that was streightforward enough, but I'm having trouble with the hands, I am going to epoxy the armature wire on, but as far as making the fleece covering, I am a little apprehensive. I take I should just copy the pattern on the fleece and stitch it together as normal, but then how do I get the structural part inside?

Btw thank you for all your help and encouragement so far


Normally I would just do the fingers separately (wires and the fleece glued on) and then just attach them to a styrene plate. But of course, they can be done in other ways too! Below is a photo of how I usually do it:

DD40422B-AF0C-4112-8D6F-F86DDA3D74B7.jpeg


E6C050BA-1ACE-4843-9B6A-6219BDF16337.jpeg


The fingets are attached to the styrene plate, and then I add a little bit of contact cement to the top edge and it’s attached that way to the rest of the hand/arm. I found this to be a straightfoward way of doing it. The styrene plate also enables you to add some kind of pocket for the arm rods, if desired. Generally on Kermit, I just use contact cement for the fingers (no stitching).
 
Normally I would just do the fingers separately (wires and the fleece glued on) and then just attach them to a styrene plate. But of course, they can be done in other ways too! Below is a photo of how I usually do it:

View attachment 1332445

View attachment 1332446

The fingets are attached to the styrene plate, and then I add a little bit of contact cement to the top edge and it’s attached that way to the rest of the hand/arm. I found this to be a straightfoward way of doing it. The styrene plate also enables you to add some kind of pocket for the arm rods, if desired. Generally on Kermit, I just use contact cement for the fingers (no stitching).
This is immensely helpful, thanks to much!
 
Only the feet, collar, and one more arm to go. I'm thinking about taking a break from Kermit after this puppet, and attempting a rowlf. He is a sack puppet, automatically making him much easier, and he is a foam head puppet, making me much more familiar with the creation process. I just want to say, thanks for all your help, I am pretty happy with how this is turning out, and it probably would a lot more like a mangled Constantine were it not for your help
 

Attachments

  • image-20200807_145455.jpg
    image-20200807_145455.jpg
    2.5 MB · Views: 275
Hi
I really want to try to make my own Kermit.
But I can't acces the google drive link posted earlier it gives me a 404 error.
 
Only the feet, collar, and one more arm to go. I'm thinking about taking a break from Kermit after this puppet, and attempting a rowlf. He is a sack puppet, automatically making him much easier, and he is a foam head puppet, making me much more familiar with the creation process. I just want to say, thanks for all your help, I am pretty happy with how this is turning out, and it probably would a lot more like a mangled Constantine were it not for your help


Very cool, thanks for sharing! He’s looking neat. Rowlf would be a great character to try; as you mentioned, he has a different construction method than kermit, with the foam structure. The basic techniques you used on Kermit will be useful for all kinds of builds! Have fun with it.
 
Hello good afternoon
forgive my bad english, i'm from mexico and i don't speak your language very well haha

I am sending you this message to ask for your help.
Look, I'm a fan of puppets, I make puppets and learn from them today, I also make puppets for my friends and family ... and although muppets are not my main hobby, I consider the characters to be very good.

and among them the kermit frog (rene, as we call it in Latin America) is one of my favorite characters on the show.

I have noticed that you have created replicas of them and would like to know if you could help me make my own kermit replica. I've never made a Kermit puppet, but I'd like to try and make one with your help.

I do puppets from time to time for fun, although they are not very good, I try a little to make them look good.

so i am wondering if you could guide me and help me create my own kermit replica.
He's such a lovely character that I could really use his help.

I do not know if you have any other social network through which I can contact you in addition to this since your help would really be good for me.

I hope you can help me.
 
Seeing Kermit or any of the Muppets just makes me smile from ear to ear. I love this! Thank you for sharing your work with us.
 

Your message may be considered spam for the following reasons:

If you wish to reply despite these issues, check the box below before replying.
Be aware that malicious compliance may result in more severe penalties.
Back
Top