Halo 5 Achilles helmet/ MK IV Gen 1 WIP

spartan1803

Well-Known Member
Hey guys I just wanted to share my progress on painting this helmet. If I had know some certain techniques before taping it all off for the detailing it would have saved a ton of time but that's how we learn I guess. I've got some touch up to do and then I'm gonna start weathering. If you have any suggestions lemme know!!!


IMG_0052.JPGIMG_0062.JPGIMG_0076.JPGIMG_0081.JPGIMG_0089.JPGIMG_0113.JPG
 

Attachments

  • IMG_0111.JPG
    IMG_0111.JPG
    976.2 KB · Views: 290
  • IMG_0101.JPG
    IMG_0101.JPG
    662.9 KB · Views: 549
Last edited:
Re: Halo 5 Achilles helmet

Well the helmet is finished!!!
IMG_0242.JPGIMG_0243.JPGIMG_0244.JPG

Ive started working on the halo wars variant spartan armor. So far I've finished one shoulder and I'm about half way through the torso.
IMG_0496.JPGIMG_0498.JPGIMG_0524.JPG
I wanting to have the back done by mid next week. It's been taking forever!
ill probably do the arms in cardstock then the waist down in foam. Thanks for looking!
 
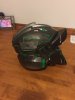
OK so it's been a while since I've done an update on this. I finished the shoulder first.
IMG_0524.JPG

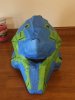
And im just about done with the chest
IMG_0648.JPGIMG_0497.JPG

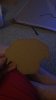
With the center piece, I didn't want to waste hours upon hours peping all the detail so I traced the opening onto cardboard and then added a lip for glueing.
I peped the outer brim and traced it onto the cardboard and then measured out the thickness. I cut foamcore to that size so I could provide support under the brim.
IMG_0683.JPGIMG_0682.JPGIMG_0678.JPGIMG_0677.JPGIMG_0671.JPGIMG_0685.JPG

After that I cut out all the floating faces for the center detail and stenciled them onto foam core or cardboard depending on the thickness I needed.
After I cut those out I glued them into place and voilà!
IMG_0691.JPGIMG_0690.JPGIMG_0689.JPGIMG_0692.JPG

I still have to add the small pieces in the very center but that shouldn't be too hard. The spacing is a tad off but a small
price to pay for all this only taking about an hour.

Tomorrow I will be getting a trial version of smooth-on 321. I'm going to test it on the shoulder as a hardener instead of using resin
and fiberglass. I have a 3 year old and even though I do work in the garage I don't want to take the chances of the fumes getting in the house.
thanks for watching guys, there is more to come!!!

edit: not really sure why my photos are out of order and sideways...
 

Attachments

  • IMG_0496.JPG
    IMG_0496.JPG
    161.9 KB · Views: 1,211
  • IMG_0500.JPG
    IMG_0500.JPG
    467.8 KB · Views: 238
  • IMG_0670.JPG
    IMG_0670.JPG
    487.5 KB · Views: 238
Last edited:
So I've done quit a bit of work. Trying to get it finished by Halloween!
chest piece is just about done just need to finish under the arms then fiber glass and bondo


IMG_1172.JPGIMG_1212.JPG

The shoulder and and cod are done. Might need to straighten the shoulder up a bit

IMG_0974.JPGIMG_1151.JPG

Biceps just need to hardened and bondoed

IMG_1211.JPGIMG_1187.JPG

Shoulder is is almost done with paint. Just need to add an emblem, needle and light!!!

IMG_1190.JPGIMG_1224.JPGIMG_1171.JPG


This will will probably be the last update on this until it's done. Have had any activity on this thread so I don't see a point in updating it
 

Attachments

  • IMG_1186.JPG
    IMG_1186.JPG
    818.7 KB · Views: 267
This thread is more than 5 years old.

Your message may be considered spam for the following reasons:

  1. This thread hasn't been active in some time. A new post in this thread might not contribute constructively to this discussion after so long.
If you wish to reply despite these issues, check the box below before replying.
Be aware that malicious compliance may result in more severe penalties.
Back
Top