Half-Life Tau Cannon

01binary

Active Member
The Tau Cannon from Half-Life has captured imaginations of gamers and 3D artists ever since Black Mesa first presented a high-definition render to build anticipation for their mod:

tau_beauty.jpg


Other artists followed suit with masterpieces like this one from Alexander Rain:

alexander-rain-01-tau-vray-01.jpg


I had various renders of the Tau Cannon on my desktop since 2012 and kept dreaming about making my own out of aluminum, copper, and rubber. At last I have a chance to do this!

Here's my initial CAD model in Autodesk Inventor. This blends my favorite parts from all re-interpretations, although it's heavily skewed toward the "original" from Half-Life 1".

tau6.PNG


tau2.PNG

tau3.PNG

tau5.PNG


To make it more realistic, I added picatinny rails so that it's possible to attach additional handles, laser pointers, flashlights, shoulder straps and any other real gun parts.

I also tried to make the stock "prettier", which to me meant a latticed cyperpunk appearance to match the look of my previous project on this site. The top handle is this one from B & H photo supply, which I thought looked cooler than the basic bucket handle from the game: SmallRig Cheese-Style Top Handle with Shoe Adapter Mount

Lastly, the side grip is also a real gun part that attaches to a picatinny rail: Amazon.com: SUPEIRXIU Quick Connect Handle for Hand Guard, Can be Tilted to 5 Non-Slip and Scratch-Resistant Positions(Black) : Automotive

This week I got the first few batches of parts, a combo of 3D printed, CNC, laser-cut, and sheet metal:

thumbnail_IMG_8824.jpg


thumbnail_IMG_8823.jpg

thumbnail_IMG_8833.jpg

thumbnail_IMG_8835.jpg

thumbnail_IMG_8836.jpg


The thing is absolutely huge, but this is a 1:1 build verified against the proportions of a person using Gary's Mod:

thumbnail_gm_flatgrass0005.jpg


I got some welding to do next, some work on the copper muzzle and pipes, and painting. I think I will go with white for this kind of vibe (but no green of course, just pretty copper):

white.PNG
 
I might be building a Half-Life 1 HEV suit with helmet next. I feel like that's required to operate the Tau Cannon, because the helmet of the suit from the game is based on an arc flash hood for working with high voltage equipment:


Of course with the dune buggy I would be able to mount the cannon on the side and drive to next Wasteland Weekend/Neotropolis that way.

Past two weeks I was working on making molds and casting the rubber parts with different colors and out of different rubbers.

There are three rubber parts: the fat cable connector (I guess that's supposed to be like a panel-mount gasket), the back of the stock, and the finger grip at the top of the stock near the trigger:
 

Attachments

  • IMG_8853.jpg
    IMG_8853.jpg
    705.9 KB · Views: 101
  • IMG_8854.jpg
    IMG_8854.jpg
    635.4 KB · Views: 86
Well, after that big Exo-suit project; this one seems simple:p 
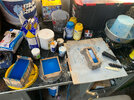
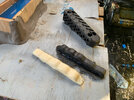
So far the quality of the parts are impressive!
Eager to see your next update(y)(y):cool::cool:
 
That looks awesome. I'm curious, is that just water based clay you're using to seal the mold boxes? Does that work well from you?
 
I am using a cheap high-fire clay from the nearest art store. I tried lots of other stuff like hot glue guns and modeling clay, but this is just so easy to use, and it works great in any season. Weak enough to put on take off easily, sticky enough to hold and seal anything. The main reason why I have this is for making 2- and 3-part molds where you have to submerge a part of the 3D-printed model into the clay, and also stamp key marks, but it's convenient all-around. Here's an example from a previous project:

chest.jpeg


It does generate extra waste, dries your hands if you don't wear gloves while working it, and it's easy to get dry dust particles all over your stuff if you don't dispose/clean carefully. So environmental footprint could be worth considering. It's also incredibly heavy to carry and transport.
 
A couple of more exciting renders.

tau-cad01.jpg


tau-cad02.jpg


I got more rubber material in, and finally settled on SmoothSil 940 for the rubber parts. It's not too hard and not too squishy, also not too sticky and looks great in black and white. I should be able to finish casting the three main rubber parts this weekend with any luck.

rubber-1.jpeg


Lastly, I decided to make that blue CO2 cartridge out of rubber as well. There aren't any cartridges that are that big in real life so I got it 3D printed, and going to add blue pigment when casting out. Ordered a custom sticker to put on it as well.
 
Making a mold for the last rubber part, the blue CO2 tank. Using DragonSkin Medium silicone for the mold because I had some handy, could have also used MoldStar.

IMG_9024.jpg


This was 3D printed and sprayed with Tamiya finishing primer a few times, polished with a few grades of sand paper.

IMG_9017.jpg


Got the stickers to put on the CO2 tank after it's cast. I wanna say the Tau Cannon is powered by depleted Plutonium and Whip-its.

IMG_9016.jpg

tank.PNG
 
Last edited:
Finished casting the tank, just a bit of cleanup still required. It got the baby-blue color I wanted, since SmoothSil 940 is pinkish-white when uncolored, so adding a bit of blue pigment is like mixing blue with white.

tank-cast1.jpg


tank-cast2.jpg


tank-cast3.jpg
 
Wow; that copper muzzle is the bombo_O:cool::cool: Heavy? Bending copper tubes is easy: take soapy water and fill those tubes to the brim.
Use a latex cork plug at each end. Put the tubes in your freezer. When the water is completely frozen, remove the tube and bend them around a wheel (could be the wheel that holds your clothes line); bend it and voilà a perfect tube!
Leave them outside, remove the corks and the water will thaw in no time.
 
Wow, great advice! How thick must the tube wall be for this to work though? There is such a large variety of what's available, I could easily get something too rigid.

Also, yes the muzzle is like 30lbs. I tried to get it made out of rolled sheet metal with stamped indentations, but it required custom mandrels so I had to downgrade to machining it out of a solid block of copper.
 
Last edited:
This is turning out amazing! I literally just started a Tau cannon build of my own in September after years and years of procrastination. Can't wait to see this thing up and spinning!
 
Wow, great advice! How thick must the tube wall be for this to work though? There is such a large variety of what's available, I could easily get something too rigid.

Also, yes the muzzle is like 30lbs. I tried to get it made out of rolled sheet metal with stamped indentations, but it required custom mandrels so I had to downgrade to machining it out of a solid block of copper.
Doesn't really matter; this trick is used in manufacturing musical instruments: trumpet, sax, trombone, etc... It works all the time when following those steps: Fill with soapy water + freeze + bend while still frozen + thaw + empty soapy water = happiness;)
 
That didn't go well. The ice blew out the end caps as soon as I started bending. I replaced the end caps with steel plugs, but that didn't make any difference. As soon as I bent the pipe, even with ice in it, it either extended out the sides and flattened the bend, or just broke.

bend-pipes0.jpg

bend-pipes1.jpg


bend-pipes2.jpg

bend-pipes3.jpg
 
I guess you'll need a bending spring that you'll buy at the plumbing section and introduce it inside you pipe.
They come in different sizes to fit inside your copper pipe. YouTube is your friend at that point ;)
 

Your message may be considered spam for the following reasons:

If you wish to reply despite these issues, check the box below before replying.
Be aware that malicious compliance may result in more severe penalties.
Back
Top