Halcyon Models Nostromo 1:960 build

HMR

Active Member
First thread and first post here. Been lurking for a while, taking in the sights. Love it so far! :)

Thought I`d share one of my projects. The USCSS 'Nostromo' Commercial Towing Vehicle.
Seen a few really nice builds of these kits and picked up some inspiration from them, when deciding what I wanted for my own version.
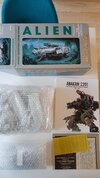
  • Lighting for the hull, gear-bays, engines and bridge. Possibly fiberoptics, although I have no previous experience with it.
  • Making new antennas and probably other parts. After going over the kit I would have liked a few more details (don`t we all?!), especially on the smaller parts.
  • A display base, primarily for hiding power wires via the main landing gear. Maybe a plaque to go with it.
2.jpg3.jpg

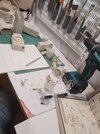
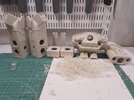
Decided to make holes for the wires as large as possible. Ease of access, should I need it.. or should I say WHEN I need it.
4.jpg

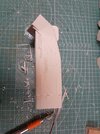
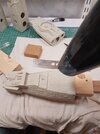
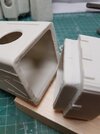
Heating and getting parts as straight as possible. Plunging the heated parts into a bucket of cold water seemed like made it set the new form.
It also soothed my fingertips. Got pretty hot..
5.jpg

7.jpg6.jpg

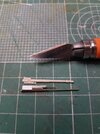
Testing a quick antenna idea.
8.jpg


More to follow.
Thanks for looking!
 
Made some progress with antennas aswell as the dish and "docking-tube" at the front. Or at least so I thought.
Based them loosely on a few screengrabs. I later found the exellent photos by John Eaves, Paul Webb and vectorzero, of the real thing.. making me a bit... undecisive. o_O

Im not sure I`ll use this first "batch" I built as is. Maybe modify some or all, or just start over, making them resemble the original a bit better. I am however worried they will stand out to much if I go super detailed, compared to the rest of the model. Decisions, decisions..

9.jpg


10.jpg


11.jpg


12.jpg


13.jpg


14.jpg


I also made a few pieces for the refinery docking mechanism. I found it weird that the middle cylinder is so off center?

Going with a lighting kit for the Zvezda / Revell Star Destroyer from GreenStrawberry as a starting point.
Drilled some holes in the main engines and cut out some frosted plexiglass im planning to use as diffusers inside each of the engines for the LED`s.


15.jpg


16.jpg


17.jpg


More to follow.
And thanks for taking a look!
 
Last edited:
Wow, thats an incredible collection. I have been to your site earlier, but didnt catch those albums for some reason. Thank you for stopping by and letting me know!
 
Very nice work so far! I am sure this will turn out really nice!

Here is a link to my collection of Nostromo photos. You'll probably find most helpful my off-site gallery named, "The Nostromo Files Reference Album 01: Nostromo Exteriors (offsite)"

There is also a link to the restoration photos you mentioned, just in case there are some there you may have missed.

Good luck!

I have been on your page many times! Great work . Its awesome to see all these great people here! Thank you for your collection, ArtooThreepio12!
 
Started making a lot of 0.30mm holes for the 0.25mm fiberoptics. Got a steady workflow going, only interupted by snapping a few drillbits.
I placed the holes roughly according to the port side, of what I think is the filming miniature attached to the refinery. It looks to have been fitted with more lights around the hull than the larger model and I like the look.

Ran into problems getting the fiberstrands through, immediately regretting not engaging my brain and testing, before drilling all those holes in one go. :cautious: Frustrated, I redrilled with 0.35mm thinking a ~15% larger drillbit would surely do the trick.
Murphy, with his law, went: "HAHA NOPE!".
With the material being kind of gummy, I assume the small 0.05mm increase pushed the material around more than actually removing it. I ended up drilling all a third time with 0.40mm. Even then, I swear those holes were shrinking!
Thats when I noticed my cuttingmat was labeled >PVC<. I certainly had gained a better understanding of why.

18.jpg


19.jpg


20.jpg


22.jpg


23.jpg


I picked up a set of Bahco needle files I have wanted for a while. Gave them an easy run in making the bridge canopies out of some clear sprue. After looking at the pictures I might change the two front pillars to taper out a bit like they should, rather than being straight.


24.jpg


25.jpg


27.jpg


More to follow.
Thanks for looking!
 
Last edited:
Mother blood! (it looks like on your cutting board)

Awesome work on the tiny observation windows!
 
I am very exited how this will tun out! These bridge windows look great. I love needle files. Won't never miss these tools again. I usually use them für small bronze or aluminum sculptures and its great fun to work with these files.
 
The great efforts towards 1:960 stuffed dices and windshieldwipers was occupied with trifles and proved futile... Onwards!

After testing I realized the fibers were not emitting enough ambient light for the cockpit and landing gear bays. The kit I bought has 9 LED`s lighting up in sequence (plus 4 single and 3 LED arrays for the engines) managed by a controlboard. I got some blue 4V LED`s thinking I would get away with piggybacking some "spare" solderingpoints on the board.
I connected one for the cockpit and two for each gear bay, totalling 7 LED`s. This piggybacking led to several of the engine LED`s not working properly. Im suspecting it may have been to much for the regulators.

Instead of hacking the controlboard, I made a simple separate circuit drawing from the main 12V input. Got 5V with a spare Pololu stepdown regulator and 3.8V with some 100Ω and 1kΩ resistors wired in series. Added two 1000µF capacitors for a subtle fade in and out.

28.jpg


29.jpg


30.jpg


31.jpg


32.jpg


35.jpg


These parts went together. I even got them straight.

36.jpg


38.jpg


I am hiding the wires in the landing gear and inserted some styrene tubes in the center. In hindsight I could have gotten away with thinner wires, drilling through the existing vertical parts of the gear, for a cleaner look.
I decided to drill into the tube from an angle to get the wire out under the feet, instead of the already ugly tube going into the ground, ruining the illusion completely.


40.jpg


41.jpg


42.jpg


Lightblocked the inside of the engines with silver paint, covered by black.


39.jpg


Glued the diffusers I made earlier in place and made some simple bracings for attaching the LED`arrays at a distance for best effect.

43.jpg


44.jpg


More to follow!
Thank you for stopping by.
 

Your message may be considered spam for the following reasons:

If you wish to reply despite these issues, check the box below before replying.
Be aware that malicious compliance may result in more severe penalties.
Back
Top