HAL 9000 Build

MrSinistar

Well-Known Member
After seeing A.P.'s truly amazing research on the screen used HAL panel, I decided to tackle my own HAL build, using A.P.'s resources. Big thanks to A.P. for all of his work and epic blueprints!

First off, I wanna point out that this build is not 100% accurate and it's not 1:1 scale. This is more like a "fun" build and making something that looks close enough for super cheap.

Anyways, the genesis of the build was some pink insulation foam.

400781_2911470952867_1443438409_3186795_1498233434_n.jpg


I grabbed a really neat 2-1/2" to 1/2" PVC connector that I thought would work great. After carefully cutting out the shape, I shoved the PVC connector into the slot and it fits very tight.

385859_2911471192873_1443438409_3186796_1321852962_n.jpg


I printed the blueprints on US letter sized paper instead of the A3 letter size so the panel is smaller, but I'm not worried about that. As long as the dimensions are right, I'm happy.

407935_2911471312876_1443438409_3186797_1141344067_n.jpg


I then cut out some .020" styrene for the front panel:

382764_2911471472880_1443438409_3186798_1620737965_n.jpg


Light test:

400776_2911472152897_1443438409_3186801_493026519_n.jpg


388438_2911472392903_1443438409_3186802_219136114_n.jpg


I forgot that the panel itself is made out of wood, so I went ahead and carefully cut out some basla wood for the new panel. I also grabbed a 1/2" PVC pipe and filled it up with my new favorite stuff: Apoxie Sculpt. After that dried, I drilled a hole in the center of the epoxy and installed a red LED for the eye. Now it's looking good!

380529_2911472872915_1443438409_3186804_171416728_n.jpg


Today, I went to Michael's and grabbed the last clear 100mm plastic ornament ball they had. After three attempts of cutting out a lens piece, I finally got a lens that I was proud of. It's not perfect, but I like it and it does the job:

399005_2911473072920_1443438409_3186805_1689362303_n.jpg


407382_2911473552932_1443438409_3186807_1205869106_n.jpg


Here's a closer representation of how bright the LED is in real life:

392593_2911473832939_1443438409_3186808_1911728216_n.jpg


I'm probably gonna put in a weaker battery or a 330ohms resistor in there.

Hope you guys like it so far!
 
PVC connector.

:lol

Love it ! Love it !

Love the idea, ingenuity and putting it into practice :)

Right up my alley :thumbsup :thumbsup :thumbsup :thumbsup
 
Hahahaha, I think I should make a SAL, lol. Thanks a lot for the compliments, Alan and apollo!

I went to Lowe's again to get more of those 2-1/2" by 1/2" PVC "bushings". Those things are awesome. I'm going to paint the eye tonight...wish me luck!

EDIT: Would you guys recommend woody putty to fix that wood splintering on both top right and bottom right sides of the eye? Also, how should I primer and sand the wood for painting? I never worked with wood before so I'm a bit nervous, lol.
 
I eventually need to make a Hall 9000. I want it to slowly fade on and off and then I can press the bubble and the lights in my room go on :)
 
That's cool, and a great economical approach! For the splinters maybe use the Apoxi Sculpt. Fill them in, then scrape it off flush with a spatula. Drag a pin through it to create lines to blend with the wood grain. Seal the wood with shellac, then paint. Don't sand it too much, you want the grain to remain to simulate the brushed aluminum look.
 
That's cool, and a great economical approach! For the splinters maybe use the Apoxi Sculpt. Fill them in, then scrape it off flush with a spatula. Drag a pin through it to create lines to blend with the wood grain. Seal the wood with shellac, then paint. Don't sand it too much, you want the grain to remain to simulate the brushed aluminum look.

Glad you like it! Thanks a lot for the advice, Rob! Can't wait to try it out tonight :D
 
good idea on the ornament balls. You can get them online at Amazon, etc as well it seems.

Can't wait to see the completed build!
 
good idea on the ornament balls. You can get them online at Amazon, etc as well it seems.

Can't wait to see the completed build!

Ahh, cool, thanks for the heads up. I need some more TBH.

Thanks for the comments! I'm hoping to work on the build after work today. I got inspired by the recent leftover run that Gordon Gekko did in the Junkyard and decided to add a wall mount in the back of the panel so I can hang him up on the wall! I don't know why I think of how to display it sooner, lol. I do need to cut the PVC pipe in half so I can hang the panel on my wall.

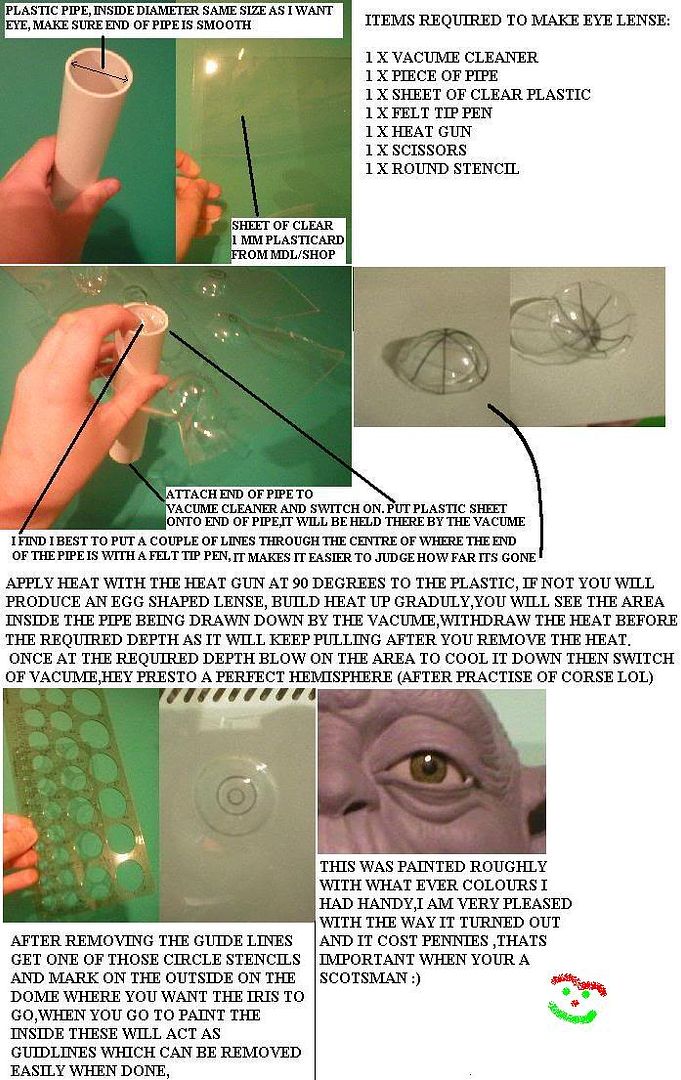
I honestly don't know about the ornament ball...I think it'll be great for other projects and it does look good on HAL, but the plastic is somewhat thick and you can very easily see the cuts that I did. This bugs me, however, I think I found a solution. Zorg posted this very cool tutorial on RPF a while back that I think would be perfect for HAL's lens:

eyestut.jpg


I hope he doesn't mind be posting it on here. Anyways, I need to get some clear plastic!
 
Alright!! Zorg's method was a great success. The heat gun melted the plastic great and after carefully cutting out and refitting the plastic in the PVC part, the new lens looks a billion times better. BTW, this is the very first thing I ever vacuumformed so I feel very special right now, LOL. XD

396911_2983345349682_1443438409_3224430_1862025425_n.jpg


396673_2983345709691_1443438409_3224431_1103804286_n.jpg


394848_2983345869695_1443438409_3224432_479205844_n.jpg


390354_2983346149702_1443438409_3224433_249968722_n.jpg


379082_2983346669715_1443438409_3224434_1891852065_n.jpg
 
I saw the same PVC part at Home Depot last night while getting ideas for another project. I was wondering how it would look with the light, painted black, ans so on... and now I know. Looks good. Keep going :)
 
sweet. I am waiting for a lens I ordered off Ebay. It's a magnifying lens, looks very convex... similar to the shape of a fish eye camera lens, and it is 81MM across (only 1mm different than most measurements I've seen for Hal's lens.

I saw another build on a GOOGLE search where they used two lenses.. the big fish eye, and a smaller one just over the LED. I want to see how that looks. If it sucks, vaccuforming it is ;)

Keep up the good work.
 
Fantastic work. I've wanted to do a Hal for my wall for so long and never found the time, but reading through this thread has inspired me to get off my butt and get started! Looking forward to updates
 
Thanks a lot guys! :D

I finally got around to painting the panel and PVC part. I also rebuilt the LED light setup and added a 330ohm resistor to reduce the brightness of the light. After painting the parts, they looked so-so, to be honest. But after I installed the lens part and the LED, it looks really awesome, IMO.

385012_3055486953177_1443438409_3263563_956895592_n.jpg


393758_3055486753172_1443438409_3263562_1748430811_n.jpg


Although I kinda wish I had a second smaller lens inside the eye so that it emulates the look of the Nikkor fisheye lens, better, the slot for the 1/2" pipe that holds the LED does a good job of replicating that look. Tomorrow, I'm planning on printing out the HAL 9000 logo on photo paper and using double sided tape to stick it onto the panel. I'm also planning on cutting out some balsa wood and finishing the trim and sides, as well as cutting the speaker piece out of very thin styrene and carefully drilling all the holes out.
 
UPDATE!

So the panel is all painted! I got a mix of automotive primer and Testors Metalizer Paint and did a matte clear coat to finish it off. Also, my vintage transistor radio grill came in the mail and after go through the very dirty insides to get to the grill, I'll be cutting it down and finally give HAL his speaker! The speaker is very bright in color so I may paint it.
 
Hey guys!

So I've been pretty busy for the past few months, but I finally got a chance to install the speaker grill on HAL.

I bought a SeaVox Transistor radio from eBay several months ago that had a nice hole layout that was the closest match to the one seen on the film. It's not corrugated like the one in the movie, but it's still close. Anywho, I disassembled the ancient thing and took the grill out. The grill was way too big so I had to very carefully trim the grill by using a dremel. I made sure I cut on the backside of the grill to better hide cut marks and scratches. The holes on the grill itself were great in providing a guide to cut straight edges and I used them accordingly. After about a half hour of cutting, here's the test fit!

540175_4109162334403_1443438409_3693636_960988805_n.jpg


I'm going to attach the grill using double sided tape and then start work on the side paneling, which will also be made out of balsa wood like the front panel.
 
Looks like I found my next project ;)
This is really looks awesome, and it just goes to show you don't need to spend a fortune to have great props. I commend you, sir :thumbsup
 
This thread is more than 11 years old.

Your message may be considered spam for the following reasons:

  1. This thread hasn't been active in some time. A new post in this thread might not contribute constructively to this discussion after so long.
If you wish to reply despite these issues, check the box below before replying.
Be aware that malicious compliance may result in more severe penalties.
Back
Top