Go-Motion ROTJ AT-ST full scratch

Hi Beaz, that would be much appreciated! Here's a shot of the part (similar to the heatsinks used on the studio scale X-wing, but the Maxi Brute X has 10 spokes/fins.

1673677.jpeg


Do you guys have a pic of the Maxi-Brute part in question? I have two vintage kits and would be happy to check for the right part.
 
Yeah ! I think that's the right part Beaz ! They probably cut it and sanded it flush ;)

Is that styrene ?


Matt, your guess about the feet is just brilliant !
Argh I have to go back on the drawing desk once Im back from work LOL
I'm DLing the pdf, I dont think Ill have time to check it before I go to work but thanks for that ! :)

Yeah I reckon that the armature looks pretty simple at the first look and finally it would take more time than they thought...

Hopefuly you'll find someone....

Awesome for the 934 sprue !!
 
:) I guess what I meant was, if this is the right part, I'm happy to loan it to someone who wants to mold and cast it for their own AT-ST build if they send me back the original part, plus maybe two castings. ;)
 
That's definitely the part, thanks for your offer Beaz! I don't know, what do you think Julien? Do you want to cast them or have me handle it? I need to order some RTV.

Great to finally confirm this part, thanks again. :)


Yup, it came off one of the of the plastic sprues of my 70's vintage Maxi-Brute.

Would be happy to loan this out for casting, if that would help.
 
Let me know if you want the vector file Julien. I still need to refine those drawings but they're good enough for their intended purpose!

This crop of the stripped ESB confirmed the design got translated over to the ROTJ. Both share the same articulation. :)

8689101.jpeg


0587019.jpeg


Man, I feel like an uber-nerd for dissecting this stuff to the nth degree. :wacko


Yeah ! I think that's the right part Beaz ! They probably cut it and sanded it flush ;)

Is that styrene ?


Matt, your guess about the feet is just brilliant !
Argh I have to go back on the drawing desk once Im back from work LOL
I'm DLing the pdf, I dont think Ill have time to check it before I go to work but thanks for that ! :)

Yeah I reckon that the armature looks pretty simple at the first look and finally it would take more time than they thought...

Hopefuly you'll find someone....

Awesome for the 934 sprue !!
 
Last edited:
That's definitely the part, thanks for your offer Beaz! I don't know, what do you think Julien? Do you want to cast them or have me handle it? I need to order some RTV.

Great to finally confirm this part, thanks again. :)

Sure I have enough RTV to cast it, it will not be pressure castings and I am scared to get airbubbles (like cheese :D) because we have to cut and sand the "heatsink" flush with the cap... We can always fill them though... That's not a big deal since there are only 2 parts...

Sure I can send you 2 castings Beaz but I will doesnt do a mold of the full part, just of what we need for the AT-ST (I mean just the front "heatsink" and the ring cap, not the rear "heatsink") so I dont know if you would find some use for them Beaz !


If you think you can get better result Matt, let me know !

That would be cool for the drawings Matt, I dont know how close are our measurements though, hopefully they are the same lol
I was wondering why the cutouts of the feet were too large when comparing to the anckle part itself ! Argh I think I will have to sand my cutouts because I cut them to fit perfectly my anckle parts so it means no movement !

That's an awesome find Matt, thanks for sharing it ! :thumbsup
 
Sure I can send you 2 castings Beaz but I will doesnt do a mold of the full part, just of what we need for the AT-ST (I mean just the front "heatsink" and the ring cap, not the rear "heatsink") so I dont know if you would find some use for them Beaz !

That works great for me, Julien, since I only want what you want, the correct greeblie for my future AT-ST build! :D

I'll drop it in the mail this week.
 
Cool Beaz, that's fine ! :D Thanks !

Since you said somewhere here the ROTJ AT-ST was ugly, I was not sure you wanted them for an AT-ST build ! :lol


Guys, I have a big concern how the neck of the 12"5 puppet was done !

3 possibilties (actually there are more) :

- Like the TESB neck
- Like the pyro ROTJ neck
- Like the one provided in the Nice-n kit. I dont know if it was a guess of John C who mastered it or if it's based on ref since it's very different from the 2 others above !

Any thoughts on that guys ?
 
It would be a 360 pivot wouldnt it bro? By that i mean side to side, front to back, bobbin' and a weavin'?

At least IMO the ROTJ, would have something way more elaborate than the TESB?

lee
 
It would be a 360 pivot wouldnt it bro? By that i mean side to side, front to back, bobbin' and a weavin'?

At least IMO the ROTJ, would have something way more elaborate than the TESB?

lee

Yeah bro but I dont know if there are two joints, I mean head side and body side ? The pyro ROTJ have two joints but since they were not animated... I dont know ! and the 2 joints do the same movement (front to back) unlike the TESB one which is a bit useless ! I'm not sure they used a kind of ball joint on those models... But I too think (no, I want to think :D) that it was more elaborate than the TESB but I'm really not sure about that... The TESB neck was already great at this point !

Some pics :

rotjatstneck.jpg


On the left : the 2 ROTJ go-motion ST's, we can notice that the neck is perpendicular to the chassis in those side views. It's always perpendicular so I dont think it was like the pyro model (bottom right). Front view : I cant spot in screencaps that the base neck can move side to side nor the top neck (where it meets the head). That's why the Nice-N design looks interesting to me... But I could be wrong...

Does someone know the truth about the neck of those puppets ? :confused
 
Last edited:
I think the easiest way to get all of the functionality would be two ball and socket joints at the base of the neck and at the top, but that wouldn't be studio accurate.

I looked at all the scenes frame by frame and came to the conclusion the neck has the same functionality as the ESB. Swivels forward and back to look up or down, swivels left and right to look scan the horizon, and the head can tilt/flop sideways left or right (like a dog when it gets curious about something).

In a few of the Sao Paulo pics, you can see the armature is setup differently though. It's almost as if they took the ESB design and flipped it upside-down! At the top is the axis for the head being able to look up or down, underneath that is the "dog tilt" joint, and I assume the base has a circular washer type bit above the hole, with a rod going down through to allow the head and neck to swivel left and right.

If you notice, towards the front of the chassis behind the Ford cosworth parts, there's screws on either side. Meaning that the base of the neck might be a separate block that fits down inside the main chassis armature and fastens in from the side. Not sure though, this area is a mystery. :)

This is a really crude idea of how it might look from the side underneath the neck bulb.

1967855.jpeg


2243575.jpeg


If the neck does more than tilt left and right, I think the only sway in the arm would be left to right, not front to back. I have a scan of an armature that has tons of these type joints on it.. if I can find it I'll post it up!
 
Last edited:
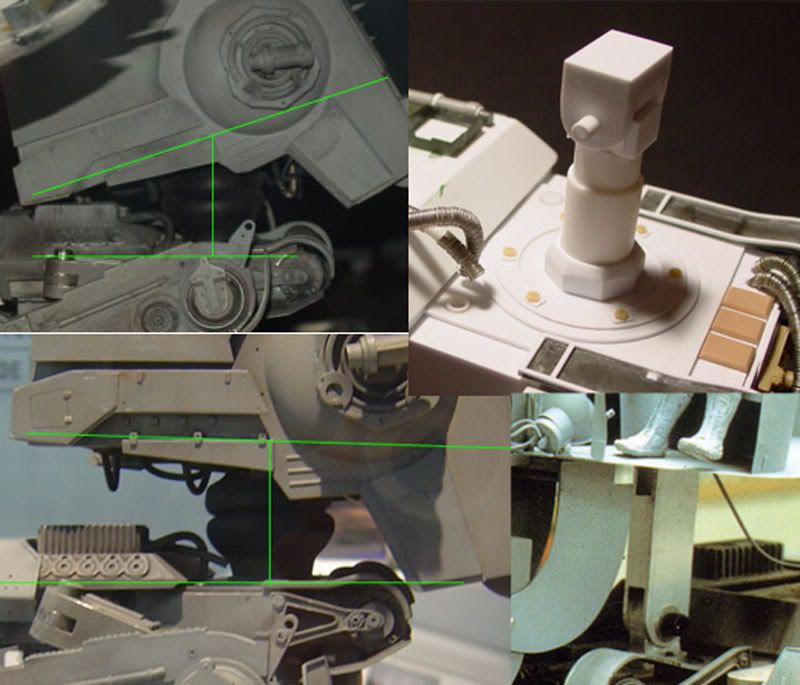
Well, it's time to put the kit lists of this baby.

Since I havent noted all the kits I could forget one or two :

-Tamiya 1/35 SU-85 (x1)
-Tamiya 1/35 KV-I (x1)
-Tamiya 1/35 Matilda (x1)
-Tamiya 1/35 Hanomag (x1)
-Tamiya 1/35 Marder III (x1)
-Tamiya 1/35 Gepard (x1)
-Tamiya 1/35 M16 (x1)
-Tamiya 1/35 8 tons (x4)
-Tamiya 1/35 Flakvierling38 (x1)
-Tamiya 1/35 Sdkfz 222 (x2)
-Tamiya 1/35 Sdkfz 232 (x1)
-Tamiya 1/35 Flak 88 (x5)
-Tamiya 1/35 Lang (x1)
-Tamiya 1/32 F-14 Tomcat (x1)
-Tamiya 1/12 Ferrari 312T (x2)
-Tamiya 1/12 JPS (x2)
-Tamiya 1/12 Porsche 934 or 935 (x1)
-Tamiya 1/6 Kawasaki (x1)

-Italeri 1/35 Priest (x1)

-Hasewaga 1/72 Leopold (x1)

-Bandai 1/48 Panther (x1)

-MPC DV's TIE Fighter (x2)

-Maxi Brute X-Wing (x1)

This is a compiled list from Matt's (Dragnink), Lee's(Ralphee), Isel's (swfan) and my finds.

Thanks to them all !

i seem to have collected some info that may be wrong. in addition to those kits i have recorded that the following kits should be in your list. could someone please confirm if these are or are part of the chosen kits?
tamiya crocodile
tamiya zundapp r75
airfix harrier gr3 av8

thanx
 
i seem to have collected some info that may be wrong. in addition to those kits i have recorded that the following kits should be in your list. could someone please confirm if these are or are part of the chosen kits?
tamiya crocodile
tamiya zundapp r75
airfix harrier gr3 av8

thanx

Hello,

Are those kits for the ROTJ go-motion AT-ST ?

The zundapp is the one which is the 88mm kit.

As for the Churchill Croc and the Harrier, I cant see any part of them on this model... Which parts are you talking about and where should they go ?
 
I think the easiest way to get all of the functionality would be two ball and socket joints at the base of the neck and at the top, but that wouldn't be studio accurate.

I looked at all the scenes frame by frame and came to the conclusion the neck has the same functionality as the ESB. Swivels forward and back to look up or down, swivels left and right to look scan the horizon, and the head can tilt/flop sideways left or right (like a dog when it gets curious about something).

In a few of the Sao Paulo pics, you can see the armature is setup differently though. It's almost as if they took the ESB design and flipped it upside-down! At the top is the axis for the head being able to look up or down, underneath that is the "dog tilt" joint, and I assume the base has a circular washer type bit above the hole, with a rod going down through to allow the head and neck to swivel left and right.

If you notice, towards the front of the chassis behind the Ford cosworth parts, there's screws on either side. Meaning that the base of the neck might be a separate block that fits down inside the main chassis armature and fastens in from the side. Not sure though, this area is a mystery. :)

This is a really crude idea of how it might look from the side underneath the neck bulb.

1967855.jpeg


2243575.jpeg


If the neck does more than tilt left and right, I think the only sway in the arm would be left to right, not front to back. I have a scan of an armature that has tons of these type joints on it.. if I can find it I'll post it up!

Hey Matt, that makes sense and you're probably right ! So I will go this way ;)

As for the neck boot, the tyres of the JPS are wrong too :( I cant find the good ones ! Once upside down, they are too flat, too short and the diameter of the side which goes inside the Kawa part is larger than the kawa part :(
 
Yep, the JPS boot isn't the right one, but I had to jump on the kit since I got mine for a good price. I mainly wanted it for the black hoses, the ford cosworth parts (chassis, chin) and the grills. I don't think anyone knows what the right neck boot is yet... I wonder if they mixed and matched from two different kits to find the right combo? We know outer rim is almost exactly the inside diameter of the kawasaki part, the top opening towards the bottom of the head looks larger though. It could be an expensive venture to get to the bottom of this one, not as simple as asking what the diameter is, as you have to flip the tires inside out to know for sure.

I think it is from an F1 kit, but there is always the possibility that it might be from something else. Maybe we can find a bunch of F1 kit owners, get our trusty rulers out and have a tire flipping party... I'll bring the beer. :love

P.S. I found some guys on an old Estes rocket forum that have the Maxi Brute parts.. one of them had a broken model, sending the parts free of charge. So no need for those castings, saves you some work! ;-)

Hey Matt, that makes sense and you're probably right ! So I will go this way ;)

As for the neck boot, the tyres of the JPS are wrong too :( I cant find the good ones ! Once upside down, they are too flat, too short and the diameter of the side which goes inside the Kawa part is larger than the kawa part :(
 
Last edited:
Yeah i was a tad of base in the type of kit used for the tyre, its close, but then i had no real dims to work from Matt (my ROTJ knowledge aint too great :lol)
Hmm well with such a long fluted section (sidewall) im still thinking for sure race car...but ive checked the Lotus MKIII, 312t, 312b, BT44b, Matra and Wolf (i like my F1's lol), and no dice matching up to the Kawasaki 1300 brake disc...so discount those bud!

Next guess...high sidewalls?....Dragsters, ILM used a few top fuels in the day, so im wondering it could have been jacked from maybe one of the Revell/AMT funny cars?

lee

Edit...one i havent checked, is the obvious, the P34 Tyrell rear? The fronts are used on the TESB for sure...would the guys back then have recalled that info and used the larger rears for the ROTJ?
 
Last edited:
This thread is more than 14 years old.

Your message may be considered spam for the following reasons:

  1. This thread hasn't been active in some time. A new post in this thread might not contribute constructively to this discussion after so long.
If you wish to reply despite these issues, check the box below before replying.
Be aware that malicious compliance may result in more severe penalties.
Back
Top