Introduction:

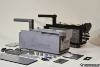
Hey Ghostbusters fans, I am excited to offer up my new trap kit. It comes with everything seen here, plus another 90+ nuts and bolts not pictured. The cartridge ejects via a lever and spring system, and the doors can be made to open and close using the simple servo setup created by Sean Charlesworth for the Tested trap. This is a full sized GB1 hero trap, with measurements sourced by John Anderson (Namebrand) off the PropStore trap. Check below for more details. Thanks for looking!
WIP build from this kit:
Kit Details:

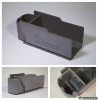
The main housing, battery compartment, and baseplate are all resin cast as one piece, and most of the screw holes have been marked for easy alignment, so there won't be a whole lot of assembly reqired. Inside of the battery compartment you will find a bracket for the spring-loaded ejection system, as well as mounting posts for the battery cover.

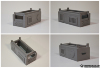
The cartridge is resin cast. Like with the main housing, most of the screw holes have been marked for easy alignment. The frames for the doors are molded onto the cartridge, so the doors and their mechanics can be installed without having to work around the instrument panel. The bottom side of the cartridge has mounting posts for the cartridge baseplate.

The instrument panel and ears are resin cast as one piece. The ears are hollow to allow room for the sprocket and chain needed for the door open/close mechanics (see Sean's guide for a hardware list or a link to his Etsy shop where he offers everything needed to run the doors). The slots on the inwards edge of the ears slip over the door frame on the cartridge, allowing the door mechanics to be installed without having to work around the instrument panel.

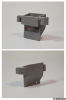
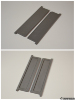
The doors are resin cast. The outside surface is marked with the caution stripping pattern for easy alignment and application of your caution tape. The backside has the hollow channel detail as seen on the hero prop.

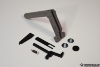
The trap handle is resin cast using TASK performance plastic for added durability. The lever used to release the spring-loaded cartridge is laser cut out of ¼” Delrin, which then sits within the slot carved out the front of the handle. A cover is included, which is to be glued down over the slot and the seam filled to hide it completely. All hardware to mount the handle is included, as well as the spring system for the lever.

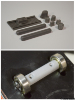
The kit includes resin cast versions of the vector plate, resistor, side rods, and all the knobs, as well as axles for the wheels and the bearings. Do note: These are not the final versions.

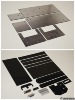
The kit also includes all the side plates laser cut out of faux-aluminum ABS, as well as all the plates needed for the cartridge slide system, servo mounts, battery compartment cover, and instrument panel cover. Also pictured here are the serial ports, springs and ¼” rods for the ejection system, and the catch for the latch. Note: The front aluminum plate comes blank by default (GB1 version), but is also available with engravings around the dials (GB2 version). The engraving will the black, but can be painted in red.
Price:
The kit is $250 + shipping (calculated by location). Add $5 for the GB2 style engraving on the front plate (and let me know when you order).
Shipping times:
Since there are still a lot of little parts that need to come in from all over the world, I am going to put estimated ship time at 3-4 weeks. Purchases will ship in the order they were received.
How to order:
PM me with your name, Zipcode, and PayPal email address and I will have PayPal send you an invoice.
Seller information:
Justin Chase Black
San Antonio, TX
GBFans Feedback Thread - http://www.gbfans.com/forum/viewtopic.php?p=102343
Etsy Shop - https://www.etsy.com/shop/ThrowingChicken
Artist Page - https://www.facebook.com/ThrowingChicken
Hey Ghostbusters fans, I am excited to offer up my new trap kit. It comes with everything seen here, plus another 90+ nuts and bolts not pictured. The cartridge ejects via a lever and spring system, and the doors can be made to open and close using the simple servo setup created by Sean Charlesworth for the Tested trap. This is a full sized GB1 hero trap, with measurements sourced by John Anderson (Namebrand) off the PropStore trap. Check below for more details. Thanks for looking!
WIP build from this kit:
Kit Details:
The main housing, battery compartment, and baseplate are all resin cast as one piece, and most of the screw holes have been marked for easy alignment, so there won't be a whole lot of assembly reqired. Inside of the battery compartment you will find a bracket for the spring-loaded ejection system, as well as mounting posts for the battery cover.
The cartridge is resin cast. Like with the main housing, most of the screw holes have been marked for easy alignment. The frames for the doors are molded onto the cartridge, so the doors and their mechanics can be installed without having to work around the instrument panel. The bottom side of the cartridge has mounting posts for the cartridge baseplate.
The instrument panel and ears are resin cast as one piece. The ears are hollow to allow room for the sprocket and chain needed for the door open/close mechanics (see Sean's guide for a hardware list or a link to his Etsy shop where he offers everything needed to run the doors). The slots on the inwards edge of the ears slip over the door frame on the cartridge, allowing the door mechanics to be installed without having to work around the instrument panel.
The doors are resin cast. The outside surface is marked with the caution stripping pattern for easy alignment and application of your caution tape. The backside has the hollow channel detail as seen on the hero prop.
The trap handle is resin cast using TASK performance plastic for added durability. The lever used to release the spring-loaded cartridge is laser cut out of ¼” Delrin, which then sits within the slot carved out the front of the handle. A cover is included, which is to be glued down over the slot and the seam filled to hide it completely. All hardware to mount the handle is included, as well as the spring system for the lever.
The kit includes resin cast versions of the vector plate, resistor, side rods, and all the knobs, as well as axles for the wheels and the bearings. Do note: These are not the final versions.
The kit also includes all the side plates laser cut out of faux-aluminum ABS, as well as all the plates needed for the cartridge slide system, servo mounts, battery compartment cover, and instrument panel cover. Also pictured here are the serial ports, springs and ¼” rods for the ejection system, and the catch for the latch. Note: The front aluminum plate comes blank by default (GB1 version), but is also available with engravings around the dials (GB2 version). The engraving will the black, but can be painted in red.
Price:
The kit is $250 + shipping (calculated by location). Add $5 for the GB2 style engraving on the front plate (and let me know when you order).
Shipping times:
Since there are still a lot of little parts that need to come in from all over the world, I am going to put estimated ship time at 3-4 weeks. Purchases will ship in the order they were received.
How to order:
PM me with your name, Zipcode, and PayPal email address and I will have PayPal send you an invoice.
Seller information:
Justin Chase Black
San Antonio, TX
GBFans Feedback Thread - http://www.gbfans.com/forum/viewtopic.php?p=102343
Etsy Shop - https://www.etsy.com/shop/ThrowingChicken
Artist Page - https://www.facebook.com/ThrowingChicken
Attachments
-
 1um6N8K.jpg462.3 KB · Views: 1,066
 -
 1um6N8K.jpg462.3 KB · Views: 1,543
 -
 1um6N8K.jpg462.3 KB · Views: 308
 -
 grfwaL0.jpg681.3 KB · Views: 333
 -
 grfwaL0.jpg681.3 KB · Views: 362
 -
 FhOiChf.jpg353.2 KB · Views: 354
 -
 eiC6dQ2.jpg850.4 KB · Views: 426
 -
 FhOiChf.jpg353.2 KB · Views: 336
 -
 grfwaL0.jpg681.3 KB · Views: 339
 -
 FhOiChf.jpg353.2 KB · Views: 606
 -
 wV0yYW7.jpg789.1 KB · Views: 316
 -
 eiC6dQ2.jpg850.4 KB · Views: 343
 -
 wV0yYW7.jpg789.1 KB · Views: 328
 -
 eiC6dQ2.jpg850.4 KB · Views: 310
 -
 Th92iji.jpg1 MB · Views: 590
 -
 JXjvp84.jpg406.9 KB · Views: 351
 -
 JXjvp84.jpg406.9 KB · Views: 395
 -
 wV0yYW7.jpg789.1 KB · Views: 418
 -
 JXjvp84.jpg406.9 KB · Views: 472
 -
 zu5zU4a.jpg800.7 KB · Views: 255
 -
 zu5zU4a.jpg800.7 KB · Views: 401
 -
 zu5zU4a.jpg800.7 KB · Views: 280
 -
 Th92iji.jpg1 MB · Views: 279
 -
 Th92iji.jpg1 MB · Views: 350
Last edited by a moderator: