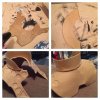
Gamora WIP

Jen Tate

New Member
I started to research my Gamora costume last year and I am now starting to put it all together. I thought I would share my progress which hasn't been easy but its been fun :)

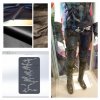
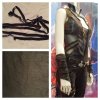
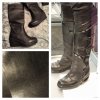
The first step was looking (a lot) at the costume and getting some good references. I then got together all the materials I would need:

Main outfit: Waxed Denim, perforated PVC and Black PVC - the detail will be sprayed on using a stencil.
Under top: black bra, power mesh and stretch elastic
Boots: plain knee high boots, plain black leather, textured black leather and 3D printed accessories
Belt: black leather and 3D printed accessories
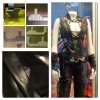
IMG_0764_zpsjcl6zr3r.jpgIMG_0775_zpsb1ptbxaw.jpgIMG_0755_zps4rcipxcl.jpgIMG_0754_zpsdjduppk5.jpg


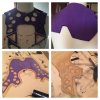
I then worked out the pattern as best I could, the back was really difficult to find refrences and this is not how the final piece will look.

IMG_2573_zpsufrcij1o.jpg

Then the scary part, putting it together :) I started by using a basic top and trouser pattern which I will alter as I go.

IMG_1813_zpsykywdpps.jpgIMG_1814_zpsl426fasz.jpgIMG_1816_zpsnlmftzcv.jpg

I then cut the detail of the front trouser leg out of PVC and used quilting fabric underneath some areas to create more detail and I have also started some piping detail on the back of the outfit. I am attaching the black PVC using an appliqué technique.

IMG_2598_zps2lwyaew3.jpgIMG_2639_zps5ao18uxg.jpgIMG_2637_zps2jco9up8.jpg

For the belt I am using leather and adding 3D printed accessories. It still needs put together but so far looks pretty cool.
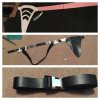
IMG_1844_zpskg14esur.jpg

For the gloves I am using leather and found these buckles which look pretty close but I have sprayed them black to match the movie.
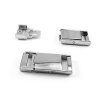
IMG_0785_zpsic24hek3.jpg
 
Looks great! I am also making a Gamora costume. Have you worked with denim before? I am a novice when it comes to sewing so any advice would be great.
 
Awesome work. Hope your going to clear it with reel icons. My starlord costume is ready for clearance.
 
awesome job!! Im working on one two. 3d printers are great, i hope to get one some day. Maybe mine will look as top notch as yours!
 
Ive never worked with denim before. This denim is really thin and is really easy to sew, you can buy a denim needle for your sewing machine but I've just used a regular one and I've had no issues.
 
Im starting to work on the boots. So far I have bought a pair of plain boots with a wedge heel and cut out a hole in the heel then neatened the hole up with some leather inside. I will be picking up some ratchet buckles from Halfords which will need spray painted black. Then I already have some leather to cut out the shapes to attach to the boot.

IMG_0657_zpstdmjd4uz.jpgIMG_3304_zpsahavprmf.jpgIMG_3303_zpsqkgbgag9.jpgratchet_zpstmdwmqhp.jpg


I have also been working on the gloves which I'm not 100% happy with so I will probably remake these at some point. I cut out a base in PVC then cut strips of the same material which I glued onto the base using a cris-cross pattern. I used a concealed zip to fasten it on the underside. I just need to add the buckles.

IMG_0651_zps3fltxswd.jpgIMG_3037_zpsewdzr1as.jpgIMG_3039_zpsv0l3abpt.jpgIMG_3222_zpsx0rnia6f.jpg

One of the hard parts of the costume is the pattern down the front of her costume and the back of her legs. I tried a few techniques and I have decide to use a stencil that was made by JJ Industries then use some spray adhesive to keep it in place then use a pearlescent purple and blue spray paint to create the same colours. I have tried the colours but I didn't stick the stencil down so the colours have bled. This will be much neater on the real thing, it was just to see how the colours looked with the denim.

IMG_3324_zps7vj8n5mb.jpg

Ive also been working on my front panels of the costume which are denim with a perforated PVC down one side and PVC on the top part with piping detail.

2b2aa700-9d8f-4b93-8e90-6c2024a779ce_zpskynkwv69.jpg

Lastly I have decided to change my original wig since i wasn't happy with it. I got lucky and found a great lace front wig which had the dark brown hair with the red on the bottom. It was way to curly though but it was easily straightened. I also had a quick test of my face paint which is MAC acrylic paint. Ignore the black marks on my face I was working out where the markings will go. I will be using white as a base over my skin then covering it with a dark green which makes a lovely cover. This paint is great as it does not rub off or leave horrible steaks. It is hard to get off though so I will need a lot of make-up remover.

IMG_2281_zpswk2bzwlg.jpgIMG_2284_zpsbixf8soi.jpgIMG_2911_zpsjvazk2xm.jpg

I have 2 weeks to get this costume together so I will be posting lots of progress this month.
 
You're progress shots of this have been great! I've been trying to pull myself together and get my Gamora outfit sorted and you've totally been inspiring me. And then you said two weeks to get your costume together... Is this for Supanova? Possibly in Perth? If so I'll be looking out for you and saying thanks for posting this because it's honestly looking amazing so far! If mine turns out even half as good I'll be happy :)
 
Thanks Chantal, I was hoping this thread would be helpful since its such an awkward costume to make, I'm so glad its inspired you. Unfortunately I didn't finish it in time for the convention I was going to which was Sunny Con.
 
I finally got the boots done which were so hard to make as I couldn't get a could picture of the back of them. Luckily I had a friend to help out :)

I got the buckles from Halfords which are ratchet buckles (used on bike boots and roller blades) and spray them all black.
IMG_3486_zpsx2kktnpu.jpg da8abb96-6602-4cff-a4ab-d928374dbc02_zpsioarzaoc.jpg
I then worked out the pattern for the wraps around the boots then cut them out from leather.
IMG_3503_zpsdzet4plk.jpg IMG_3506_zpsmwvkmcif.jpg IMG_3511_zpsnp0t9ur9.jpg IMG_3507_zpsbjqs9j1a.jpg
I cut into the bottom and front of the boot so the leather could be inserted in and glued down.
IMG_3523_zpsapssb9vm.jpg IMG_3526_zps4lohlpuz.jpg IMG_3518_zpsqm5hpw2y.jpg
The front part is attached with Chicago screws which I spray painted black.
IMG_3495_zps29otjed4.jpg IMG_3525_zpstiq8nejh.jpg IMG_3504_zps0gamffwt.jpg
The boots had some other details on them which were the little silver clips along some of the edges and a gold square on the outside of each boot which were made from metal. The squares were sprayed gold.
IMG_3491_zpszm8ytiq8.jpg IMG_3538_zpsf4wdtnjf.jpg
The ratchet clips were screwed onto the boots and each wrap of leather had a strap which fits through the clip and secures them in place. The details on the boots were scratched to give a worn effect.
IMG_3541_zpsjxvbd5x7.jpg IMG_3548_zpssdij6hhg.jpg
 
The neck piece was made from foam which I covered in worbla then sprayed black. I cut out the silver details from metal which fitted into the indentations I had made.

IMG_3368_zpsko59mym2.jpgIMG_3371_zpstgmpwuzf.jpgIMG_3528_zps6ahtaok6.jpg
 
The top has perforated pvc on the sides up the front and black pvc on the shoulders which have piping detail on them. The sides of the top are cut out separately and also have piping detail. I then attached the pants and top together.

IMG_3545_zpsuhxdqgtc.jpg IMG_3546_zpsamla9gqm.jpgIMG_3547_zpsiu7vq8j6.jpg IMG_3564_zps25nmzoci.jpg

The details were sprayed on using a stencil.
IMG_3324_zps7vj8n5mb.jpg IMG_3559_zpspus7spyz.jpg IMG_3560_zpskkzbjbqp.jpg
 
This thread is more than 8 years old.

Your message may be considered spam for the following reasons:

  1. This thread hasn't been active in some time. A new post in this thread might not contribute constructively to this discussion after so long.
If you wish to reply despite these issues, check the box below before replying.
Be aware that malicious compliance may result in more severe penalties.
Back
Top