Full size 74-Z Speeder Bike build (ROTJ)

MrV

Sr Member
Me and a few friends (JR, AP, MW, JO, JM) have decided to embark on constructing a full size speeder bike from ROTJ. We have a range of talents and skills so should have what it takes to see this through to completion. Plans have been pretty hard to find and what is out there is not so accurate. To start with i found on the net a copy of the ROTJ blue print plans for the bike (with very bad resolution). This was enough to add a scale bar onto so that we could start scaling parts. We ran with the initial length of 3.3 metres based on the Wookieepedia entry on the bike. We also purchased the plans and 3D print files from Craig Tinder (Aces in Action). Although his build is lacking in some accuracy the way he built the main body is very clever.

The build team do not live near each other so we are really counting on the scaled plans to link up as we complete various parts.

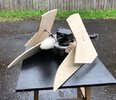
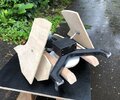
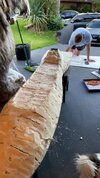
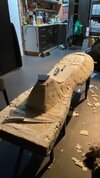
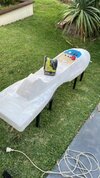
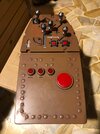
With some spare timber we made a start on the under body.
 

Attachments

  • IMG_8715.JPG
    IMG_8715.JPG
    152.2 KB · Views: 194
Body shop boys have cut out the Craig Tinder templates. and filled with building insulation foam sheets. A steel tube was installed through the body for a rod for the handle bars. The voids were then filled with expanding foam. It now resembles a big Bantha poo.
 

Attachments

  • IMG_9754.JPG
    IMG_9754.JPG
    201.3 KB · Views: 227
  • IMG_9751.JPG
    IMG_9751.JPG
    73.1 KB · Views: 218
The terrain finder has been made out of; a) a plastic wine glass, b) a medicine cup, c) coke bottle section and d) an old outdoor solar light spike. Hi-tech hey! This will have some additional detailing to get it looking like the original part.

I also made a side panel from wood and foam sheet that i cast as i need three identical pieces. I decided to make and cast this rather than 3D print as trying to sand the crevices would be too hard.
 

Attachments

  • IMG_9752.JPG
    IMG_9752.JPG
    222.8 KB · Views: 174
  • IMG_9932.JPG
    IMG_9932.JPG
    181.4 KB · Views: 175
The lads have done outstanding work here! who would have thought they could get this shape out of that blob of foam. The saying comes to mind "Making a silk purse out of a sows ear". The next step is a covering of builders bog, a two part resin mix that drys rock hard and can be sanded.
 

Attachments

  • IMG_9910.JPG
    IMG_9910.JPG
    76.8 KB · Views: 241
  • IMG_9750.JPG
    IMG_9750.JPG
    105.6 KB · Views: 235
  • IMG_9749.JPG
    IMG_9749.JPG
    83.5 KB · Views: 250
Awesome. This reminds me very much of how surfboards are made, starting with a foam blank, which is shaped and then covered in a fiberglass cloth. If you’re looking to add strength, I would recommend getting the type of Fiberglass cloth that comes woven on a big roll that is used for surfboards.
 
Body shop boys have cut out the Craig Tinder templates. and filled with building insulation foam sheets. A steel tube was installed through the body for a rod for the handle bars. The voids were then filled with expanding foam. It now resembles a big Bantha poo.
Guessing the foam is to keep the weight down ?

Looks impressive Already!
 
I started the engine build with sheet tin, a flower pot, aluminium flat bar. and a tupperware cup for the centre of the engine. Budget constraints did not allow us to buy an original Coughtrie lamp (about $100+ postage) base for the engine so JR on the team designed one up and printed it out for about $2.00.
 

Attachments

  • IMG_9530.jpg
    IMG_9530.jpg
    119.8 KB · Views: 171
  • IMG_9532.jpg
    IMG_9532.jpg
    69 KB · Views: 167
  • IMG_9960.jpg
    IMG_9960.jpg
    90 KB · Views: 174
  • IMG_9931.jpg
    IMG_9931.jpg
    67.3 KB · Views: 193

Your message may be considered spam for the following reasons:

If you wish to reply despite these issues, check the box below before replying.
Be aware that malicious compliance may result in more severe penalties.
Back
Top