(food safe molding and casting?)

xl97

Master Member
Question for all the active molding and casting members here..

I want to take a 3D printed object.. and make a non-porous, -CAST- of it (actually like 10-15 of them in the end)..

I do not want to use the actual 3D printed part because my understanding is that the plastic is porous and can keep mold and bacteria trapped in it..etc..

These objects will have liquid/liquor somewhat touching them.. so I'd like to eliminate that... :)

And cast them in a food safe material.

Preferably a very STRONG/DURABLE (yet food safe) medium?


Side note: might also be looking for someone to help edit a model from thinigverse if anyone has the time? (PM me)


All feedback appreciated.

Thanks!
 
Last edited:
I recommend you use a paint or varnish for aquarium decoration as a final surface. It is waterproof and does not harm health and is absolutely impermeable (bacteria, etc.), also odorless. Fish are very sensitive. I can't advise a specific brand, I'm from another country.
 
Thanks...

I have never molded/cast anything before.. so in theory if it goes this route.. it will be my first time! LOL

So 'whatever' medium I end up using to cast with... just paint it with 'paint for aquarium decorations'? (something I have also never heard of before)

Thanks.. I'll try to google that paint.


Anyone else.. (I'm located in the United States by the way...)
 
I've made food moulds with food safe Silcone RTV and no one died. And you can get it in various Shore, but perhaps not strong/hard enough for what you want? I've also made 3d moulds for chocolate direct but the layer lines defeated it and wouldnt release. From what you say you want something moulded to be in the food itself, or making a bowl or cup?
 
No.

I do not want a material for a food safe 'MOLD'..

I am looking (I guess?) for a material to CAST something that is 'food safe'

In the end this item might come in contact with liquid....(that will be consumed).. so I ***dont want this to just be a 3D printed part that will get mold/bacteria stuck on it.. I'd prefer it to be cast in some materials that is hard/durable.. and also 'food safe' (resistant to the mold/bactiera..etc)

***(Although new design I believe can use a 3D printed part as the final piece and no liquid should come in contact?.. but I dont 3D model/print) :(
 
Hi xl97,

I will agree with ArtResin as it is the resin that artist use to turn wood bowls, and make bar tops with.


What are you trying to make? A Swizzle Stick that goes into a drink? A fountain for a punch bowl? A garnish for a plate of food?

I ask because. like any object to be molded, the complexity of the model will determine how it is molded and cast.

Could the material be styrene, the same material used in plastic serving wear? Can the piece be cast into a ridged mold or does it need a rubber mold?
 
An important thing is to allow any resin you use to post cure enough time (or force it with an oven as/if the manufacturer says to do so) so it liberates all the toxic stuff it contains. Just in case. Post curing is a must.
Also, choose the food safe silicones to mold as said above.
But in any case, ask the supplier (or the manufacturer better) to make sure and stick to materials with a certificate.
Be very careful if it´s touching liquid that will be drinken, it can take someone to the hospital. I ´ve seen that happen. I recall a guy using clear polyester resin for fake ice in a theatre project. One of the actors ended in the hospital.
 
clonesix

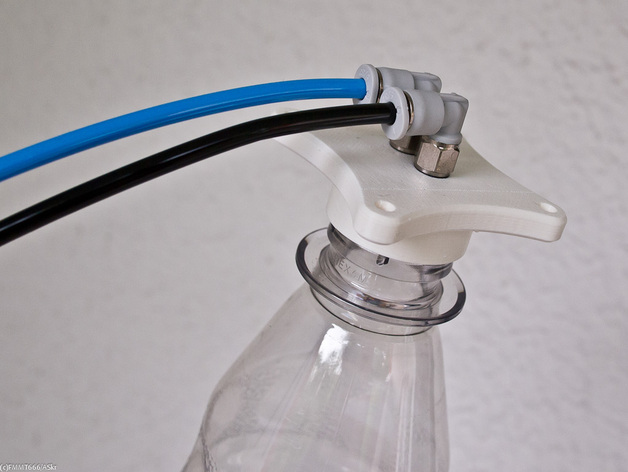
for a visual... (more or less) something like this:

of course that model 'as-is' does NOT work.. but its close....

The 'liquid' should not come in contact with it.. (but it can).. so I'd rather not have the end part be a pitted/layered/porous FDM printed object.. :)

Is needs to withstand 'some' pressure (like maybe 10PSI.. which is not much).. but something like styrene and gluing will not work.


As far as cast in rigid or rubber mold.. (no clue unfortunately.. never done ANY casting before)

So it should NOT come into contact the liquid by design.. but I'd like to use something as smooth and not porous as possible..

I think step one (either way) is get a working 3D model..LOL
 
A picture is worth 1K words!

As I first read your request for "...and make a non-porous, cat of it," I was envisioning a "CAT" like the sample file that I printed with my new printer as a test for quality, was a cat. Ok, so you don't want a cute little kitten perched on 15 soup bowls, that look like they are drinking from the bowl.

Admittedly, this makes me sad. You don't want a cat at all. Not that I can't get behind the bottle top, it's just that it isn't as cute as a kitten.


With that said, epoxy is your casting medium, and you have a variety of molding options, including Not printing the part, but printing the mold to cast the part. That might take some 3D skill to remove the part from a solid for a mold, but it removes a molding step if possible.
 
photo helped. I agree with epoxy. As for such a simple shape, I calculate the time spent on a 3D model, then printing on a 3D printer, I would probably model the prototype by hand with Chavant clay of the highest hardness. 10 minutes of work.
 
HA!

Typo fixed! :)

Epoxy it is then.. is there a specific kind of anything? (remember, never molded/cast anything before)

I am currently struggling on either:

a.) getting help on editing that model posted above
or
b.) Learning Fusion 360 to edit it myself.. (a MUCH longer road) LOL

Curious as to how one would model a prototype my hand? When you need to have specific (pco 1881) threads to match the 2-liter threads?
I don't know if I understand correctly, if you have a bottle with a thread, you have to 3D modeling on pc difficult, right? You can simply push the bottle into the chavant clay.
 
How would I get a 'solid' piece? and how would 'pushing' it into the clay make threads?

Push in and then PACK the lay around it? and then what? try to un-screw it to remove the bottle from the clay? (wouldnt that risk warping my 'mold'? and not having 'tight' threads? if I let it dry.. will it 'release' by just un-screwing it from the 'clay'?

I guess I'm not following your thought process here.


side question: does this 'chavant' clay 'shrink' at all during the drying process?
 
Last edited:
How would I get a 'solid' piece? and how would 'pushing' it into the clay make threads?

Push in and then PACK the lay around it? and then what? try to un-screw it to remove the bottle from the clay? (wouldnt that risk warping my 'mold'? and not having 'tight' threads? if I let it dry.. will it 'release' by just un-screwing it from the 'clay'?

I guess I'm not following your thought process here.


side question: does this 'chavant' clay 'shrink' at all during the drying process?
chavant clay has a different hardness. The hardness varies with temperature. If you heat this clay in your hands, it will soften. If you leave it then at room temperature, or even better, it will solidify in the refrigerator. The thread is definitely not damaged, you unscrew the bottle. The hardness is rich enough for casting. Look at my alien statue, how much detail I have, none was damaged during the creation of the mold.
 
Are you sure you don't want a cat? They're cute and fluffy.

at this point, I can still only guess what this is for: a chemistry experiment? Distilling alcohol? fermenting something? Capturing and collecting gasses?

Nevertheless... I want to throw out one more thought. After reading vlado's response about Chavant clay, what about Super Sculpy? you would form the pliable Sculpy around the bottle, add the two fittings, and unscrew and bake it. And you have a part with the right threads and no need to make a mold.

For that matter, is there a reason that you can't just add two hose fittings to the original bottle cap?
 
Its for a curent 'BarBot' (automated drink maker) project I have been working on.

My current pressurized dispensing system was a FAIL (had leaks)

that approach was using rubber cork/stoppers with 2 holes bored out and hose/line fed through it..

I'm not sure if the rubber is the fail point (leaking).. or if I actually got 6MM Tee push-fittings.. (instead of legit 1/4" push fittings)

So one line.. pushes the air in.. and the other line (which will extend into the bottle and into the liquid) then dispenses the liquid (through a code controlled electronic solenoid)

I am looking to make an alternative to the 'caps' I have in use now.. with a much better and cleaner (easier to access..etc) solution:


2-liter_setup.jpg


The fittings themselves are too 'wide/big' to fit into the default cap size (OD)..

I tried to add some 'hose/line' (as you see above) to accommodate for that... (still not a huge fan of this approach)..

would be nicer to just have 10+ 3D printed caps.. (unfortunately my Fusion 360 skills are basically non-existent!) LOL so its more of a learning curve if I have to do this myself.
 
Last edited:
You can buy fittings that go on PET bottles with two feeders, or are you looking for something more bespoke? They have the seal in the lid as well, cant remember how much PSI i put through them, 40 ish perhaps.
IMG_7326.jpg
 
This thread is more than 3 years old.

Your message may be considered spam for the following reasons:

  1. This thread hasn't been active in some time. A new post in this thread might not contribute constructively to this discussion after so long.
If you wish to reply despite these issues, check the box below before replying.
Be aware that malicious compliance may result in more severe penalties.
Back
Top