I have 2 kits in stock and ready to go. That'll be it for a few weeks while I do the small run Red TROS versions.
-
Welcome to the Project Runs Forum!
This forum is intended for interest gauging and active runs. Due to the transient nature of this forum, please keep all research and ongoing discussion in one of our main forums so your information is not lost.
Only Premium Members can start a new run.
You are using an out of date browser. It may not display this or other websites correctly.
You should upgrade or use an alternative browser.
You should upgrade or use an alternative browser.
Unlimited Run Floating Jedi Training Remote BUILDER'S KIT
- Thread starter Trooper_trent
- Start date
Kits are currently sold out. I'll have more in a few weeks.
Valheru84
New Member
These look so amazing, I think I need to diversify my OT collection somewhat from just saber hilts and these look like a super fun project to put together so I think you've just sold another kit ") Would you mind PMing me when you have some more available?
Would you mind PMing me when you have some more available?
A quick question though - do you ever think you can get the stand again that allows the remote to hang from it instead? I remember seeing that one ages ago which someone incorporated the base into their shelving above the remote and the effect was just next level! If not, I see zapwizard has come up with a very nice display case design which if you left the base lighting off, would almost have the same effect of the remote seeming to float completely of it's own accord.
One other question - do you have to gently place the remote in the magnetic field each time the base is turned on or can you just flick the power on and the remote jumps up into position?
Would you mind PMing me when you have some more available?A quick question though - do you ever think you can get the stand again that allows the remote to hang from it instead? I remember seeing that one ages ago which someone incorporated the base into their shelving above the remote and the effect was just next level! If not, I see zapwizard has come up with a very nice display case design which if you left the base lighting off, would almost have the same effect of the remote seeming to float completely of it's own accord.
One other question - do you have to gently place the remote in the magnetic field each time the base is turned on or can you just flick the power on and the remote jumps up into position?
These look so amazing, I think I need to diversify my OT collection somewhat from just saber hilts and these look like a super fun project to put together so I think you've just sold another kit
A quick question though - do you ever think you can get the stand again that allows the remote to hang from it instead? I remember seeing that one ages ago which someone incorporated the base into their shelving above the remote and the effect was just next level! If not, I see zapwizard has come up with a very nice display case design which if you left the base lighting off, would almost have the same effect of the remote seeming to float completely of it's own accord.
One other question - do you have to gently place the remote in the magnetic field each time the base is turned on or can you just flick the power on and the remote jumps up into position?
The remote hanging from the shelf is mine, which can be seen Here.
That one was older tech. It doesn't light up and they don't really make those anymore.
The base is a very strong magnet so when it's not plugged in, the ball would stick to it and could damage the parts. So you have to turn the base on first and then gently set the remote. It takes a bit of practice but I go over that in detail in the video tutorials so you can practice as much as you want before you ever start putting parts on it.
I actually have materials to make a kit, I just don't have any of the white boxes left that they come in. If you're ok with the parts coming in just the shipping box (they'd still have the custom cut foam pieces and be shipped perfectly secure) I can make you one now.
Just let me know.
Edit: I just tested one to see if it works upside down like I had heard somewhere. It does not. Sorry.
Last edited:
Yeah I've been making them for over a year (if you include the 100 limited edition fully built ones) and I've got the process down so that it's quick to churn out a kit when I need to. Shouldn't be a problem.
Valheru84
New Member
Thanks for the quick reply Trent. A shame it doesn't work upside down, would have loved to replicate your install in my own shelves. Thanks for testing it out just now.
In regards to grabbing a kit now without the white box (the one I'm assuming that has your name and the kit name on it in your OP photos?), I'd be fine with that if it doesn't create any room in the shipping box for the foam or parts to "rattle" around in as such since it will need to go all the way across the big lake and nearly all the way to the bottom of Australia. I've got no issue waiting until you've got the normal box available if that's better, I'm in no rush (I'm still yet to even use your stencils and neck tape adapter on my V2 ).
In regards to grabbing a kit now without the white box (the one I'm assuming that has your name and the kit name on it in your OP photos?), I'd be fine with that if it doesn't create any room in the shipping box for the foam or parts to "rattle" around in as such since it will need to go all the way across the big lake and nearly all the way to the bottom of Australia
. I've got no issue waiting until you've got the normal box available if that's better, I'm in no rush (I'm still yet to even use your stencils and neck tape adapter on my V2 ).I am working on my 2nd build (for a friend). It will be the Red remote. I got to try my hand at latex paint chipping. The movie model only had chipping in the empty areas, so I had to pencil in where all the greeblies go before I put on the latex. Tonight I will paint it red.
Valheru84
New Member
Just ordered one of these kits. It will be a steep learning curve for me but something I'm really looking forward to building and hopefully able to retroactively apply some of the skills learned back on some saber hilts I already own that need weathering and a few other details added.
PhantomPickle
Active Member
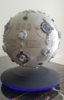
Here's a pic of my completed kit. It looks more weathered in person but the lighting and my phone camera are hard to work with. A few things I might redo later but I'm really happy with how it turned out. I have absolutely zero experience with things like this but Trooper_trent's instructions were amazing. I'm going to have to buy another since my parents have since claimed this for their own.
Ignore the scuff marks on the base, I'm going to make an enclosure or and a "Do Not Touch" sign because people keep trying to sweep their hands underneath it. They are going to give a heart attack.
For those on the fence or a little tentative about starting, don't be. Trust me I was the same way and it was extremely easy. Heck I even messed up really bad in some parts and you can't even notice.
Thank you Trooper_trent for an amazing kit.
Attachments
Nice! That turned out great! Thanks for the kind words!
I finished my training remote build video. It is 43 minutes of geeky ASMR style goodness. (No narration or music)
--------------------------------------
I also finished my red training remote build. This one I built for a friend.
TrooperTrent helped me select the shade of red, and suggested using the latex chipping. I have to say I like it a bit better than the original.
I tool some artistic liberties versus the original movie prop. I kept the silver edging, put in more damage areas, and then also put chrome bits inside those damaged area to make it look like there was metal underneath.
Other modifications compared to what Trooper Trent's instructions:
-Painted the inside white with a brush to make the light reflection brighter.
-Used the tape the diffusers come on to diffuse the lights even more.
-Painted the inside of the smaller laser ports chrome (again for more light)
-Converted the base LEDs from blue to red (using a cheap 12V led strip from eBay)
-------------------
I am also working on the getting a group buy for the case ready. I have the design down, and instruction video made. Got to work out the costs.
Killer! Thanks for sharing. Just watched the video. Very well done!
Quick update! I was able to get a price reduction on materials so I'm passing that on to customers.
Price drop for the kits puts them now at $329 and free shipping.
Additionally, I currently have a bit more kit parts than I have of the white inner boxes, so if you want a kit at a discount and are ok with it coming in just a shipper box (still exactly the same kit and comes completely encased in custom foam and well protected) but no "trooper trent marskman-h" box, I'll discount those to kits to $300 shipped. I have two discounted kits currently, and maybe one or two more after I get everything assembled and organized.
Thanks!
Quick bump for anyone looking for a fun quarantine project lol. I still have a couple of discounted kits that are exactly the same, just missing the product box. $300. Message me for details
EchoBase01
New Member
Quick bump for anyone looking for a fun quarantine project lol. I still have a couple of discounted kits that are exactly the same, just missing the product box. $300. Message me for details
Hi. I'm interested in one our your training remote kits. I have zero experience in making a prop and I was wondering if you have any instructions that go with assembeling the remote? Currently, I'm out of funds and I will have the total amount by the beginning of this July. Please let me know if the kit will still be available by that time? Thank You So Much.
Very Respectfully, Fred
Hi Fred,Hi. I'm interested in one our your training remote kits. I have zero experience in making a prop and I was wondering if you have any instructions that go with assembeling the remote? Currently, I'm out of funds and I will have the total amount by the beginning of this July. Please let me know if the kit will still be available by that time? Thank You So Much.
Very Respectfully, Fred
Message replied to.
Yes I'll have them in July and yes, absolutely they come with full tutorial videos. If you read the reviews here and on my etsy shop you'll see how easy people find the build process.
Howdy folks, I have started a group buy for my custom training remote stand. this allows you to put it under a glass dome. See this thread:
Done / Completed - Domed glass case stand for Trooper Trent's floating Jedi Training Remote
If you are lucky enough to own one of Trooper_trent's amazing Floating Jedi Training Remotes, then you know that it deserves some protection. After all it is not easy to dust off a spinning ball. The slightest bump can send the remote crashing into the base. Why put a spherical device into a...
 www.therpf.com
EchoBase01 Trooper_Trent's videos are beyond detailed. He covered every little detail. The only tricky part that you can't fix is drilling the holes. I would recommend practicing on some piece of thin plastic before drilling the ball just so you get a feel for it.
I have enough materials to do two more discounted kits (everything but the product box) for $300 and I think that's going to be it for a while until this quarantine thing is over. It's proving more and more difficult to get the materials I need while everything is on lock-down.
But I'll resume as soon as I can get restocked.
Thanks!
But I'll resume as soon as I can get restocked.
Thanks!
One more discounted kit left. $300 shipped to the US.
best,
Trent
best,
Trent
Similar threads
- Replies
- 3
- Views
- 201
- Replies
- 5
- Views
- 486
- Replies
- 2
- Views
- 537
- Replies
- 4
- Views
- 1,311
- Replies
- 0
- Views
- 214