ok so i have been looking around at all the iron man builds people have done and thought they are freaking amazing and i feel its time i give it a shot but i wanted to do something big and memorable for my first time building. I might be biting off more than I can chew with this, but I cant wait to give it a shot. I have my foam arriving tomorrow and plan to start printing the the templates out tomorrow morning i got alot of free time and plan to be working on this thing as much as can to make sure it is done right with the proper detail. I will update with pics as stuff gets done and will appreciate any help from anyone who has done a big build or any foam build before as I think this thing is going to around the 6'5-7 ft area. plan on using a camera and other electronics for comfort and ease of wearing the suit. Any who i thought i would make a post here and see what pointers people can give me for a first time builder
You are using an out of date browser. It may not display this or other websites correctly.
You should upgrade or use an alternative browser.
You should upgrade or use an alternative browser.
first time builder going big right off the bat with a hulkbuster foam build
- Thread starter hturt
- Start date
As someone who has started (and by started I mean, printed the pep files, stuck the card sheets together and cut out the templates for the shoulder, helmet and forearm) I would ensure you have a VERY VERY comfy pair of scissors
After a day of that I had a numb spot on my hand that took about a week to go away.
Also, I scaled mine up a bit to 7' and I needed 95 A4 sheets for the leg alone.
After a day of that I had a numb spot on my hand that took about a week to go away.
Also, I scaled mine up a bit to 7' and I needed 95 A4 sheets for the leg alone.
Ikras
Active Member
There's a lot of good info out there for foam building. Been at it at a little myself but there are more experienced people who I'm sure can help out more too.
From my experience some of the most important things are the edges on your pieces. Try and keep you blade sharp and get good clean edges and then when parts line up you can get a really nice finish on them.
Also even when cutting out your parts keep looking at the reference image and think about how the parts will be angled compared to the others. If you can cut an edge with a slope right from the start that will help a lot. You can slope the edges after cutting either through trimming with a knife or I've seen some people mention using scissors but I've found it helps a lot to try and get the edge as close to what you need right off the bat.
There's a lot of info in this first post which might help you as well. After the designs there's a variety of tips and tricks with diagrams that might help explain some of what I've been describing.
http://www.therpf.com/f24/jfcustoms-foam-files-148889/
I'd say as well watch plenty of youtube tutorial videos on foam construction. There's a lot of helpful stuff on there. Hope this is of some use to you.
Also even when cutting out your parts keep looking at the reference image and think about how the parts will be angled compared to the others. If you can cut an edge with a slope right from the start that will help a lot. You can slope the edges after cutting either through trimming with a knife or I've seen some people mention using scissors but I've found it helps a lot to try and get the edge as close to what you need right off the bat.
This is the bit I struggle with
Ikras
Active Member
This is the bit I struggle with
I think your best bet may be practicing some joints just on random shapes you've put together to get a feel for it better. When you go for it just hold your knife at an angle and try to maintain that during the cut. On a straight edge I've round a steel rule to be a great help to keep the direction and let you worry about the angle. When it comes to it I guess if you are worried one way or another then you are better having too steep an edge as you can fill that with extra foam afterwards to help the angle hold.
If it is too shallow I tend to use my knife and try to cut from one end and keep a greater angle that before. Just be careful you don't take it too close to the edge as it can spoil a nice clean edge. I've got a dremel on the way just now and I think that can be use to help in a similar way but just sanding down the edges a bit.
As well, always have the file open for your templates and look back it whenever you can. I find it helpful to start at a region where the angles are defined by the parts that much be connected, like with the iron man helmet chin for example.
Sometimes it does just make more sense to redo the part if the angles are wildly off but this hopefully reduces over time as you get more experience. I know I'm still making plenty of mistakes but with that comes better understanding.
Hope this covered the bit you meant.
Cabaline16
New Member
Here is what I've learned as a first-time foam worker this last week:
- Always make sure you're using a sharp knife!! Otherwise you get crappy edges that don't line up well
- 2-3 thin coats of contact cement, cure for at least 15 minutes and then push and pull the pieces together, sticking the outside edge together first -- helps you get as smooth of a seam as possible.
- I've seen conflicting advice on different forums, but from my experience, Bondo and foam do not mix well at all! I attempted to use it to fill my seams and it caused the whole helmet to bust apart. After starting fresh, I made sure to get a good grip on my outside edges and this time around, there are no gaps in my seams.
- It helps, before you attach anything curved, to really work the pieces good with heat and your hands, to make them really flex well and get a good bend in them. Once things are attached, this is much harder to do.
Anyways, that's all I've got so far. I might have more this weekend, after I finish painting... Good luck! Don't get discouraged if you have to re-cut some pieces or start a section over! Just look at it as a learning experience and try to get a better piece the next time around!")
- Always make sure you're using a sharp knife!! Otherwise you get crappy edges that don't line up well
- 2-3 thin coats of contact cement, cure for at least 15 minutes and then push and pull the pieces together, sticking the outside edge together first -- helps you get as smooth of a seam as possible.
- I've seen conflicting advice on different forums, but from my experience, Bondo and foam do not mix well at all! I attempted to use it to fill my seams and it caused the whole helmet to bust apart. After starting fresh, I made sure to get a good grip on my outside edges and this time around, there are no gaps in my seams.
- It helps, before you attach anything curved, to really work the pieces good with heat and your hands, to make them really flex well and get a good bend in them. Once things are attached, this is much harder to do.
Anyways, that's all I've got so far. I might have more this weekend, after I finish painting... Good luck! Don't get discouraged if you have to re-cut some pieces or start a section over! Just look at it as a learning experience and try to get a better piece the next time around!
As mentioned, cutting the angles into the pieces when first cutting out will make much tighter (and cleaner) joints.
My approach is to write the cut angles on the edges of the paper templates, referencing the file in pepakura constantly. So, for a couple of edges that form a 90 degree corner when built, I write (45) on the edge of each template that meets. It takes a bit of time, but it is worth it in my opinion. After I've traced the template outline on the foam, I then cut the angles per my template notes. Scissors will work to do this, but I prefer cutting 99% of my stuff with a plain old box cutter (always with fresh blades).
Good luck on this project :thumbsup, these oversized suits are a lot of work, but the oversized details can make a lot of the smaller stuff easier to work with. If you take a look at my Igor build (link in my signature), I go over a lot of oversize issues (stilts, extentions, cameras, etc) and how I solved them.
yeah still waiting on the delivery getting anxious to get started also im not completely sure where i got the template for the foam unfold i know it was on here i will hvae to look it up again and get back to youI know the feeling with waiting for supplies. Always seems so much longer than it actually is.
Looking forward to seeing some pics. What templates are you working from or are you working by eye?
As mentioned, cutting the angles into the pieces when first cutting out will make much tighter (and cleaner) joints.
My approach is to write the cut angles on the edges of the paper templates, referencing the file in pepakura constantly. So, for a couple of edges that form a 90 degree corner when built, I write (45) on the edge of each template that meets. It takes a bit of time, but it is worth it in my opinion. After I've traced the template outline on the foam, I then cut the angles per my template notes. Scissors will work to do this, but I prefer cutting 99% of my stuff with a plain old box cutter (always with fresh blades).
Good luck on this project :thumbsup, these oversized suits are a lot of work, but the oversized details can make a lot of the smaller stuff easier to work with. If you take a look at my Igor build (link in my signature), I go over a lot of oversize issues (stilts, extentions, cameras, etc) and how I solved them.
yeah honestly your igor build was what really kind of gave me the motivation to go for something out of the normal iron man build. I will probably be checking on your igor post to see what kind of stuff will transfer over and help lol
yeah honestly your igor build was what really kind of gave me the motivation to go for something out of the normal iron man build. I will probably be checking on your igor post to see what kind of stuff will transfer over and help lol
Very cool. Feel free to hit me up with any questions on stuff, I've got a lot of experience with the big suits (In other words, I've spent a lot of time and money doing things wrong before getting things right :lol )
Very cool. Feel free to hit me up with any questions on stuff, I've got a lot of experience with the big suits (In other words, I've spent a lot of time and money doing things wrong before getting things right :lol )
awesome yeah if anything comes up i will definitely ask i just got my templates printed and starting cutting the helm out on the paper hoping this will be one of the easier pieces of the build to make as its big and round so may take me a bit to get the heating right and the right shape
What type of foam did you get? I buy my Sears rolls half-dozen at a time, and immediately open them all up to take the packing load off. Then it roll them up the opposite direction, and slide them under my bed to keep them from rolling out. Heat will also knock the 'memory' out of the foam as well. You can run a heat gun over the foam when laid somewhat flat, or if your weather cooperates spread out a roll in your yard and let the sun do the work. Of course, the last suggestion only works if it's sunny out
What type of foam did you get? I buy my Sears rolls half-dozen at a time, and immediately open them all up to take the packing load off. Then it roll them up the opposite direction, and slide them under my bed to keep them from rolling out. Heat will also knock the 'memory' out of the foam as well. You can run a heat gun over the foam when laid somewhat flat, or if your weather cooperates spread out a roll in your yard and let the sun do the work. Of course, the last suggestion only works if it's sunny out
awesome will need to try this out i got my foam from amazon http://www.amazon.com/gp/product/B00LHUT8HI/ref=oh_aui_detailpage_o00_s01?ie=UTF8&psc=1 can probably find it cheaper in a store somewhere i just havent looked wanted to make sure it was eva foam so did an online order for first time now that i know what it looks/ feels like i can look for at sears or home depot/ lowes
- - - Updated - - -
I know the feeling with waiting for supplies. Always seems so much longer than it actually is.
Looking forward to seeing some pics. What templates are you working from or are you working by eye?
here is the link for the templates i used http://www.therpf.com/f78/smookcmbs-hulkbuster-pep-files-all-files-available-212583/
well since the pep file only showed me the one side for the face plate after cutting the first half out and not liking my cuts i decided to print both halfs and tape them together to create a 1 piece face plate and i think it came out better still a smidge rough on some of the edges but when i pick up a dremel this week i think i can smooth it out. any one have any pointers on small precision cuts as that seem to be my weak spot


That's what I do, on a lot of the foam unfolds they are only going to give you one half of the symmetrical shape. I lay the piece down,trace it, then flip it over and trace the other half to create one large outline. Some shin (and some bicep) unfolds are especially notorious for having only one side of even center pieces, so if you cut each side separate you'll end up with a seam running down the dead center of your entire part. If you look at the bicep in the right of the pic below (ignore the red circle), you can see that there's no seam down the center because all of those templates were flipped like you did for the faceplate. You can even see the pen mark in the foam towards the top to help me align the flipped template.
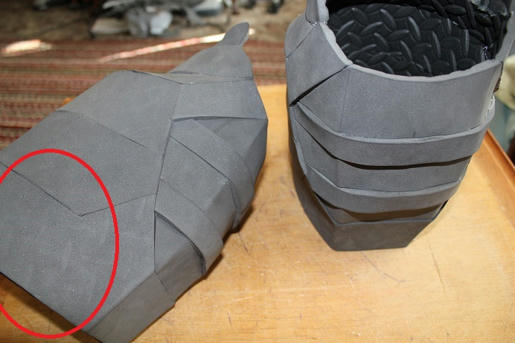
Less seams is better, but just make sure that the piece your flipping is truly a straight edge; even lightly curved edges usually come out better if you cut the sides separate and then glue, because the joint is supposed to have a bit of curve to it.

Less seams is better, but just make sure that the piece your flipping is truly a straight edge; even lightly curved edges usually come out better if you cut the sides separate and then glue, because the joint is supposed to have a bit of curve to it.
Similar threads
- Replies
- 2
- Views
- 539
- Replies
- 43
- Views
- 3,142
- Replies
- 2
- Views
- 367
- Replies
- 0
- Views
- 812
- Replies
- 10
- Views
- 593