You are using an out of date browser. It may not display this or other websites correctly.
You should upgrade or use an alternative browser.
You should upgrade or use an alternative browser.
first sculpture
- Thread starter diesel225
- Start date
Colossus601
Active Member
Great start...looks like you are almost to where you want to be.Your smoothing technique,I think, is working well,keep refining the surface...but if you want "perfection" you may have to choose a point where you say thats as good/smooth as this material,clay,can get. To achieve an absolutely smooth/perfect surface you may have to mold then cast your sculpt in say...resin and sand it smooth seal it or prime it,then cast again....I know that sucks but it all depends on the result you want.
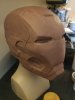
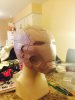
I had the same dilemma with roma plastilina when I did my Ironman.Out of lack of greenbacks (and experience) then I opted for the pretty smooth look...looks ok...but not perfect.Smooth-on has a silicone oomoo reasonably priced and also smooth cast 300 resin.
Here are a couple of pics of mine...I like it but I would suggest...perfection.....good luck my friend.
...
Looking really good! I've found it very difficult to get surfaces perfectly even and smooth, when working with clay. I know some can do it, but I haven't had much success. Especially difficult with some of the harder clays, like Monster Clay (which I really enjoy using).
Like Colossus601 said, you may be best served by making a garbage mold, which you cast a working piece from. Just something quick and dirty, that you can get a decent pull from. Once you have that, you bondo it, and sand to get the perfect surface. Even then it takes a lot of work, and you may still find a few areas which need a little extra attention, once you spray it with primer. For the lines, you can also crisp them up at this phase. Using a combination of needle files, and blades, you an cut them as you need. If the general shape is there, and you just need to crisp them up, you can use a thin gauge piece of stainless steel (or similar) with 220 or so sandpaper wrapped around the end. Run that up and down the channels to really even them out.
If this is the only piece you're making, then you're done, and ready for paint. Otherwise, time to make the REAL mold.
Last edited by a moderator:
Thanks guys that helps a lot. I was thinking the same thing. I have all the stuff to make the mold. I'm going to use rebound 25 I got some of the thi-vex for the second and third coat of the silicon mold, I am going to use plasti past as the mother mold and cast it in 300.
So a couple questions on molding I have watched videos and read posts and I have the basic idea on how to do it but a couple questions that you guys might be able to answer.
1) I was going to use 3 coats of rebound 25 I only have 2 of the trial size so 4lbs is this enough and how much would you use per layer?
2) I have trial size of plasti past as well I hope this is enough should I just mix up the whole thing
3) is mold release 200 good enough to use on the sculpt or should I also use smooth on wax to help release the mold from sculpt as well how many coats of mold release 200 do you guys use?
sorry for all the questions and I do appreciate all the advice.
pitchforknumb
Sr Member
I've had good luck with wd-40 and sand paper for getting scupts smooth. It takes a lot of work to get it really metal like smooth, but it is possible. For getting some nice clean edges I freeze it first with and air duster and then take the sand paper to it. You can get some nice crips detail that way.
1) I was going to use 3 coats of rebound 25 I only have 2 of the trial size so 4lbs is this enough and how much would you use per layer?
You might be able to get the whole thing covered with one trial set, if you're stingy with the first couple of coats. When I first started out doing molds, I found that one trial set would produce a good mold for a single mask. But they were only half masks, not the whole thing like you have, so YMMV. For a good production mold, you probably want at least 4 coats of Rebound 25. For the first "paint coat", you may want to use a little of their thinner in it, if you have some. Not entirely necessary, but it will help flow into the nooks and crannies really well, and also help reduce bubbles. They say Rebound doesn't need to be degassed, but I still get bubbles in mine if I don't. Even unthinned, Rebound spreads out really thin, so you don't need to mix up that much. Maybe 1 or 2 oz. of A and B. Better to use less at first, as you can always add more. Too much, and you're always scooping it up, and pouring it back on top, to avoid wasting.
For the second layer, I usually go unthinned. But still using about the same amount.
If things are not looking like they have a good coat on them, you might want to do one more coat, with just a few drops of thi-vex, just to get a slightly thicker skin on there, before you start spreading around the really thick stuff.
Third coat, you want to thicken quite a bit, kinda like peanut butter consistency. Start with about 15 - 20 drops of the thi-vex, and see how it feels--you can always add more, just don't go overboard. Use this to fill in all the deeper holes, and undercuts.
Depending on how well that went, you may need to do another coat like that, or just one more which is a bit less thick, to help even out the surface.
One other tip (you may have seen), it is really helpful to pick up any color of the silc-pig silicone pigments. With that, you can tint every other layer, and really tell how well you are covering things. Otherwise, it all looks pink, and you can't really tell what you've done from layer to layer.
2) I have trial size of plasti past as well I hope this is enough should I just mix up the whole thing
I haven't used a trial size of the plasti-paste, but you might be able to cover the whole thing with it. You probably don't want to mix it all up at once though, because this is going to require a 2-part shell, otherwise you won't be able to get the castings out later. Depending on how you go about that, it's possible to do it all in one go, but usually people do it one half at a time. There's also a method I see guys like Volpin use, where they join two pieces of plywood, cut in the profile of the mold, and then use that as the center joint, and run all the plastipaste at once, on either side.
3) is mold release 200 good enough to use on the sculpt or should I also use smooth on wax to help release the mold from sculpt as well how many coats of mold release 200 do you guys use?
With Rebound, ease release 200 will be more than fine. I would NOT wax it-- the rubber will pick up that detail (it can even reflect fingerprints), and ruin your end result. Spray it lightly once, and brush into all the cracks. Let it sit a few minutes, and then hit it again with a light coat. Shouldn't need more than that. Let it sit for 15 - 30 minutes before you start putting on the rebound though. I do put the sonite wax on top of the cured silicone, before I apply the plastipaste though. Not entirely necessary, but it helps lube things up a bit, and make it easier to remove later. It's also necessary to use between shell halves, so the plastipaste doesn't stick to itself (also helpful to put aluminum foil in between).
Sorry, lots of typing, hope it makes a little sense at least.
pitchforknumb
Sr Member
Usually I start around 400 or 500, and then keep progressing to 800 or 1000.


So here are some pics of prosses rebound 25
5 total coats
2 regular
1 slightly thicker couple drops of thi vex
2 with 20 drops of Thi vex
i used 2 total trial kits of rebound 25
i figured more is better first time. Next I had one trial size plasti past 2 just letting everyone know that was not enough.
one side was thick enough but couldn't make second half thick enough and it cracked on demolding. So I just ordered the 13 lb one so won't run out and I can re enforce the good half and make it smoother.
i noticed that the silicon on the back of the sculpt pulled away some so not sure how it will come out I'm sure bondo and sanding will eventually get it right. Then make a new mold off the final copy.
Total time was like 8-10 hrs I think. I'll get back to you guys once I pull my first copy mid next week when plasti past 2.
next time I will get the thinning stuff you were talking about and I need like 2 color dyes to show were I went over I think that is super important becuase it gets tricky to tell were you just hit or were might need more.
Thanks again with all your help on this.
Oh and for any guys like me new to all of this I would recommend minimum of these amounts of things if doing a full large helmet. I'm sure as I get better and better I can use less then this on the rebound 25 but I would recommend
minimum 2 trials rebound 25
1 small thinning out additive
1 small thi vex
silicon dyes at least 1 to use on every other layer.
2 trial sizes plasti past 2
sonite wax to put on top of the silicon before applying plasti past 2 use a generous amount.
mold release 200
10-20 mixing buckets I got 20 there cheap
tons of paint stirrers I used Wooden rulers that were like 30 cents
disposable paint brushes
none latex gloves
tons of disposable clear plastic cups
one more thing on the plasti past 2 either pack the cups tight or weigh them I had issues with how much liquid to past I ended up with. I had more past then liquid. Next time I will weigh it out.
liquids type stuff like rebound or casting resins are fine to just fill in cups but past doesn't seem to work out as good with out weighing it. At least for a newbi like my self.
Cool, looking good! You're right, the shell looks a little thin, but should do the job for your waste mold.
I always seem to wind up with more paste than hardener with plastipaste as well. One more tip there, for next time: pick up some denatured alcohol, and pour a bit into a cup. Once you have the mold covered with plastipaste, dip your fingers (with gloves, of course) in the denatured alcohol, and smooth out the shell; dipping them back in, when the paste starts to stick to the gloves again. Some people do the same with a chip brush, but I personally don't think that works as well as your hands. Anyway, this will make slush-casting much easier on your hands, when you put the real mold to use.
I always seem to wind up with more paste than hardener with plastipaste as well. One more tip there, for next time: pick up some denatured alcohol, and pour a bit into a cup. Once you have the mold covered with plastipaste, dip your fingers (with gloves, of course) in the denatured alcohol, and smooth out the shell; dipping them back in, when the paste starts to stick to the gloves again. Some people do the same with a chip brush, but I personally don't think that works as well as your hands. Anyway, this will make slush-casting much easier on your hands, when you put the real mold to use.
Never mind I just looked it up.
 Yep, any hardware store will have it.
 One thing I forgot--although you should be wearing a respirator with a lot of this stuff, I definitely recommend one when working with the alcohol. I don't know if it's necessarily toxic stuff, but it'll give you a headache real quick.
Similar threads
- Replies
- 6
- Views
- 1,250
- Replies
- 6
- Views
- 1,295
- Replies
- 2
- Views
- 501
- Replies
- 14
- Views
- 1,904