First 3D Printer Project - 1/24 Scale X-Wing with my new Prusa Mini (Complete!).

skahtul

Sr Member
RPF PREMIUM MEMBER
Well, technically not my first project as the kids and I built a bunch of little props as a test when I first got the printer last week including the Cryo-Canister from Jurassic Park, Rey's Blaster, and a few others from movies they really like, it's been a lot of fun.

After those were done, I started looking around online for a larger model project and came across a pretty good looking 1/24th Scale X-Wing (that is what the description says anyway, not sure how exacting the scale is). I did print off about 90% of the parts for the USS Sulaco ship which I believe is about 36" long when complete but that one is on the back burner, it's a TON of parts to assemble and will need a lot of finishing work. The X-Wing seemed like a good project to start with since it's something I am pretty familiar with and it's large enough that I 'might' be able to try my hand at scratch building some of the parts as I know the printer is not going to get everything 100%. Which, is not my mission anyway. I am never the one who worries about every little minutia of the build, although I do love researching the projects and reading what others have found here. My goal with this project is to build a pretty decent looking 'studio' scale model, which is a first for me.

Once I had the printer build and OctoPrint configured, it was time to print. This little printer is pretty amazing (so far) and the kids and I will be building a lot of 3D models and props with this. Granted, not nearly as cool as many of the actual props build here on the RPF, but this is where I am at in my journey. Certainly its a good way to introduce the kids to 3D modeling, printing, painting, and weathering and all-around generally building something.

Also, I have a Raspberry PI compatible camera on the way so when I get that I will post some time-lapse videos or a link to them if I can (I need to look into posing videos here as I have not yet gone down that road).

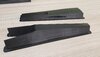
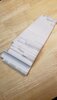
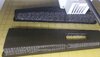
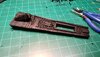
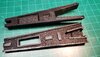
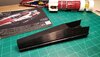
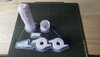
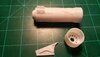
Here are the first few parts. I did have to print the 4 main body parts on an Ultimaker that is at my work as the print bed on this Mini is too small, but it will be able to handle everything else. I have almost no experience with something at this scale and only started printing about 2 months ago. I started on a printer that I had access too in anticipation of getting my Mini.

20200526_221119.jpg


20200526_221127.jpg


20200526_221133.jpg


At first I thought that the small round "hat" portion on the rear of the X-Wing was upside down, but it seems that it varies from model to model? I am not sure the history behind that or if there is a 'correct' version but someone here might be able to shed some light on that.
20200526_221146.jpg
 
Great so far...keen to see more images, the plug on the back of the X-Wing is to cover a mounting point for filming, so it’s just whatever way the film makers replaced the plug after getting the shot they were after

J
 
Nice, thanks for the info. Upper and lower front section should be done today. Then I will start the rear upper and lower section which is about a 30 hour print. Second S foil should be done also, which is also a long print.

I have to do a little work on the nose cone as the original one does not slice correctly for some reason.
 
Here are some parts as they come off the printer. I will post some pics after the clean up is done.

The dark colored pieces are from the Ultimaker amd the white ones are all from my mini. The dark color makes it really had to see any of the detail at this point.
 

Attachments

  • 20200527_203052.jpg
    20200527_203052.jpg
    2.4 MB · Views: 263
  • 20200527_200639.jpg
    20200527_200639.jpg
    1 MB · Views: 272
  • 20200527_173330.jpg
    20200527_173330.jpg
    3 MB · Views: 247
I thought I would show a bit of the cleaning processes. I can already tell one of the challenges I am going to have is that I am going to have to re-engrave most of the panel lines. I don't think there is any way for the printer to get that level of detail correct so most of them are pretty much filled in. There is, I believe still some good detail left. I will be curious what the top looks like when it's done. I think, given its orientation on the print bed it should actually turn out pretty good.

Here is some of what's involved in cleaning out the inside of the front. The supports are pretty easy to rip out with a screwdriver, pliers and flush cutters.
 

Attachments

  • 20200527_214112.jpg
    20200527_214112.jpg
    3.4 MB · Views: 323
  • 20200527_215129.jpg
    20200527_215129.jpg
    3.2 MB · Views: 303
  • 20200527_220140.jpg
    20200527_220140.jpg
    4.1 MB · Views: 292
  • 20200527_220032.jpg
    20200527_220032.jpg
    3.1 MB · Views: 296
I did want to address what I believe is one of the most difficult aspect when using 3D prints for modeling or even prop making which is print lines (there than making it look like real metal maybe)... It does not matter how amazing your PETG/PLA/ABS printer is (unless you are using resin or perhaps some other type) you are going to have to deal with them. I am pretty sure with the X-Wing model I am going to address them the same way I did with my first ever prop, Epoxy coating.

I have been doing some research and people do get very good results with sanding, but in this case, I think the level of sanding required to make this smooth will erase any detail that is left.

It's not done, but here is how I addressed print lines with my blaster so far.

Here you can see a ton of print lines:
20200512_220736.jpg


Here it is after the Epoxy coating, much smoother. The print lines still seem to be there in the barrel but it's perfectly smooth, the resin is just clear.
20200522_004528.jpg


And finally after a few coats of the Alclad Grey Primer Microfiller:
20200522_231754.jpg
 
Wow, this is ambitious! Are you using XTC-3D for coating the print? I have used it a bunch in the past for my 3D parts, but haven't really done it around really detailed parts like this. Looking good so far though!

SB
 
Wow, this is ambitious! Are you using XTC-3D for coating the print? I have used it a bunch in the past for my 3D parts, but haven't really done it around really detailed parts like this. Looking good so far though!

SB

No, but I did look into that. I am actually using an epoxy from Z-Poxy and its a "finishing resin". Not 100% sure what that means but it does go on really thin and dries hard as a rock.
 
And yes, detailed parts will be a challenge. I feel that if I soften the lines too much when I coat it then it will not look right when I weather it.
 
Your build is coming along nicely! Good job

Sharp detail is where filament 3D printers struggle the most. Any kind of filler ( XTC, Bondo, filler primer, spot putty, etc...) will tend to round off edges and fill in details since they are adding an additional layer to the surface. The sanding that follows can also round off details if we are not careful.
With all the finishing work required, I always ask myself "Would it be easier to make this a different way?"

Consequently, I prefer to use filament 3D printers for the basic shape of contours that are hard to make using traditional methods, and then make the other details/parts with a different, more appropriate tool/method. It's the old adage of "using the right tool for the job".
3D printers are very useful, and have revolutionized some aspects of making - but they aren't the Be-all-end-all replacement for every other tool in the world that the inventors have advertised.
 
Last edited:
For sure! That's why for me this is a good experiment, I can find out what I can and even more importantly, can not do with a printer. There is no one size fits all solution.

I am just excited to start moving beyond regular model kits and move slowly into the scratch build arena and see what else I can make.
 
Here are one of the 4 rear engine assemblies.

The rear upper and lower sections are almost done, should be finished sometime tomorrow. I should be able to start getting a feel for what it will look like.
 

Attachments

  • 20200528_175525.jpg
    20200528_175525.jpg
    2.2 MB · Views: 243
  • 20200529_122931.jpg
    20200529_122931.jpg
    3.8 MB · Views: 243
I hope I didn't come off as bashing 3D printers. They have certainly made some parts of Making so much easier.
It just kills me when I see other folks using them to make something that would be so much simpler, cleaner, stronger or even quicker if a different tool was used. :)
 
No way, didn't read it that way at all!

The input and experience is welcome, its why I post :)

Stock at .10 detail level. I have been comparing the prints to our Ultimaker and even some of the large original Prusa printers and its been fantastic. It can handle overhangs steeper than both those printers. Nothing I have printed for this model on mine has used supports. I did a test on one of the attack foils (one with support and one without) just to compare. Yeah, for having almost no idea what I am doing, I think its looking good so far.

Setup my time lapse camera last night.

20200528_225919.jpg
 
It's pretty obvious how this is meant to be mounted, studio-style from the back. You can see the hole through the middle so it looks like I will be building some kind of armature which will be an adventure!

20200530_210430.jpg
 
Here is a really rough first fit, whoever modeled this really made it nice with gray keys and slots for everything, very nice work.

A bit larger than my Bandai :)

20200530_211504.jpg


20200530_212337.jpg
 
This thread is more than 3 years old.

Your message may be considered spam for the following reasons:

  1. This thread hasn't been active in some time. A new post in this thread might not contribute constructively to this discussion after so long.
If you wish to reply despite these issues, check the box below before replying.
Be aware that malicious compliance may result in more severe penalties.
Back
Top