You are using an out of date browser. It may not display this or other websites correctly.
You should upgrade or use an alternative browser.
You should upgrade or use an alternative browser.
Firefly / Serenity Mal's Gun showoff thread
- Thread starter DavidS
- Start date
Patattack -- nice! How did you finish the pistol to get that coloring? Details, please.
...your neighbor willing to do an extra set of grips??
Part one:
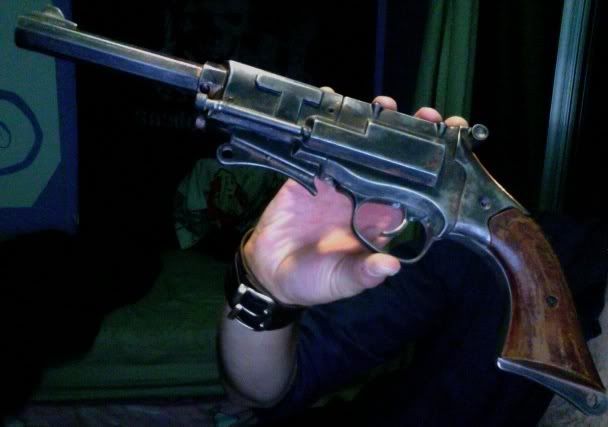
Soytenly! I started with the polishing techniques in Sid's instructions (fine sandpaper followed by brass Dremel polishing wheel) until everything was squeaky-clean. Then I followed Boba Debt's lead and used the PS-11 pewter oxidizing solution (available here: http://www.miniaturemolds.com/mm5/merchant.mvc?Screen=PROD&Store_Code=castings&Product_Code=PS11 ). That left me with a satin bright-copper color with a bit of blue-green verdigris patina areas here and there. Then I got a bottle of Birchwood-Casey Perma-Blue and just went to town! :lol Rubbed it on every piece until it darkened the "copper" to a point I was happy with, which took a bit longer than I expected for some parts. The application of the Perma-Blue also removed/covered the vast majority of the verdigris. Finally, after bumping two of the pieces together and realizing the finish was easily scratched, I decided I should clear-coat it. So I washed all the pieces in soap and water, then rinsed in plain water, then clear-coated. I probably could have spent more on a fancier/more durable clear-coat, but I ended up just using Future floor wax. I applied it to each piece individually, because I wanted the gun to look like it had been "assembled" rather than have the borders between the pieces all filled in.
Now, when I applied the clear-coat, something interesting happened. The first coat I applied looked fine when wet, but after it had dried, there was some kind of verdigris - different from the first stuff! I'm not sure about the chemistry of any of it, but it was very bizarre. The green seemed to actually be on top of the clear-coat (or at least a part of it), so I very gently scraped off what I could. Then, I applied another coat - when that dried, the green that was still left had faded quite a bit. All in all, I probably ended up doing four or five coats of Future on each piece, just to make sure it was as protected as possible, and to fade the verdigris as much as possible (as it faded more with each application). The other day I accidentally scratched a tiny chunk off the clear-coat, and it seemed to go all the way to the bare metal, so I put a little patch of Future to cover the hole. I might end up getting a more durable coat after all, if it can be so easily scratched. I actually picked up half a can of Tamiya clear spray-paint (color number TS-13) at a garage sale a few days ago. Can anyone vouch for the better/worse durability of that compared to Future floor wax?
Part two:
Haha, I'm afraid I may have misrepresented the situation. I'm simply going to get some free scrap walnut from my neighbor and try my own hand at carving the grips. I have little-to-no experience, so it will be a challenge, but at this point I just really want to get rid of those crappy plastic things. :lol
Thanks!
I may build another SidKit someday, and if so, I will use your tips.
Excellent! Now keep in mind it was about a year ago that I did everything but the clear-coating, so I might not be spot-on with some of the details. So, uh, don't be surprised if something happens differently. But I know 100% I've got those chemicals right.
")
Question for anyone in this thread: if you've got a stand for Mal's gun, would you mind measuring the height of both the "legs" the gun sits on? I might end up trying to make myself a stand with leftover walnut, to match the grips.
Sidewinder
Sr Member
Here's some grips i've shaped out of American Black Walnut.
SAS
SAS
Darth Brass
Sr Member
Here's some grips i've shaped out of American Black Walnut.
SAS
I'm salivating at all these wood grips! Love them!
DrMcoy
Sr Member
Finally got mine done -- Sidkit finished out based on methods explained by Pattatack (who, I believe used info passed on from Bobba Debt).
Here's some pics --
http://web.mac.com/tedeckel1/Site_3/Photos.html
Hard to show actual color as flash lighting changes things -- but I took some flash and non-flash pics -- the truest color seems to be the pics that show it in display case on shelf.
Used pewter oxidizing solution first, then either Perma Blue or a similar solution, but it was a Browning solution -- the name escapes me at the moment. Then I applied a thin coat of gun oil, then highlighted it here and there very gently with Rub N Buff gold paint. Grips painted with acrylic, then used the india ink method described by some RPFer to make simulated grain finish, then shot it with Krylon satin clear -- but it still seems a little tacky after more than 2 weeks of dry time...never had this happen before, and not sure why -- maybe it has somethign to do with the india ink.
Anyways, I think it turned out pretty decent. A big thanks to everyone who shares info on how to finish their props and to David Stokes who sold me his kit and threw in a nifty stand (not shown, but it is an almost exact copy of the QMx stand, which I also have).
p0sitr0nic
Well-Known Member
I dont have mine, but when i get it, I hope to do it justice like I see here...
He had the same complaints in another thread. Maybe try using a different browser; the pix show up fine using Firefox.Doc, your photo page isn't working, and I'm curious to see how yours turned out!
*shrugs*
He had the same complaints in another thread. Maybe try using a different browser; the pix show up fine using Firefox.
*shrugs*
Actually, I use Firefox 3. But when I used my "open in IE tab" thing, the pics turned out fine. :wacko
In any case, looks like it turned out pretty well! I like the color it ended up with.
PlanetLII
Well-Known Member
Well I have finished some mods that I thought would warrant a few new (albeit very badly taken) pics.
I have removed all the nickel plating as I felt it ended up too shiny. The frame sustained a little damage in the form of small scratches, but I felt it added to the 'worn' look.
I also caved in and stripped the varnish off the grips and in order to darken the walnut grips, stained them with walnut colour stain :wacko

I also scrapped my first stand with the antique brass studs as I didn't like it and built a new more subtle one.

The patch was bought off eBay and distressed by rubbing the dirt from the woodyard where I work all over and then flicking 'Bubonic Brown' acrylic paint over it to emulate mud splatters.

I didn't want it to feel like a part of the stand but as another piece of Mal's kit with the gun. That is why I only attached with double sided tape.

All in all I am very happy with all the mods
halowarmor
Member
I know this is an old thread, but I want to ask my question in an existing thread before I create a whole new one.
I am about to receive a "Wilco Models" resin version of Mal's Firefly gun, and would like some advice on how to "weather" it. I have seen the "rub-n-buff" method mentioned, but that is all.
I would love a QMx version or one of the other metal ones, but alas it looks like I am to late to get one of those, and sadly they are also out of my price range
Mara Jade's Father
Master Member
Here is mine. It is a Sidkit. Cliff did the build up a few years ago and I just got the wood grips from Sidewinder. Thank you Sidewinder.

halowarmor
Member
Dude that thing looks Sweet! I woulnt mind having one of those, but even if I could find one for sale it isn't in the budget. Lol
charlie98210
Active Member
Is anyone still making/selling the wooden grips for the early version of
Mal's gun?
By that, I mean the version used in the series, not the shorter, heavier
version used in the movie Serenity.
I'm asking this because resin models of the Firefly pistols are still showing
up every-so-often on ebay.
Mal's gun?
By that, I mean the version used in the series, not the shorter, heavier
version used in the movie Serenity.
I'm asking this because resin models of the Firefly pistols are still showing
up every-so-often on ebay.
AJLoCascio
Sr Member
Sadly had to be sold - so someone has mine out in the verse.
It's a Sidkit, w/ gun Blue and some brass paint. I apologize for the cheesy advertisement text - it went up on ebay, so I hammed it up:
It's a Sidkit, w/ gun Blue and some brass paint. I apologize for the cheesy advertisement text - it went up on ebay, so I hammed it up:
Last edited:
charlie98210
Active Member
Sadly had to be sold - so someone has mine out in the verse.
It's a Sidkit, w/ gun Blue and some brass paint. I apologize for the cheesy advertisement text - it went up on ebay, so I hammed it up:
That's a beautiful replica. I'm sorry you had to sell it.
AJLoCascio
Sr Member
Thanks ! And I'm sorry too - it was my favorite replica to date. But Sadly it was either sell that or literally starve. Thankfully now that I have a job, that should not be an issue.
Similar threads
- Replies
- 6
- Views
- 388
- Replies
- 53
- Views
- 7,584
- Replies
- 57
- Views
- 4,128
- Replies
- 259
- Views
- 28,564