Re: falcon and slave 1 in 1/44
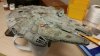
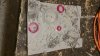
So I was just airbrushing the little red panels on the back of the engine area when my airbrush burped and a huge sploosh of red came out.
Even though it was masked...it wasn't THAT well masked...
I'm trying to get rid of it, but it make take a few layers
Let dry and then sand & lightly scrape off the excess; red is very difficult to cover with a light color, so you pretty much will have to remove it all or apply a layer of primer. You might consider doing a spot removal of the paint, then mask along panel lines so the touch-up won't be apparent. Too much paint on a small scale model tends to cover up the detail.
Going back a bit, fogging on clear parts is (with solvent cements like TAM ET) is when you apply too much and it runs out onto the smooth surface of the clear bits, 'crazing' the surface (ie, creating micro-pits as the plastic dissolves, 'beads up' and then resolidifies.) Trick is to use very tiny amounts of the solvent along the joint (think 'tack welding'). Fogging using CA, aka 'super glue', happens when the glue fumes settle on the plastic and cure. Again, trick is to use very tiny amounts, plus a bit of airflow to blow the funes *away* from the parts. Also, using a clear acrylic coating like the infamous Future floor treatment (has a different name now, like 'Johnson's Floor Finish' or some such...) before gluing helps prevent the fume-fog from happening.
Cleaning up the fogging can be done with 4-grit nail polishing sticks or similar polishing tools; just be careful to fully support the clear part while sanding otherwise you can end up cracking it or inducing tiny stress fractures that show as refracting lines in the plastic - and is unfixable. I use a malleable, stiff 'craft' clay stuffed into or around the part to support it while polishing.
You can also glue clear parts with the old standby, PVA adhesive glue, aka 'Elmers' (other brands of craft white glue work as well, but all best for parts that will have little stress on them.) MicroScale makes a clear-drying adhesive (Micro Krystal Klear) jfor this purpose & also useful for creating clear panels in opening by applying it as a film into the 'frames'; it then dries "crystal clear." Good for making tiny windows.
Tip for clear parts: use a black permanent marker to carefully edge the clear part; this cuts the refraction effect at the joint surfaces (an effect similar to 'silvering' of decal film.) However, if using a solvent glue, the inks will liquify so it can create a mess if not careful. Guess 'careful' is the operative word when working with clear styrene parts, given how easily scratched and how brittle they are...
Regards, Robert