Ewok pack animal concept model puppet

scotthothpatrol

Well-Known Member
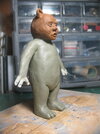
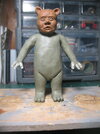
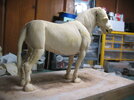
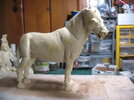
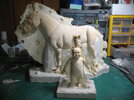
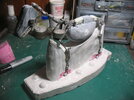
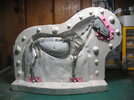
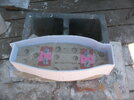
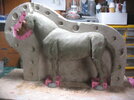
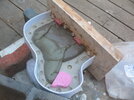
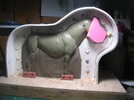
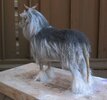
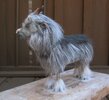
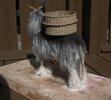
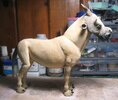
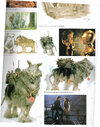
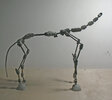
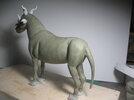
Here is something that is not seen much and that is Stop-Motion puppets. My approach for this one is taking an ILM concept model and making it as a articulated puppet. The source is from some photos taken from the Chronicles book and I found a clip of Phil Tippet holding the model taken from a ROTJ documentary. This project uses a ball and socket armature and will be cast in foam latex rubber and covered with faux fur from the craft store. A lot of the sculpting is guess work concerting that the concept model is covered in thick fur. Scott
 

Attachments

  • Scan1.jpg
    Scan1.jpg
    1.2 MB · Views: 218
  • ewok animal.jpg
    ewok animal.jpg
    1.8 MB · Views: 208
  • IMG_8715.jpg
    IMG_8715.jpg
    1.6 MB · Views: 147
  • IMG_8716.jpg
    IMG_8716.jpg
    1.8 MB · Views: 144
  • IMG_8767.jpg
    IMG_8767.jpg
    2 MB · Views: 149
  • IMG_8772.jpg
    IMG_8772.jpg
    1.2 MB · Views: 124
  • IMG_8774.jpg
    IMG_8774.jpg
    1.3 MB · Views: 120
  • IMG_8775.jpg
    IMG_8775.jpg
    1.2 MB · Views: 229
No Ewok creature would be complete without an Ewok. The finished one is something I made a wile back but I felt was too big in scale for the horse creature so I sculpted this newer smaller one. Next will be to make molds.
 

Attachments

  • IMG_7826.jpg
    IMG_7826.jpg
    1.2 MB · Views: 147
  • IMG_8791.jpg
    IMG_8791.jpg
    1.5 MB · Views: 143
  • IMG_8790.jpg
    IMG_8790.jpg
    1.6 MB · Views: 138
It has been a while since I posted anything on this project. I had made the molds and then took some time to do some other things. But the desire to get back into the SW universe caught me again so today I got around to casting the puppets up in the foam latex. Here are the latest pictures.
 

Attachments

  • IMG_9002.jpg
    IMG_9002.jpg
    1.6 MB · Views: 98
  • IMG_9001.jpg
    IMG_9001.jpg
    1.6 MB · Views: 100
  • IMG_9000.jpg
    IMG_9000.jpg
    1.5 MB · Views: 93
  • IMG_8992.jpg
    IMG_8992.jpg
    1.8 MB · Views: 92
  • IMG_8990.jpg
    IMG_8990.jpg
    1.8 MB · Views: 94
  • IMG_8786.jpg
    IMG_8786.jpg
    1.8 MB · Views: 82
  • IMG_8783.jpg
    IMG_8783.jpg
    1.6 MB · Views: 77
  • IMG_8782.jpg
    IMG_8782.jpg
    1.5 MB · Views: 77
  • IMG_8781.jpg
    IMG_8781.jpg
    1.8 MB · Views: 82
  • IMG_8780.jpg
    IMG_8780.jpg
    1.7 MB · Views: 69
  • IMG_8776.jpg
    IMG_8776.jpg
    1.5 MB · Views: 81
Here is the progress I have made. The fur is some faux fur from the craft store cut and glued on using Best-Test paper cement. The basket I got off ebay. Next will be to work on the ewok figure and decorate the basket.
 

Attachments

  • IMG_9044.jpg
    IMG_9044.jpg
    420 KB · Views: 99
  • IMG_9041.jpg
    IMG_9041.jpg
    389.3 KB · Views: 92
  • IMG_9040.jpg
    IMG_9040.jpg
    411 KB · Views: 86
  • IMG_9037.jpg
    IMG_9037.jpg
    450.7 KB · Views: 89
  • IMG_9038.jpg
    IMG_9038.jpg
    390.4 KB · Views: 95
  • IMG_9026.jpg
    IMG_9026.jpg
    500.3 KB · Views: 100
Could you elaborate some more on how you apply that faux fur onto the skin? Where do you start and how do you build up layers?

Chaïm
 
Could you elaborate some more on how you apply that faux fur onto the skin? Where do you start and how do you build up layers?

Chaïm
Sure, Thanks for asking. I start with the back feet and work my way up from the back to the head. Applying the fur is easy just apply a small patch of glue and cut off a tuft of hair and stick it to the glue. When applying the fur I try to apply at an angle and then the tuft partly covers the one below it. Once a section is done I spray the fur with hair spray and with a tooth brush give it a good brushing. This gets the fur to lay flat and brushes out all the loose hair. Hope that helps
 
Here he is all done. The original had some board looking things sticking up out of the basket that I just could not rationalize as being something Ewoks could have made so I thought it would be more interesting to have bones around the basket. These are chicken bones I cut and lengthened and then made molds and casted.
 

Attachments

  • IMG_9079.jpg
    IMG_9079.jpg
    450.7 KB · Views: 90
  • IMG_9068.jpg
    IMG_9068.jpg
    314.9 KB · Views: 85
  • IMG_9070.jpg
    IMG_9070.jpg
    280.7 KB · Views: 87
  • IMG_9071.jpg
    IMG_9071.jpg
    304 KB · Views: 86
  • IMG_9072.jpg
    IMG_9072.jpg
    477.3 KB · Views: 92
  • IMG_9073.jpg
    IMG_9073.jpg
    1.4 MB · Views: 91
  • IMG_9074.jpg
    IMG_9074.jpg
    1.7 MB · Views: 78
  • IMG_9075.jpg
    IMG_9075.jpg
    253.6 KB · Views: 81
  • IMG_9078.jpg
    IMG_9078.jpg
    553.9 KB · Views: 77
  • IMG_9079.jpg
    IMG_9079.jpg
    450.7 KB · Views: 76
  • IMG_9080.jpg
    IMG_9080.jpg
    495.3 KB · Views: 82
  • IMG_9082.jpg
    IMG_9082.jpg
    415.4 KB · Views: 81
  • IMG_9056.jpg
    IMG_9056.jpg
    1.8 MB · Views: 96

Your message may be considered spam for the following reasons:

If you wish to reply despite these issues, check the box below before replying.
Be aware that malicious compliance may result in more severe penalties.
Back
Top