You are using an out of date browser. It may not display this or other websites correctly.
You should upgrade or use an alternative browser.
You should upgrade or use an alternative browser.
ESB "Hoth scanner" prop - active project!
- Thread starter OdiWan72
- Start date


Nice job on the countersinking OdiWan72! Don't forget to countersink the two tiny holes on each of the jigsaw parts. Only two of the jigsaw parts on each face of the prop show the countersunk side of those holes (as circled in red below), but I'd say it's safe to assume that they are all countersunk the same, just the countersinking isn't visible on the other two jigsaw parts.

Take a closer look at this reference photo to see the countersinking on those particular holes:


Take a closer look at this reference photo to see the countersinking on those particular holes:
Great job on these guys. We are still short some parts though, the main ones being on the top, especially the 'latches' on the top. I don't have any sheet metal fabricators that I use so don't know where to start. Is anyone planning to tackle these in metal?
Great job on these guys. We are still short some parts though, the main ones being on the top, especially the 'latches' on the top. I don't have any sheet metal fabricators that I use so don't know where to start. Is anyone planning to tackle these in metal?
I had the latches lasercut by Bengrimm some time ago. But they are so intricate to bend, that I am afraid I would simply mess them up :/
Attachments

Last edited:
I had the latches lasercut by Bengrimm some time ago. But they are so intricate to bend, that I am afraid I would simply mess them up :/
Yeah, it would need to be done by a company that does sheet metal work for smaller parts. I can't remember the RPF'er that had the macro transition box made but whatever shop did those can surely do these. Has anyone done the 3D drawings for accuracy?
Yeah, it would need to be done by a company that does sheet metal work for smaller parts. I can't remember the RPF'er that had the macro transition box made but whatever shop did those can surely do these. Has anyone done the 3D drawings for accuracy?
I have some drawings, yes. Even in that (VXF?) format, which the lasercutters are working with...but we´d have to check their accuray.
Maybe Cantina_Dude could chime in, since we´re in need for the white boxes and the new read-out frame as well.
For now I´ll simply transplant the "breakers" from my scratchbuilt scanner to the V.2
I've been collecting bits and pieces for this since Markus started this thread - as there have been various parts runs I've joined in. I'm mostly caught up but need to work on things like the clamps that are being talked about here most recently, the red and green RS Components buttons, etc.


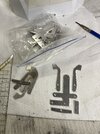
You'll see here that my original aerial plugs are of the incorrect 'checkered' variety rather than the 'ribbed/ridged' version, however.
Might someone out there have the proper variety I can purchase? Or even a good casting?
Dan
(If the clamp assembly ever gets a run please count me in for that. I think the split ring is in work somewhere and I think I'm on a wait list for that. I see several pages earlier in the thread a nice 3D model of the clamps and little mystery white plastic boxes - at this point I've be happy to print my own until better metal clamps and a good casting of the original found part white box is found...)


Nowhere accurate, but should work as a placeholder…
Might just need a larger switch
View attachment 1616951View attachment 1616952View attachment 1616953View attachment 1616954View attachment 1616955View attachment 1616956
Wow, great job Markus (as usual). Did you pick those up on eBay?
Wow, great job Markus (as usual). Did you pick those up on eBay?
Yes, I just searched for some illuminated rockers switches, that has the ridges on the inner sides, as seen here (these are the ones I worked with, too small unfortunately):

Wippschalter 250V 15A beleuchtet 31x14mm EIN-AUS schaltend 230V Mini-Schalter | eBay
Entdecken Sie Wippschalter 250V 15A beleuchtet 31x14mm EIN-AUS schaltend 230V Mini-Schalter in der großen Auswahl bei eBay. Kostenlose Lieferung für viele Artikel!
www.ebay.de
Well, THAT was nerve-wracking!!! Drilling the holes resulted in one big scratch above the right one, from when the drill it slipped 
I usually cover the surrounding areas with tape before drilling/ dremeling, but not this time ARGH !!!!
Tried to polish it out, which did not work well...anyway...it´s done (and covered with tape again for further operations *lol*) *phew*
Once the Apoxy putty I used to fill the tubes with dried, I can install them along with the couplings
Last edited:
Looking good Markus. Sorry to hear about the mishap. What did you use to cut the hole? Hole saw? Needless to say, screen accurate for this thing would have some wear anyway, especially if you wanted to have that post production look.
Step drill up to 25 mm
Hey guys
Tatooine Machine kindly requested that I join this project
coming soon!


 www.therpf.com
Tatooine Machine kindly requested that I join this project
coming soon!
Limited Run - Hoth scanner and binoculars split clamp assemblies + small threaded Michell cones - machined aluminium
Hello guys, As TatooineMachine explained in his project run thread, his machinist retired and he has kindly asked me to take over the split clamp part of his run so you guys can finish your scanner and binocs quickly :) It is a small technical part but I have to say that I'm super excited to be...
www.therpf.com
Last edited:
Eethan these look great & thanks for taking this over, the community needs guys that will do small runs of these special parts! Cantina_Dude thanks for the help, you are awesome!
Hey guys
Tatooine Machine kindly requested that I join this project
coming soon!
View attachment 1626757 View attachment 1626758
Limited Run - Hoth scanner and binoculars split clamp assemblies + small threaded Michell cones - machined aluminium
Hello guys, As TatooineMachine explained in his project run thread, his machinist retired and he has kindly asked me to take over the split clamp part of his run so you guys can finish your scanner and binocs quickly :) It is a small technical part but I have to say that I'm super excited to be...
Yeeeeees!!!!!
I've been collecting bits and pieces for this since Markus started this thread - as there have been various parts runs I've joined in. I'm mostly caught up but need to work on things like the clamps that are being talked about here most recently, the red and green RS Components buttons, etc.
View attachment 1616277
View attachment 1616278
You'll see here that my original aerial plugs are of the incorrect 'checkered' variety rather than the 'ribbed/ridged' version, however.
Might someone out there have the proper variety I can purchase? Or even a good casting?
Dan
(If the clamp assembly ever gets a run please count me in for that. I think the split ring is in work somewhere and I think I'm on a wait list for that. I see several pages earlier in the thread a nice 3D model of the clamps and little mystery white plastic boxes - at this point I've be happy to print my own until better metal clamps and a good casting of the original found part white box is found...)
Just repeating this post to see if someone might be able to help with better/accurate aerial plugs...
Thanks!
Dan
Similar threads
- Replies
- 11
- Views
- 1,168
- Replies
- 24
- Views
- 818
- Replies
- 2
- Views
- 459
- Replies
- 8
- Views
- 700