AlexGordon
Active Member
Posted this on FX and I only have 400 views. Not sure why people aren't looking at the thread, but I feel I at least deserve more than 400 views from the amount of people on that forum (I have 700 on a forum that has 70 people, and FX has 6000). So anyway, I'm gonna combine all of the posts into one long one here. It may look weird since posts will be ending from the other forum but the post here will continue.
So, my good friend juan got a blastercore and had been talking to me for a while about how much he would love to have an e-11. Then luke posted his kit of vintage parts (sterling, counter, scope, replica t-track) and juan wanted to buy it but didn't know how he was gonna get it built or get it sent to him in it's current condition. I told him to ask around and after no one would do it I said I would. This should be much easier electronics wise than building a saber (not easier wiring, just less cram-fu) and I've always wanted to see an e-11, so I consider this a privilege.
So, specs are gonna be a blastercore 4.0 with satellite board, blaster ray progression in the side of the receiver (stun mode turns them blue), either a low powered rgb led or an ledengin for the main and aux rays (Haven't decided yet and I would love opinions), 2w speaker(s), 14500 or 14650 pack (long runtime isn't an issue with a blaster since it isn't always on like a saber), pvc sled like erv's build, 1.3mm recharge port accessed by opening the back of the receiver, and a few other tricks I have up my sleeve. Don't wanna give it all away now.")
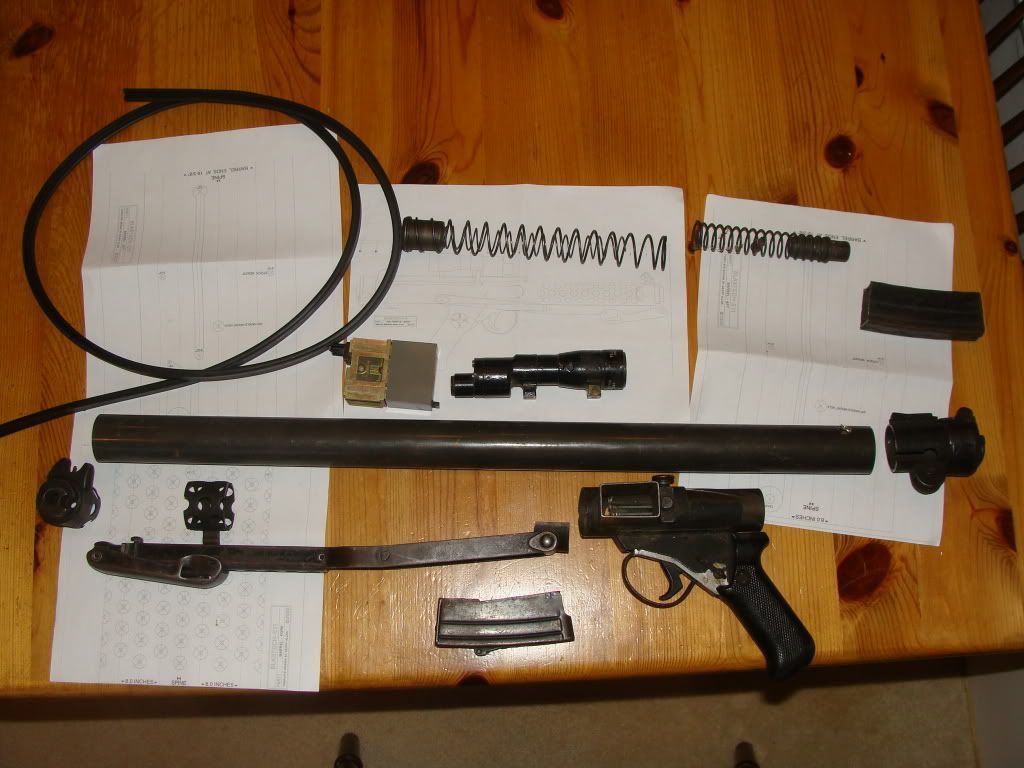
Here's what I'm starting with along with this

Todo list:
1. Find someone who can do the machining on the barrel for me
2. Find proper ray propogation leds
3. Calculate resistances for main ray, aux ray, ray progression leds
4. Find proper sized limit switches for clip detection and trigger (maybe).
5. Figure out what exactly I will need for a hall effect sensor (having trouble figuring out which one will work with the board)
6. Gonna need powdercoated or painted (gonna try to have ldm do his tactical weathering on it).
7. Find 1.3mm recharge port and make adapter for tamiya connector
8. decide on aux switch placement
9. Figure out how to make original semi/auto selector the BC semi/auto selector
10. Figure out some kind of pvc barrel (original isn't included) to hold the ledengin on the front (gonna need a heatsink if I use an ledengin) and ray progression leds.
11. I need to grind off all of the old receiver and attach everything to the new one (oh fun).
That's about all I can think of for now, but I'm sure I have more to worry about. I have plenty of time since the parts aren't even here yet though.
I tried to make the receiver with the steel tube that luke sent me, but that is some strong stuff. I can't get through it with any of my drill bits. Gonna have to call in the cavalry on this one.
So, Since I couldn't work on the receiver today, I decided to start removing all of the old receiver that I didn't need. I started with the rear sight and folding stock latch.

first part of the old receiver removed.

don't worry, the vice grips weren't clamped on anything important. I just needed a way to grip the hot steel without getting burned.


There are the 2 (maybe 3 if I can get the endcap mount lathed out to fit the new receiver) pieces I'm keeping from that part.
On to the folding stock. this one was a bit trickier, but I managed to remove all of the old receiver while leaving the swivel mount. I left a small layer of old receiver to make it easier when jb-welding, but it won't look any different. this took about 45 minutes just to sand.


Then I moved on to making the rear sight fit the same way as the folding stock.


some minor chatter there. Can easily be sanded out. I'm checking with juan though because I know he said he wants a rough gun and that would add to it. Seriously would take 5 minutes to sand out though.

And no pic on the receiver yet since it was too hot and I only have 2 hands. the folding stock was easy to hold in place but not the sight.
That's all for now, but once I pick up some more dremel cutting disks and sanding drums I'll have some more for you guys.
Oh, and I posted this somewhere else also, that's why some of the stuff repeats itself. I have a 3 page thread already and I pulled out the good stuff and stuck it together for this.
EDIT: I am having the bolt welded to the receiver so there are no legal issues. That also means I have to be sure I cut all of the necessary slots into it for wires to pass through, limit switches to fit, etc. before I have it welded. Also, the chatter I mentioned doesn't really even look like it's there even before sanding if it is painted. I did a test to see if I could tell where the chatter was with paint on it and I couldn't because of the "hammered steel" appearance of the rest of the gun. I'm excited to get this going even more now that I have it. it's gonna look so good when it's done.
I R Haz Gude Neuz.

My drill can penetrate the freaking thick steel. This is as far as I got on 2 charges of the drill battery.

Much straighter than I would have expected without even sanding or filing it.
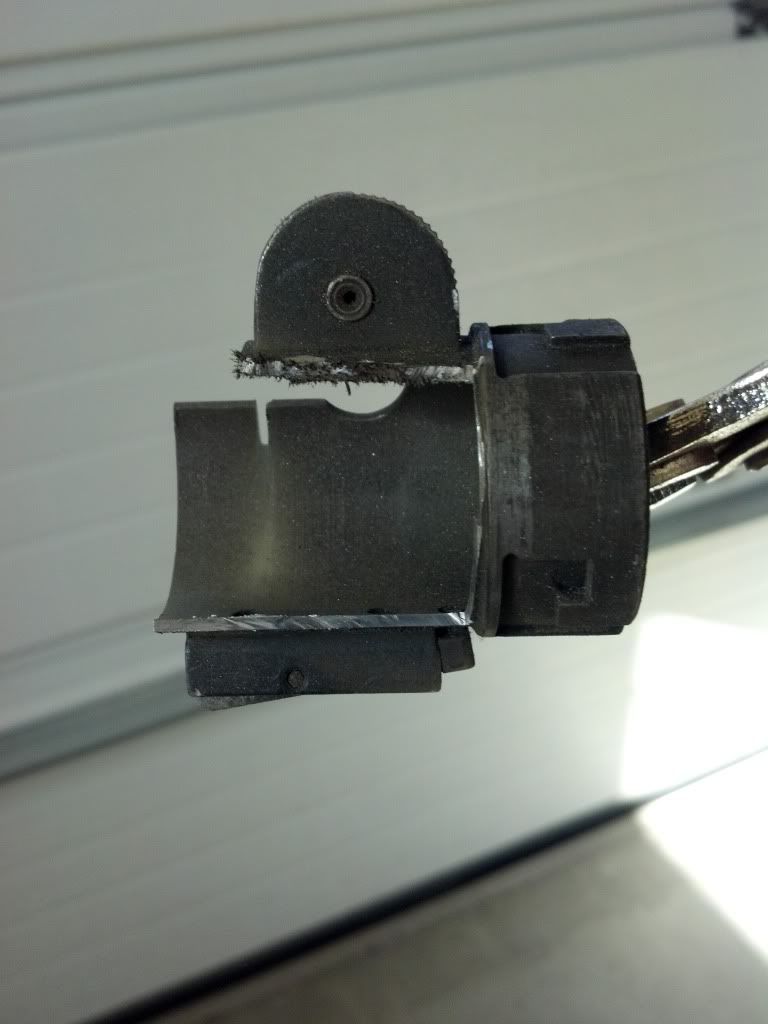
Also, Got the grip, mag holder, muzzle, and front sight removed. The front sight was very tricky to remove without totally destroying the emitter. It will sit a hair high of center because of the material I had to remove, but no one will notice that. there was literally no other way to do it with my toolset. With a welder, power grinder, and a few other assorted tools, maybe it could have happened.


and some flat black paint after I removed the rust and old paint (as best as it would come off)
I have even better news about this project, but that will have to wait until later. Seriously, you guys are gonna be impressed with the update tonight. Obviously I'm pumped about it or I'd just be silent until the update. The amount of work that got done (and is still to be done) on this project today was unprecedented.
Oh, and I thought I'd mention that 3 people that I showed my hand drilled holes to called me a liar for saying I did them by hand. None of them believed I did it by hand. ;D TLC BABY!
The surprise is that I found out my grandpa's shop accross the street from his main company has a mill. I called him and asked if he had a 13/16" drill bit (for the ejector slide) and when he said he could just have his guy mill it I was at his office before he hung up the phone. They also have 3 drill presses and 2 different size lathes. And welding and painting equipment. So...

I got to have the slots milled! That saved me about 4 hours of work or more. Now, there was a hiccup when having the slot milled, and I was the only one that figured out the reason. 3 expert machinists and I was the one who came up with the reason they were scratching their heads. The bolt slot wasn't straight. Now, it doesn't really matter if the slot wasn't straight (the slot itself is straight, but by my reasoning it has to be on an angle). It started perfectly in the smaller hole and ended off center on the bigger hole for the bolt. it took longer to fix than the whole rest of the machining did. Basically, we elongated the hole and it looks fine now. The reason that I came up with (since we all knew mills can't mill crooked lines if they are locked on one axis and only free on the other) is that as the steel was being removed, the pipe had no support and gave way under the pressure of the vice. But all is well now.

oh, and I found out my uncle has a drill press. Sooo... after my homework was done and he got off work, I went over there. Man do I wish I didn't know there were 76 holes when I started. 3 hours 15 minutes later, here I am.

Here's our "rig" since the drill press vice was too shallow for the pipe.

Just getting started

and done. there are 2 holes left to drill since the drill press wouldn't fit anything bigger than 7/16". At least I got the 74 other holes done though.
I would have taken more pics, but it's hard when you have steel shavings all over your hands and don't want to take 5 minutes to get cleaned off before touching your phone. Yes I wore gloves, but that didn't stop the steel from finding it's way to my fingertips after I removed them.
So today was about 1 week of work at my previous pace all in one day.
I'm exhausted.
So today I got the final 2 holes drilled (the .5" ones that I couldn't do), the keyhole slot for the folding stock done (and I now have a perfect understanding of how it works), the receiver cut to length, and the holes deburred and sanded smooth. The bolt actually functions at this point. Too bad I'm gonna have to weld it shut. It's really cool.
So... pics


Monday morning bright and early, I'm headed back to the shop to have the muzzle lathed down to fit and the outer diameter of the rear of the receiver (underneath the twist lock cap) lathed down to match however much we lathe out of the inner part of the twist lock. That should be it for machine work that I would have a hard time (but not impossible time) doing myself. From there on in it should be all attaching, simple and hidden cuts into the receiver, and one more trip for the welding, then painting, electronics, and dun.
small update today. Mocked up some of what I had and snapped some pics. I need another 3/16" to come off of the receiver for the folding stock to lock in place. everything will still like up just like the original though (the rivet in the rear sight is supposed to line up with the center of the bolt hole if the gun is assembled properly) and the locking stock will prove that. Other than that, I marked up all of the holes that the trigger, clip, and anything else will need plus all of the mounting locations.


Also, when mentioning that I was removing the rust on the vintage parts my grandpa told me there is a sandblaster in the machine shop. So... I'm gonna assemble the blaster and then have it sandblasted so they don't have to sandblast 25 parts individually. That can be tied in with the welding in of the bolt to make the whole project legal.
Last night I made the magazine hole and started the trigger holes and wire holes for the trigger group (not pictured). I got a tungsten carbide cutter bit for the dremel and it worked wonders.
Today, I went back to the machine shop for 7 hours. My phone died just before I got there so I couldn't take any pics till I got home. The parts are siver because they were sandblasted. I did the receiver, clip, clip holder, and grip.
With the machinist, our first order of business was to shorten the receiver another 3/16". Then we cleaned up the twist lock cap (inner part) on the lathe and widened the inner diameter. Not much to show picture wise for that, but I have one showing how we then turned down the receiver to fit the cap we had widened. We split the difference.


Then, we made the scope mount and drilled and tapped the holes for it. There is so much variance in this from prop to prop that I just decided to go with what looked best. In that last picture you can also see half of the weld on the bolt (which I had modified with a passthrough for wires and a spot for a clip detection switch, plus we shortened it by removing the hollow part toward the back).

From here I just started adding parts to the gun to show how it will look when it's finished.


I also had a bracket for the hengstler counter made so that I can size it up when I'm ready.


and some various pics of the lettering that is now visible after the sandblasting.


At this moment, the stock, mag holder, and inner twist lock part on the back are all j-b welded and the whole blaster is taped up and sitting on my bench. It should be cured by morning. I'm gonna go outside and finish cleaning up the forward sight, ejector slot protector, muzzle guard, muzzle, and the stub thing that goes between the only visible holes on the gun. From there I can probably get the majority of the important stuff j-b welded in the morning before I leave for florida.
Parts arrived at my house on 3/6/12, thread was posted, and then nutin much happened with each update (obviously I mean comments, not actual work). The people over there really like me. :facepalm lol.
So, whatcha guys think?
So, my good friend juan got a blastercore and had been talking to me for a while about how much he would love to have an e-11. Then luke posted his kit of vintage parts (sterling, counter, scope, replica t-track) and juan wanted to buy it but didn't know how he was gonna get it built or get it sent to him in it's current condition. I told him to ask around and after no one would do it I said I would. This should be much easier electronics wise than building a saber (not easier wiring, just less cram-fu) and I've always wanted to see an e-11, so I consider this a privilege.
So, specs are gonna be a blastercore 4.0 with satellite board, blaster ray progression in the side of the receiver (stun mode turns them blue), either a low powered rgb led or an ledengin for the main and aux rays (Haven't decided yet and I would love opinions), 2w speaker(s), 14500 or 14650 pack (long runtime isn't an issue with a blaster since it isn't always on like a saber), pvc sled like erv's build, 1.3mm recharge port accessed by opening the back of the receiver, and a few other tricks I have up my sleeve. Don't wanna give it all away now.
Here's what I'm starting with along with this
Todo list:
1. Find someone who can do the machining on the barrel for me
2. Find proper ray propogation leds
3. Calculate resistances for main ray, aux ray, ray progression leds
4. Find proper sized limit switches for clip detection and trigger (maybe).
5. Figure out what exactly I will need for a hall effect sensor (having trouble figuring out which one will work with the board)
6. Gonna need powdercoated or painted (gonna try to have ldm do his tactical weathering on it).
7. Find 1.3mm recharge port and make adapter for tamiya connector
8. decide on aux switch placement
9. Figure out how to make original semi/auto selector the BC semi/auto selector
10. Figure out some kind of pvc barrel (original isn't included) to hold the ledengin on the front (gonna need a heatsink if I use an ledengin) and ray progression leds.
11. I need to grind off all of the old receiver and attach everything to the new one (oh fun).
That's about all I can think of for now, but I'm sure I have more to worry about. I have plenty of time since the parts aren't even here yet though.
I tried to make the receiver with the steel tube that luke sent me, but that is some strong stuff. I can't get through it with any of my drill bits. Gonna have to call in the cavalry on this one.
So, Since I couldn't work on the receiver today, I decided to start removing all of the old receiver that I didn't need. I started with the rear sight and folding stock latch.
first part of the old receiver removed.
don't worry, the vice grips weren't clamped on anything important. I just needed a way to grip the hot steel without getting burned.
There are the 2 (maybe 3 if I can get the endcap mount lathed out to fit the new receiver) pieces I'm keeping from that part.
On to the folding stock. this one was a bit trickier, but I managed to remove all of the old receiver while leaving the swivel mount. I left a small layer of old receiver to make it easier when jb-welding, but it won't look any different. this took about 45 minutes just to sand.
Then I moved on to making the rear sight fit the same way as the folding stock.
some minor chatter there. Can easily be sanded out. I'm checking with juan though because I know he said he wants a rough gun and that would add to it. Seriously would take 5 minutes to sand out though.
And no pic on the receiver yet since it was too hot and I only have 2 hands. the folding stock was easy to hold in place but not the sight.
That's all for now, but once I pick up some more dremel cutting disks and sanding drums I'll have some more for you guys.
Oh, and I posted this somewhere else also, that's why some of the stuff repeats itself. I have a 3 page thread already and I pulled out the good stuff and stuck it together for this.
EDIT: I am having the bolt welded to the receiver so there are no legal issues. That also means I have to be sure I cut all of the necessary slots into it for wires to pass through, limit switches to fit, etc. before I have it welded. Also, the chatter I mentioned doesn't really even look like it's there even before sanding if it is painted. I did a test to see if I could tell where the chatter was with paint on it and I couldn't because of the "hammered steel" appearance of the rest of the gun. I'm excited to get this going even more now that I have it. it's gonna look so good when it's done.
I R Haz Gude Neuz.
My drill can penetrate the freaking thick steel. This is as far as I got on 2 charges of the drill battery.
Much straighter than I would have expected without even sanding or filing it.
Also, Got the grip, mag holder, muzzle, and front sight removed. The front sight was very tricky to remove without totally destroying the emitter. It will sit a hair high of center because of the material I had to remove, but no one will notice that. there was literally no other way to do it with my toolset. With a welder, power grinder, and a few other assorted tools, maybe it could have happened.
and some flat black paint after I removed the rust and old paint (as best as it would come off)
I have even better news about this project, but that will have to wait until later. Seriously, you guys are gonna be impressed with the update tonight. Obviously I'm pumped about it or I'd just be silent until the update. The amount of work that got done (and is still to be done) on this project today was unprecedented.
Oh, and I thought I'd mention that 3 people that I showed my hand drilled holes to called me a liar for saying I did them by hand. None of them believed I did it by hand. ;D TLC BABY!
The surprise is that I found out my grandpa's shop accross the street from his main company has a mill. I called him and asked if he had a 13/16" drill bit (for the ejector slide) and when he said he could just have his guy mill it I was at his office before he hung up the phone. They also have 3 drill presses and 2 different size lathes. And welding and painting equipment. So...
I got to have the slots milled! That saved me about 4 hours of work or more. Now, there was a hiccup when having the slot milled, and I was the only one that figured out the reason. 3 expert machinists and I was the one who came up with the reason they were scratching their heads. The bolt slot wasn't straight. Now, it doesn't really matter if the slot wasn't straight (the slot itself is straight, but by my reasoning it has to be on an angle). It started perfectly in the smaller hole and ended off center on the bigger hole for the bolt. it took longer to fix than the whole rest of the machining did. Basically, we elongated the hole and it looks fine now. The reason that I came up with (since we all knew mills can't mill crooked lines if they are locked on one axis and only free on the other) is that as the steel was being removed, the pipe had no support and gave way under the pressure of the vice. But all is well now.
oh, and I found out my uncle has a drill press. Sooo... after my homework was done and he got off work, I went over there. Man do I wish I didn't know there were 76 holes when I started. 3 hours 15 minutes later, here I am.
Here's our "rig" since the drill press vice was too shallow for the pipe.
Just getting started
and done. there are 2 holes left to drill since the drill press wouldn't fit anything bigger than 7/16". At least I got the 74 other holes done though.
I would have taken more pics, but it's hard when you have steel shavings all over your hands and don't want to take 5 minutes to get cleaned off before touching your phone. Yes I wore gloves, but that didn't stop the steel from finding it's way to my fingertips after I removed them.
So today was about 1 week of work at my previous pace all in one day.
I'm exhausted.
So today I got the final 2 holes drilled (the .5" ones that I couldn't do), the keyhole slot for the folding stock done (and I now have a perfect understanding of how it works), the receiver cut to length, and the holes deburred and sanded smooth. The bolt actually functions at this point. Too bad I'm gonna have to weld it shut. It's really cool.
So... pics
Monday morning bright and early, I'm headed back to the shop to have the muzzle lathed down to fit and the outer diameter of the rear of the receiver (underneath the twist lock cap) lathed down to match however much we lathe out of the inner part of the twist lock. That should be it for machine work that I would have a hard time (but not impossible time) doing myself. From there on in it should be all attaching, simple and hidden cuts into the receiver, and one more trip for the welding, then painting, electronics, and dun.
small update today. Mocked up some of what I had and snapped some pics. I need another 3/16" to come off of the receiver for the folding stock to lock in place. everything will still like up just like the original though (the rivet in the rear sight is supposed to line up with the center of the bolt hole if the gun is assembled properly) and the locking stock will prove that. Other than that, I marked up all of the holes that the trigger, clip, and anything else will need plus all of the mounting locations.
Also, when mentioning that I was removing the rust on the vintage parts my grandpa told me there is a sandblaster in the machine shop. So... I'm gonna assemble the blaster and then have it sandblasted so they don't have to sandblast 25 parts individually. That can be tied in with the welding in of the bolt to make the whole project legal.
Last night I made the magazine hole and started the trigger holes and wire holes for the trigger group (not pictured). I got a tungsten carbide cutter bit for the dremel and it worked wonders.
Today, I went back to the machine shop for 7 hours. My phone died just before I got there so I couldn't take any pics till I got home. The parts are siver because they were sandblasted. I did the receiver, clip, clip holder, and grip.
With the machinist, our first order of business was to shorten the receiver another 3/16". Then we cleaned up the twist lock cap (inner part) on the lathe and widened the inner diameter. Not much to show picture wise for that, but I have one showing how we then turned down the receiver to fit the cap we had widened. We split the difference.
Then, we made the scope mount and drilled and tapped the holes for it. There is so much variance in this from prop to prop that I just decided to go with what looked best. In that last picture you can also see half of the weld on the bolt (which I had modified with a passthrough for wires and a spot for a clip detection switch, plus we shortened it by removing the hollow part toward the back).
From here I just started adding parts to the gun to show how it will look when it's finished.
I also had a bracket for the hengstler counter made so that I can size it up when I'm ready.
and some various pics of the lettering that is now visible after the sandblasting.
At this moment, the stock, mag holder, and inner twist lock part on the back are all j-b welded and the whole blaster is taped up and sitting on my bench. It should be cured by morning. I'm gonna go outside and finish cleaning up the forward sight, ejector slot protector, muzzle guard, muzzle, and the stub thing that goes between the only visible holes on the gun. From there I can probably get the majority of the important stuff j-b welded in the morning before I leave for florida.
Parts arrived at my house on 3/6/12, thread was posted, and then nutin much happened with each update (obviously I mean comments, not actual work). The people over there really like me. :facepalm lol.
So, whatcha guys think?
Last edited: